Add Navigation
- Create the Main Layout
- Create a View Title
- Update the Product Catalog
- Add an Orders View
- Complete Code for This Step
- Next Steps
So far, the application has only one view: the product catalog. In the full Click & Collect back office, employees would also process customer orders and track deliveries, each in a view of its own. They’d move between the views using a navigation menu that stays on the screen.
In this step, you’ll add a main layout with a navigation menu, and show every view inside it. You’ll then add a second view for orders, so that there is somewhere to navigate. The orders view is only a placeholder, since building it would repeat what you’ve already done for the product catalog.
|
Tip
|
More Information Available
This step is based on the Add a Router Layout and Add a Navigation Menu guides. Read them if you want more detailed information about layouts and menus in Vaadin.
|
Create the Main Layout
A layout that the router shows views inside is called a router layout. You’ll build yours with the App Layout component. It has a drawer on the side, where you’ll put the application name and a Side Navigation menu. The views appear next to the drawer.
The layout doesn’t belong to any feature, so put it in a package of its own. Create a new package com.example.base.ui, and inside it, a class named MainLayout:
Source code
MainLayout.java
package com.example.base.ui;

import com.vaadin.flow.component.Unit;
import com.vaadin.flow.component.applayout.AppLayout;
import com.vaadin.flow.component.avatar.Avatar;
import com.vaadin.flow.component.avatar.AvatarVariant;
import com.vaadin.flow.component.html.Span;
import com.vaadin.flow.component.icon.Icon;
import com.vaadin.flow.component.orderedlayout.FlexComponent;
import com.vaadin.flow.component.orderedlayout.HorizontalLayout;
import com.vaadin.flow.component.orderedlayout.Scroller;
import com.vaadin.flow.component.orderedlayout.ScrollerVariant;
import com.vaadin.flow.component.sidenav.SideNav;
import com.vaadin.flow.component.sidenav.SideNavItem;
import com.vaadin.flow.router.Layout;
import com.vaadin.flow.server.menu.MenuConfiguration;

@Layout 1
class MainLayout extends AppLayout {

    MainLayout() {
        // Create components
        var appLogo = new Avatar("Click & Collect"); 2
        appLogo.addClassName("app-logo");
        appLogo.addThemeVariants(AvatarVariant.AURA_FILLED, AvatarVariant.XSMALL);

        var appName = new Span("Click & Collect");
        appName.addClassName("app-name"); 3

        var menu = new SideNav();
        menu.setMinWidth(200, Unit.PIXELS); 4
        MenuConfiguration.getMenuEntries().forEach(entry -> { 5
            var item = new SideNavItem(entry.title(), entry.menuClass(), 6
                new Icon(entry.icon()));
            item.setMatchNested(true); 7
            menu.addItem(item);
        });

        // Layout drawer
        var header = new HorizontalLayout(appLogo, appName);
        header.setAlignItems(FlexComponent.Alignment.CENTER);
        header.setPadding(true);

        var scroller = new Scroller(menu);
        scroller.addThemeVariants(ScrollerVariant.OVERFLOW_INDICATORS); 8

        setPrimarySection(Section.DRAWER); 9
        addToDrawer(header, scroller);
    }
}-
@Layoutmakes this the layout of every view in the application, so you don’t have to change the views to use it. -
An Avatar shows the initials of a name. Here, it stands in for a logo. The variants make it small, with a filled background.
-
The class names connect the logo and the name to the styles that you’ll add next.
-
Keep the menu, and thereby the drawer, at least 200 pixels wide.
-
MenuConfiguration.getMenuEntries()returns an entry for every view that has a@Menuannotation. You’ll add the annotation to the views later in this step. -
A
SideNavItemis a link to a view, with a label and an icon. The menu highlights the item of the view that the user is on. -
Highlight the item also when the URL continues past the view’s path. You’ll need this in the next step, when the product ID becomes part of the URL.
-
The scroller makes the menu scrollable when it has more items than fit in the window. The variant shows an indicator at the edge where there is more to scroll to.
-
Make the drawer the primary section, so that it takes the full height of the window. This layout doesn’t use the navigation bar of App Layout. Each view shows its own title instead, as you’ll see in the next section.
The layout doesn’t refer to any view class. Instead, each view declares its own menu entry with an annotation. This keeps the layout independent of the features. Adding a view to the menu doesn’t require changes to the layout, and the layout can link to views in other packages, even though the view classes are package-private.
Next, style the logo and the name. The project skeleton has a stylesheet for your own styles, src/main/resources/META-INF/resources/styles.css, and the Application class loads it. Add the following rules to the file:
Source code
styles.css
.app-logo {
    border-radius: min(40%, var(--vaadin-radius-m));
    margin-inline-start: var(--vaadin-padding-inline-container);
}

.app-name {
    font-weight: var(--aura-font-weight-semibold);
    font-size: var(--aura-font-size-l);
}
The rules use style properties of the Aura theme, so that the radius, spacing, and font match the rest of the application.
If you open http://localhost:8080 now, the drawer on the left shows the application name, and the product catalog appears next to it. The menu is still empty, since no view has a @Menu annotation yet.
|
Note
|
Layouts and Security
When you secure the application later, the layout needs an access annotation of its own, such as @PermitAll. Otherwise, users are denied access to every view inside it. See Add a Router Layout for details.
|
Create a View Title
Since the layout has no navigation bar, each view shows its own title at the top, together with a button that opens and closes the drawer. Every view needs the same title bar, so make it a component that the views can share. Create a class named ViewTitle in the com.example.base.ui package:
Source code
ViewTitle.java
package com.example.base.ui;

import com.vaadin.flow.component.Composite;
import com.vaadin.flow.component.applayout.DrawerToggle;
import com.vaadin.flow.component.html.H1;
import com.vaadin.flow.component.orderedlayout.FlexComponent;
import com.vaadin.flow.component.orderedlayout.HorizontalLayout;

public class ViewTitle extends Composite<HorizontalLayout> { 1

    public ViewTitle(String title) {
        addClassName("view-title"); 2

        var layout = getContent();
        layout.add(new DrawerToggle(), new H1(title)); 3
        layout.setAlignItems(FlexComponent.Alignment.CENTER);
    }
}-
The class is public, since views in other packages use it.
-
The class name connects the component to the styles that you’ll add next.
-
The toggle button hides and shows the drawer. On narrow screens, App Layout hides the drawer, and the toggle button is how users open it.
Then add these rules to styles.css:
Source code
styles.css
.view-title h1 {
    font-size: var(--aura-font-size-l);
    font-weight: var(--aura-font-weight-semibold);
}

.view-title vaadin-drawer-toggle {
    margin: 0;
}
The first rule makes the heading smaller than a heading normally is, since it shares a row with other components. The second removes the margin around the toggle button.
Update the Product Catalog
Next, add the product catalog to the menu, and give it a title. To add a view to the menu, annotate it with @Menu.
At the same time, give the product catalog a path of its own. So far, it has been the root view at "", which made sense while it was the only view. When the application has a menu, each view should have its own path, such as products and orders. This also matters in the next step, where the product ID becomes part of the URL: products/12 says more than 12, and the menu can tell that it belongs to the product catalog.
The view already has a toolbar at the top, with the search field and the Add Product button. Put the title at the start of the toolbar, so that the toolbar becomes the title bar of the view.
Change ProductCatalogView as follows. The rest of the class stays the same:
Source code
ProductCatalogView.java
// The other imports stay the same
import com.example.base.ui.ViewTitle;
import com.vaadin.flow.router.Menu;
import com.vaadin.flow.router.PageTitle;
import com.vaadin.flow.router.Route;
import com.vaadin.flow.router.RouteAlias;

@Route("products") 1
@RouteAlias("") 2
@PageTitle("Product Catalog")
@Menu(order = 1, icon = "vaadin:package") 3
class ProductCatalogView extends MasterDetailLayout {

    ProductCatalogView(ProductCatalogService service) {
        // Create components
        var title = new ViewTitle("Product Catalog");

        var searchField = new TextField();
        // ...

        // Layout view
        // ...

        var toolbar = new HorizontalLayout();
        toolbar.setWidthFull();
        toolbar.setWrap(true); 4
        toolbar.addToStart(title, searchField); 5
        toolbar.addToEnd(addButton);

        // ...
    }

    // ...
}-
The view is now at http://localhost:8080/products.
-
A route alias is an extra path for the same view. With it, http://localhost:8080 still opens the product catalog.
-
The menu entry gets its title from
@PageTitle, and its icon from the Vaadin Icons collection. Theordersets the position of the item in the menu. -
On narrow screens, let the toolbar wrap to more rows, instead of pushing the Add Product button out of view.
-
Show the title first, before the search field.
The menu now has a Product Catalog item. It’s highlighted, since you’re on the product catalog view. The title, the search field, and the Add Product button share the row at the top of the view.
Add an Orders View
Next, add a second view, so that there is somewhere to navigate. Orders are a different feature than the product catalog, so they get a package of their own. Create a new package com.example.order, and inside it, a class named OrdersView:
Source code
OrdersView.java
package com.example.order;

import com.example.base.ui.ViewTitle;
import com.vaadin.flow.component.html.Paragraph;
import com.vaadin.flow.component.orderedlayout.VerticalLayout;
import com.vaadin.flow.router.Menu;
import com.vaadin.flow.router.PageTitle;
import com.vaadin.flow.router.Route;

@Route("orders") 1
@PageTitle("Orders")
@Menu(order = 2, icon = "vaadin:cart") 2
class OrdersView extends VerticalLayout {

    OrdersView() {
        add(new ViewTitle("Orders")); 3
        add(new Paragraph("Customer orders will be listed here.")); 4
    }
}-
The view is at http://localhost:8080/orders.
-
The
orderputs the item below the product catalog in the menu. -
Start the view with a title, like the product catalog.
-
The view only shows a short text. A real orders view would have a grid, a form, and a service of its own, like the product catalog has.
The menu now has two items, although you didn’t change MainLayout:
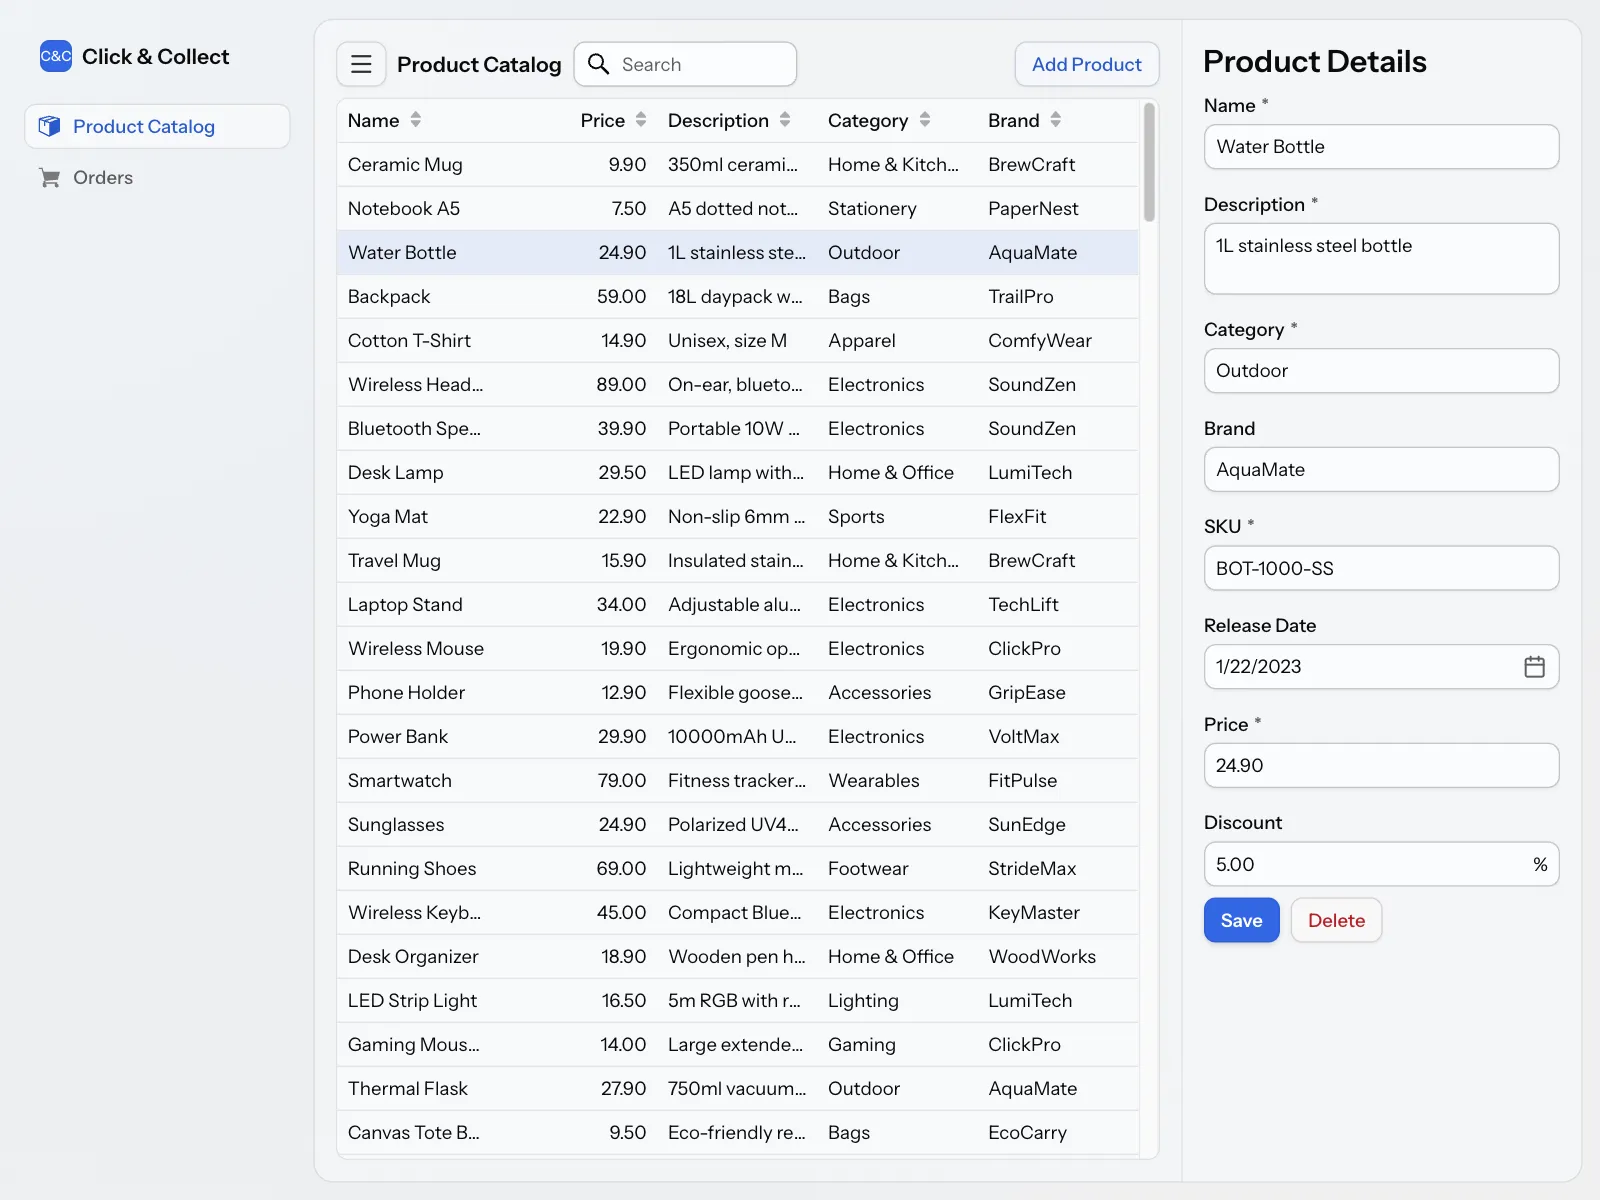
Click the items to move between the views. The URL in the browser changes, and the menu highlights the item of the current view. The browser’s Back and Forward buttons work as well. Click the toggle button next to the title to hide the drawer, and click it again to show it.
Now make the browser window narrower. When the window is narrow enough, the drawer disappears, and the toolbar of the product catalog wraps to two rows. Click the toggle button to open the drawer on top of the view.
Complete Code for This Step
If your application doesn’t behave as described, compare your files with these listings. This step changes ProductCatalogView and styles.css, and adds three classes. The other classes are the same as in the complete code of the Add Data step.
ProductCatalogView.java
Source code
Java
package com.example.product;

import com.example.base.ui.ViewTitle;
import com.vaadin.flow.component.button.Button;
import com.vaadin.flow.component.grid.ColumnTextAlign;
import com.vaadin.flow.component.grid.Grid;
import com.vaadin.flow.component.icon.VaadinIcon;
import com.vaadin.flow.component.masterdetaillayout.MasterDetailLayout;
import com.vaadin.flow.component.notification.Notification;
import com.vaadin.flow.component.notification.NotificationVariant;
import com.vaadin.flow.component.orderedlayout.HorizontalLayout;
import com.vaadin.flow.component.orderedlayout.VerticalLayout;
import com.vaadin.flow.component.textfield.TextField;
import com.vaadin.flow.data.value.ValueChangeMode;
import com.vaadin.flow.router.Menu;
import com.vaadin.flow.router.PageTitle;
import com.vaadin.flow.router.Route;
import com.vaadin.flow.router.RouteAlias;
import org.springframework.dao.DuplicateKeyException;
import org.springframework.dao.OptimisticLockingFailureException;

@Route("products")
@RouteAlias("")
@PageTitle("Product Catalog")
@Menu(order = 1, icon = "vaadin:package")
class ProductCatalogView extends MasterDetailLayout {

    ProductCatalogView(ProductCatalogService service) {
        // Create components
        var title = new ViewTitle("Product Catalog");

        var searchField = new TextField();
        searchField.setPlaceholder("Search");
        searchField.setPrefixComponent(VaadinIcon.SEARCH.create());
        searchField.setValueChangeMode(ValueChangeMode.LAZY);

        var grid = new Grid<ProductCatalogItem>();
        grid.addColumn(ProductCatalogItem::name)
            .setHeader("Name")
            .setSortProperty(ProductCatalogItem.SORT_PROPERTY_NAME);
        grid.addColumn(ProductCatalogItem::price)
            .setHeader("Price")
            .setTextAlign(ColumnTextAlign.END)
            .setSortProperty(ProductCatalogItem.SORT_PROPERTY_PRICE);
        grid.addColumn(ProductCatalogItem::description)
            .setHeader("Description")
            .setSortProperty(ProductCatalogItem.SORT_PROPERTY_DESCRIPTION);
        grid.addColumn(ProductCatalogItem::category)
            .setHeader("Category")
            .setSortProperty(ProductCatalogItem.SORT_PROPERTY_CATEGORY);
        grid.addColumn(ProductCatalogItem::brand)
            .setHeader("Brand")
            .setSortProperty(ProductCatalogItem.SORT_PROPERTY_BRAND);
        grid.setItemsPageable(pageable -> service
            .findItems(searchField.getValue(), pageable)
        ).setIdentifierProvider(ProductCatalogItem::productId);

        var drawer = new ProductFormDrawer(productDetails -> {
            var saved = service.save(productDetails);
            grid.getDataProvider().refreshAll();
            return saved;
        }, productDetails -> {
            service.delete(productDetails);
            grid.deselectAll();
            grid.getDataProvider().refreshAll();
        }, this::handleException);

        searchField.addValueChangeListener(e ->
                grid.getDataProvider().refreshAll());

        grid.addSelectionListener(e -> {
            var productDetails = e.getFirstSelectedItem()
                .flatMap(item -> service.findDetailsById(item.productId()));
            productDetails.ifPresent(drawer::setProductDetails);
            setDetail(productDetails.isPresent() ? drawer : null);
        });
        addBackdropClickListener(e -> grid.deselectAll());
        addDetailEscapePressListener(e -> grid.deselectAll());

        var addButton = new Button("Add Product", e ->
                new AddProductDialog(
                        productDetails -> {
                            var saved = service.save(productDetails);
                            grid.getDataProvider().refreshAll();
                            service.findItemById(saved.getProductId())
                                   .ifPresent(grid::select);
                        },
                        this::handleException
                ).open()
        );

        // Layout view
        setSizeFull();
        setDetailSize("300px");
        setExpandMaster(true);

        var toolbar = new HorizontalLayout();
        toolbar.setWidthFull();
        toolbar.setWrap(true);
        toolbar.addToStart(title, searchField);
        toolbar.addToEnd(addButton);

        var listLayout = new VerticalLayout(toolbar, grid);
        listLayout.setSizeFull();
        grid.setSizeFull();

        setMaster(listLayout);
    }

    private void handleException(RuntimeException exception) {
        if (exception instanceof OptimisticLockingFailureException) {
            var notification = new Notification(
                "Another user has edited the same product. "
                + "Please refresh and try again.");
            notification.setPosition(Notification.Position.MIDDLE);
            notification.addThemeVariants(NotificationVariant.WARNING);
            notification.setDuration(3000);
            notification.open();
        } else if (exception instanceof DuplicateKeyException) {
            var notification = new Notification(
                "The SKU is already in use. Please enter another one.");
            notification.setPosition(Notification.Position.MIDDLE);
            notification.addThemeVariants(NotificationVariant.WARNING);
            notification.setDuration(3000);
            notification.open();
        } else {
            // Delegate to Vaadin's default error handler
            throw exception;
        }
    }
}
MainLayout.java
Source code
Java
package com.example.base.ui;

import com.vaadin.flow.component.Unit;
import com.vaadin.flow.component.applayout.AppLayout;
import com.vaadin.flow.component.avatar.Avatar;
import com.vaadin.flow.component.avatar.AvatarVariant;
import com.vaadin.flow.component.html.Span;
import com.vaadin.flow.component.icon.Icon;
import com.vaadin.flow.component.orderedlayout.FlexComponent;
import com.vaadin.flow.component.orderedlayout.HorizontalLayout;
import com.vaadin.flow.component.orderedlayout.Scroller;
import com.vaadin.flow.component.orderedlayout.ScrollerVariant;
import com.vaadin.flow.component.sidenav.SideNav;
import com.vaadin.flow.component.sidenav.SideNavItem;
import com.vaadin.flow.router.Layout;
import com.vaadin.flow.server.menu.MenuConfiguration;

@Layout
class MainLayout extends AppLayout {

    MainLayout() {
        // Create components
        var appLogo = new Avatar("Click & Collect");
        appLogo.addClassName("app-logo");
        appLogo.addThemeVariants(AvatarVariant.AURA_FILLED, AvatarVariant.XSMALL);

        var appName = new Span("Click & Collect");
        appName.addClassName("app-name");

        var menu = new SideNav();
        menu.setMinWidth(200, Unit.PIXELS);
        MenuConfiguration.getMenuEntries().forEach(entry -> {
            var item = new SideNavItem(entry.title(), entry.menuClass(),
                new Icon(entry.icon()));
            item.setMatchNested(true);
            menu.addItem(item);
        });

        // Layout drawer
        var header = new HorizontalLayout(appLogo, appName);
        header.setAlignItems(FlexComponent.Alignment.CENTER);
        header.setPadding(true);

        var scroller = new Scroller(menu);
        scroller.addThemeVariants(ScrollerVariant.OVERFLOW_INDICATORS);

        setPrimarySection(Section.DRAWER);
        addToDrawer(header, scroller);
    }
}
ViewTitle.java
Source code
Java
package com.example.base.ui;

import com.vaadin.flow.component.Composite;
import com.vaadin.flow.component.applayout.DrawerToggle;
import com.vaadin.flow.component.html.H1;
import com.vaadin.flow.component.orderedlayout.FlexComponent;
import com.vaadin.flow.component.orderedlayout.HorizontalLayout;

public class ViewTitle extends Composite<HorizontalLayout> {

    public ViewTitle(String title) {
        addClassName("view-title");

        var layout = getContent();
        layout.add(new DrawerToggle(), new H1(title));
        layout.setAlignItems(FlexComponent.Alignment.CENTER);
    }
}
OrdersView.java
Source code
Java
package com.example.order;

import com.example.base.ui.ViewTitle;
import com.vaadin.flow.component.html.Paragraph;
import com.vaadin.flow.component.orderedlayout.VerticalLayout;
import com.vaadin.flow.router.Menu;
import com.vaadin.flow.router.PageTitle;
import com.vaadin.flow.router.Route;

@Route("orders")
@PageTitle("Orders")
@Menu(order = 2, icon = "vaadin:cart")
class OrdersView extends VerticalLayout {

    OrdersView() {
        add(new ViewTitle("Orders"));
        add(new Paragraph("Customer orders will be listed here."));
    }
}
styles.css
Source code
CSS
/* Add your styles here */

.app-logo {
    border-radius: min(40%, var(--vaadin-radius-m));
    margin-inline-start: var(--vaadin-padding-inline-container);
}

.app-name {
    font-weight: var(--aura-font-weight-semibold);
    font-size: var(--aura-font-size-l);
}

.view-title h1 {
    font-size: var(--aura-font-size-l);
    font-weight: var(--aura-font-weight-semibold);
}

.view-title vaadin-drawer-toggle {
    margin: 0;
}
Next Steps
You’ve added a main layout with a navigation menu, and a second view to navigate to. From now on, every view that you annotate with @Menu shows up in the menu without changes to the layout.
In the next step, you’ll put the selected product in the URL, so that users can share and bookmark links to individual products. Proceed to the Add Deep Linking step to continue the tutorial.