Deploying a Vaadin Application to Azure Cloud
- Step 1: Install the Azure CLI
- Step 2: Download a Starter App
- Step 3: Add the Azure Plugin
- Step 4: Create a Production Build
- Step 5: Configure Your Application
- Step 6: Deploy Your Application
This tutorial shows you how to deploy a Vaadin application to Microsoft’s Azure cloud using the traditional App Service, that works well for most typical Vaadin applications. If you have specific requirements, Azure has several other options to host Vaadin applications, such as raw virtual machines, and Container Apps. Azure also has great Kubernetes support.
Azure offers a 30-day free trial that includes 12 months of free commercial services. You can find details of their free and commercial services on the Azure website.
|
Note
|
Azure account required
To complete this tutorial, you need an Azure account.
You can sign up at https://signup.azure.com/.
|
Step 1: Install the Azure CLI
You can find installation instructions for different platforms in the Azure CLI documentation.
Step 2: Download a Starter App
Download a minimal Vaadin project and unpack the downloaded zip into a folder on your computer.
Step 3: Add the Azure Plugin
Open your pom.xml file and add the following section in the <plugins> tag in the <build> section:
Source code
pom.xml
pom.xml<plugin>
<groupId>com.microsoft.azure</groupId>
<artifactId>azure-webapp-maven-plugin</artifactId>
<version>2.5.0</version>
</plugin>Check the latest version of the plugin from the Azure App Service docs.
Step 4: Create a Production Build
Open the project directory from a terminal window, and enter the following command to generate a JAR file of your application:
Source code
terminal
mvn packageStep 5: Configure Your Application
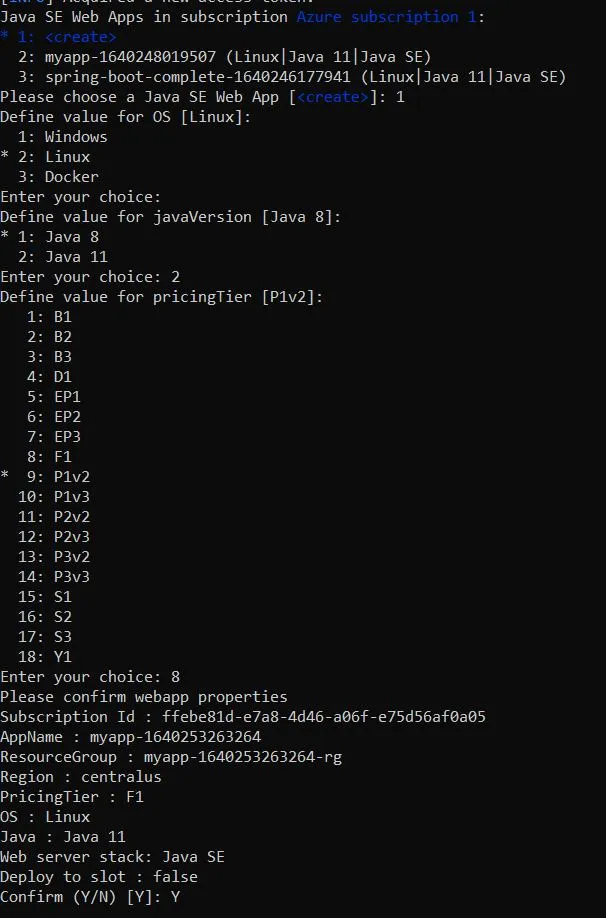
From the terminal window, enter the following command:
Source code
terminal
mvn azure-webapp:configThis command authenticates you with Azure via the browser, assuming you aren’t already logged in with Azure CLI. Then you are prompted to choose from various options. For example, you could select the following:
-
<create> when asked to choose a Java SE Web App
-
Linux when asked to choose an OS
-
Java 11 for the Java version
-
F1 for the
pricingTier -
Enter 'Y' on your keyboard to confirm
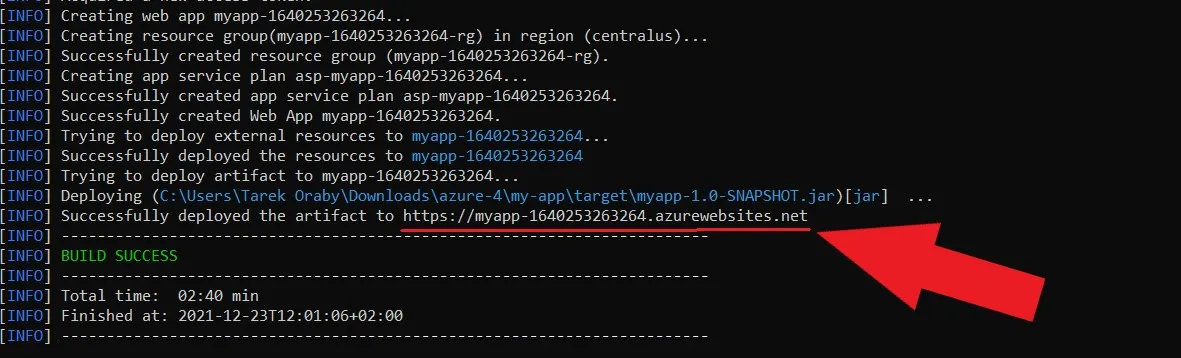
Step 6: Deploy Your Application
Enter the following command to deploy your application:
Source code
terminal
mvn azure-webapp:deployYou may be required to authenticate again in the browser. Once authenticated, your application is deployed to Azure and you should see your application URL in the logs, as in the following screenshot.