Deploying a Vaadin Application to Amazon Web Services
- Step 1: Install the AWS Elastic Beanstalk CLI
- Step 2: Download a Starter App
- Step 3: Change the Server Port
- Step 4: Create a Production Build
- Step 5: Initialize a Beanstalk Project
- Step 6: Configure Beanstalk Deployment
- Step 7: Create Beanstalk Environment
- Step 8: Deploy Your Application
This tutorial shows you how to deploy a Vaadin application to Amazon Web Services (AWS) Elastic Beanstalk. AWS Elastic Beanstalk is an easy-to-use service for deploying web applications developed with Java (among other programming languages). AWS offers short-term free trials from the date you activate a particular service. You can find details about their free offerings on the AWS website.
|
Note
|
AWS account required
To complete this tutorial, you need an AWS account.
You can sign up at https://aws.amazon.com/.
|
Step 1: Install the AWS Elastic Beanstalk CLI
The CLI installation requires Python to be installed on your machine. You can download and install Python from python.org/downloads. After Python is installed, you can install the Elastic Beanstalk CLI by running the following command from a terminal window:
Source code
terminal
pip install awsebcli --upgradeStep 2: Download a Starter App
Download a minimal Vaadin project and unpack the downloaded zip into a folder on your computer.
Step 3: Change the Server Port
AWS Elastic Beanstalk is configured to forward requests to port 5000 by default, whereas the Vaadin starter application runs on port 8080.
To change the port where the application runs, open the application.properties file under the src/main/resources directory, and change the server port from 8080 to 5000.
Source code
application.properties
application.propertiesserver.port=5000It’s also possible to change the default port from the Beanstalk side, if needed.
Step 4: Create a Production Build
Open the project directory from a terminal window, and enter the following command to generate a JAR file of your application:
Source code
terminal
mvn packageStep 5: Initialize a Beanstalk Project
From a terminal window, enter the following command to initialize a Beanstalk project:
Source code
terminal
eb inityou’re asked to choose a region for the project. If you’re unsure, choose the one geographically closest to you.
Source code
Select a default region
1) us-east-1 : US East (N. Virginia)
2) us-west-1 : US West (N. California)
3) us-west-2 : US West (Oregon)
4) eu-west-1 : EU (Ireland)
5) eu-central-1 : EU (Frankfurt)
6) ap-south-1 : Asia Pacific (Mumbai)
7) ap-southeast-1 : Asia Pacific (Singapore)
8) ap-southeast-2 : Asia Pacific (Sydney)
9) ap-northeast-1 : Asia Pacific (Tokyo)
10) ap-northeast-2 : Asia Pacific (Seoul)
11) sa-east-1 : South America (Sao Paulo)
12) cn-north-1 : China (Beijing)
13) cn-northwest-1 : China (Ningxia)
14) us-east-2 : US East (Ohio)
15) ca-central-1 : Canada (Central)
16) eu-west-2 : EU (London)
17) eu-west-3 : EU (Paris)
18) eu-north-1 : EU (Stockholm)
19) eu-south-1 : EU (Milano)
20) ap-east-1 : Asia Pacific (Hong Kong)
21) me-south-1 : Middle East (Bahrain)
22) af-south-1 : Africa (Cape Town)
(default is 3):
Next, if this is the first time you’re using the AWS CLI, you’re asked to provide your AWS credentials. See the AWS documentation to learn how to create an access ID and key.
Source code
You haven't yet set up your credentials or your credentials are incorrect
You must provide your credentials.
(aws-access-id): AKIAIOSFODNN7EXAMPLE
(aws-secret-key): wJalrXUtnFEMI/K7MDENG/bPxRfiCYEXAMPLEKEY
Next, you’re asked to select a name for your application.
You can enter a name or accept the default "my-app" value.
Source code
Enter Application Name
(default is "my-app"):
Next, you’re asked if you’re using Node.js. Enter the letter "n", as this is a Java project.
Source code
It appears you're using Node.js. Is this correct?
(Y/n): n
Next, choose "Java" from the list of the platforms.
Source code
Select a platform.
1) .NET Core on Linux
2) .NET on Windows Server
3) Docker
4) GlassFish
5) Go
6) Java
7) Node.js
8) PHP
9) Packer
10) Python
11) Ruby
12) Tomcat
(make a selection): 6
Next, for the platform branch, select "Corretto 11".
Source code
Select a platform branch.
1) Corretto 11 running on 64bit Amazon Linux 2
2) Corretto 8 running on 64bit Amazon Linux 2
3) Java 8 running on 64bit Amazon Linux (Deprecated)
4) Java 7 running on 64bit Amazon Linux (Deprecated)
(default is 1): 1
Finally, enter the letter "n" for the last two prompts to skip the configuration of both CodeCommit and SSH.
Source code
Do you wish to continue with CodeCommit? (Y/n): n
Do you want to set up SSH for your instances?
(Y/n): n
Step 6: Configure Beanstalk Deployment
The project initialization performed in the previous step automatically creates a configuration file in the project directory under .elasticbeanstalk/config.yml.
Now, you need to configure the deployment instructions to point to the project’s JAR by adding the following setting to the config.yml file:
Source code
config.yml
config.ymldeploy:
artifact: target/myapp-1.0-SNAPSHOT.jarStep 7: Create Beanstalk Environment
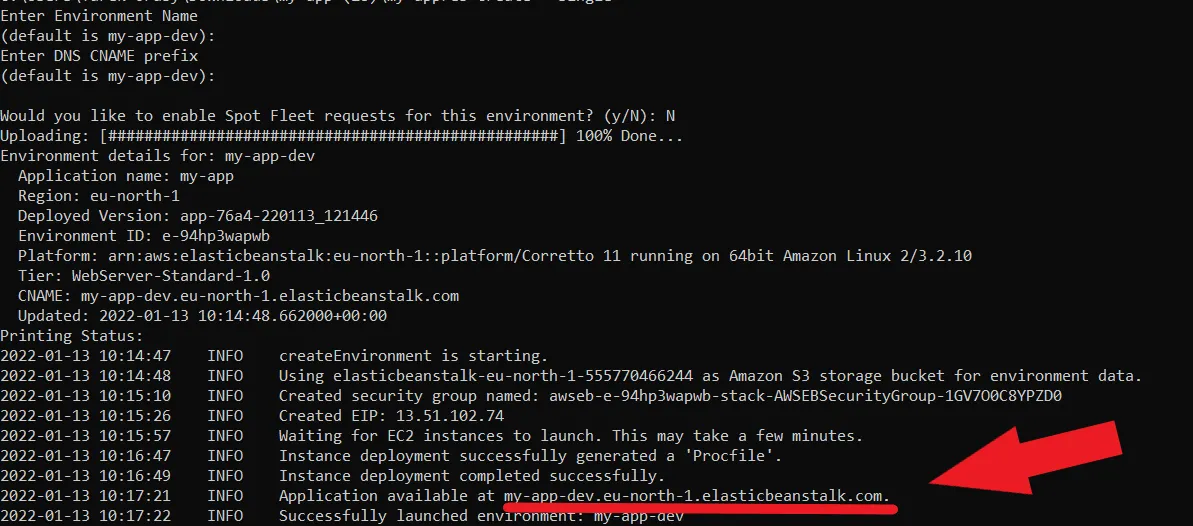
Next, you need to create an Elastic Beanstalk environment with the following command:
Source code
terminal
eb create --singleThis command creates an AWS environment with a single EC2 instance.
Next, you’re prompted to enter an environment name and Domain Name System (DNS) CNAME prefix.
You can keep the defaults.
Source code
Enter Environment Name
(default is my-app-dev):
Enter DNS CNAME prefix
(default is my-app-dev):
Next, enter the letter "N" when prompted for whether you want to enable Spot Fleet:
Source code
Would you like to enable Spot Fleet requests for this environment? (y/N): NIf this is the first time you’re running the AWS CLI, you might be asked to create a service role for your account. This service role is required to create the Beanstalk environment. To create this service role, you should press Enter when you see the following prompt:
Source code
2.0+ Platforms require a service role. We will attempt to create one for you. You can specify your own role using the --service-role option.
Type "view" to see the policy, or press ENTER to continue:
The creation of the environment takes a moment to finish.
Your application URL appears in the logs as shown in the following screenshot.