Connecting the View to the Backend
- An Introduction to Spring Boot
- Backend Overview
- Creating a Service for Accessing the Database
- Implementing Filtering in the Repository
- Using the Back-End Service from the View
In the previous chapter, you created the view using Vaadin components and layouts. In this chapter, you connect the view to the backend to display and update data.
You can find the back-end code in the src/main/java directory.
This chapter covers:
-
Spring Boot.
-
How to create a Spring Service for interfacing the backend.
-
How to access a service from the view.
An Introduction to Spring Boot
Vaadin uses Spring Boot on the server. Spring Boot is an opinionated, convention-over-configuration approach to creating Spring applications. Spring Boot automates much of the required configuration and manages an embedded Tomcat server, so you don’t need to deploy the application to a separate server.
In this tutorial, you use the following features that are configured by Spring Boot:
-
Spring Data for accessing the database through JPA and Hibernate.
-
An embedded H2 Database for development, and PostgreSQL for production.
-
Spring Boot DevTools for automatic code reload.
-
Embedded Tomcat server for deployment.
-
Spring Security for authenticating users.
Backend Overview
The starter you downloaded contains the entities and repositories you need, along with a sample data generator.
Domain Model: Entities
The Vaadin CRM application has three JPA entities that make up its domain model: Contact, Company, and Status.
A contact belongs to a company and has a status.
You can find the entities in the com.example.application.data.entity package.
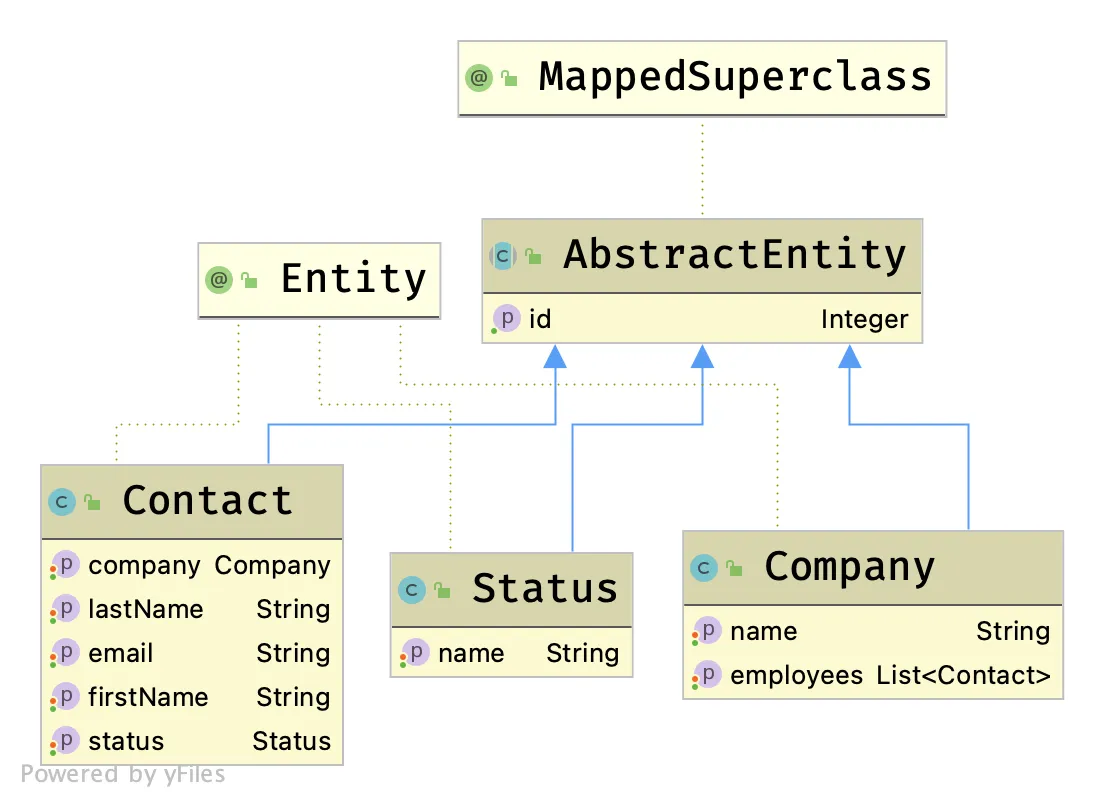
Database Access: Repositories
The application uses Spring Data JPA repositories for database access.
Spring Data provides implementations of basic create, read, update, and delete (CRUD) database operations when you extend from the JpaRepository interface.
You can find the repositories in the com.example.application.data.service package.
Creating a Service for Accessing the Database
Instead of accessing the database directly from the view, you create a Spring Service. The service class handles the application’s business logic and, in larger applications, it often transforms database entities into Data-Transfer Objects (DTO) for views. In this tutorial, you create a single service that provides all the methods you need.
Create a new class, CrmService.java, in the data.service package with the following content:
Source code
CrmService.java
CrmService.javapackage com.example.application.data.service;
import com.example.application.data.entity.Company;
import com.example.application.data.entity.Contact;
import com.example.application.data.entity.Status;
import com.example.application.data.repository.CompanyRepository;
import com.example.application.data.repository.ContactRepository;
import com.example.application.data.repository.StatusRepository;
import org.springframework.stereotype.Service;
import java.util.List;
@Service 1
public class CrmService {
private final ContactRepository contactRepository;
private final CompanyRepository companyRepository;
private final StatusRepository statusRepository;
public CrmService(ContactRepository contactRepository,
CompanyRepository companyRepository,
StatusRepository statusRepository) { 2
this.contactRepository = contactRepository;
this.companyRepository = companyRepository;
this.statusRepository = statusRepository;
}
public List<Contact> findAllContacts(String stringFilter) {
if (stringFilter == null || stringFilter.isEmpty()) { 3
return contactRepository.findAll();
} else {
return contactRepository.search(stringFilter);
}
}
public long countContacts() {
return contactRepository.count();
}
public void deleteContact(Contact contact) {
contactRepository.delete(contact);
}
public void saveContact(Contact contact) {
if (contact == null) { 4
System.err.println("Contact is null. Are you sure you have connected your form to the application?");
return;
}
contactRepository.save(contact);
}
public List<Company> findAllCompanies() {
return companyRepository.findAll();
}
public List<Status> findAllStatuses(){
return statusRepository.findAll();
}
}-
The
@Serviceannotation makes this a Spring-managed service that you can inject into your view. -
Use Spring constructor injection to autowire the database repositories.
-
Check if there is an active filter, return either all contacts or use the repository to filter based on the string.
-
Service classes often include validation and other business rules before persisting data. Here, you check that you aren’t trying to save a
nullobject.
Implementing Filtering in the Repository
Add the search() method to the contacts repository to provide the service class with the required method for filtering contacts.
Source code
ContactRepository.java
ContactRepository.javapublic interface ContactRepository extends JpaRepository<Contact, Long> {
@Query("select c from Contact c " +
"where lower(c.firstName) like lower(concat('%', :searchTerm, '%')) " +
"or lower(c.lastName) like lower(concat('%', :searchTerm, '%'))") 1
List<Contact> search(@Param("searchTerm") String searchTerm); 2
}-
Uses the
@Queryannotation to define a custom query. In this case, it checks if the string matches the first or the last name, and ignores the case. The query uses Java Persistence Query Language (JPQL) which is an SQL-like language for querying JPA-managed databases.
You don’t need to implement the method. Spring Data provides the implementation based on the query.
Using the Back-End Service from the View
You can now inject the CrmService into the list view to access the backend.
Source code
ListView.java
ListView.javapackage com.example.application.views.list;
import com.example.application.data.entity.Contact;
import com.example.application.data.service.CrmService;
import com.vaadin.flow.component.Component;
import com.vaadin.flow.component.button.Button;
import com.vaadin.flow.component.grid.Grid;
import com.vaadin.flow.component.orderedlayout.HorizontalLayout;
import com.vaadin.flow.component.orderedlayout.VerticalLayout;
import com.vaadin.flow.component.textfield.TextField;
import com.vaadin.flow.data.value.ValueChangeMode;
import com.vaadin.flow.router.PageTitle;
import com.vaadin.flow.router.Route;
import java.util.Collections;
@Route(value = "")
@PageTitle("Contacts | Vaadin CRM")
public class ListView extends VerticalLayout {
Grid<Contact> grid = new Grid<>(Contact.class);
TextField filterText = new TextField();
ContactForm form;
CrmService service;
public ListView(CrmService service) { 1
this.service = service;
addClassName("list-view");
setSizeFull();
configureGrid();
configureForm();
add(getToolbar(), getContent());
updateList(); 2
}
private Component getContent() {
HorizontalLayout content = new HorizontalLayout(grid, form);
content.setFlexGrow(2, grid);
content.setFlexGrow(1, form);
content.addClassNames("content");
content.setSizeFull();
return content;
}
private void configureForm() {
form = new ContactForm(service.findAllCompanies(), service.findAllStatuses()); 3
form.setWidth("25em");
}
private void configureGrid() {
grid.addClassNames("contact-grid");
grid.setSizeFull();
grid.setColumns("firstName", "lastName", "email");
grid.addColumn(contact -> contact.getStatus().getName()).setHeader("Status");
grid.addColumn(contact -> contact.getCompany().getName()).setHeader("Company");
grid.getColumns().forEach(col -> col.setAutoWidth(true));
}
private HorizontalLayout getToolbar() {
filterText.setPlaceholder("Filter by name...");
filterText.setClearButtonVisible(true);
filterText.setValueChangeMode(ValueChangeMode.LAZY);
filterText.addValueChangeListener(e -> updateList()); 4
Button addContactButton = new Button("Add contact");
HorizontalLayout toolbar = new HorizontalLayout(filterText, addContactButton);
toolbar.addClassName("toolbar");
return toolbar;
}
private void updateList() { 5
grid.setItems(service.findAllContacts(filterText.getValue()));
}
}-
Autowire
CrmServicethrough the constructor. Save it in a field, so you can access it from other methods. -
Call
updateList()once you have constructed the view. -
Use the service to fetch companies and statuses.
-
Call
updateList()any time the filter changes. -
updateList()sets the grid items by calling the service with the value from the filter text field.
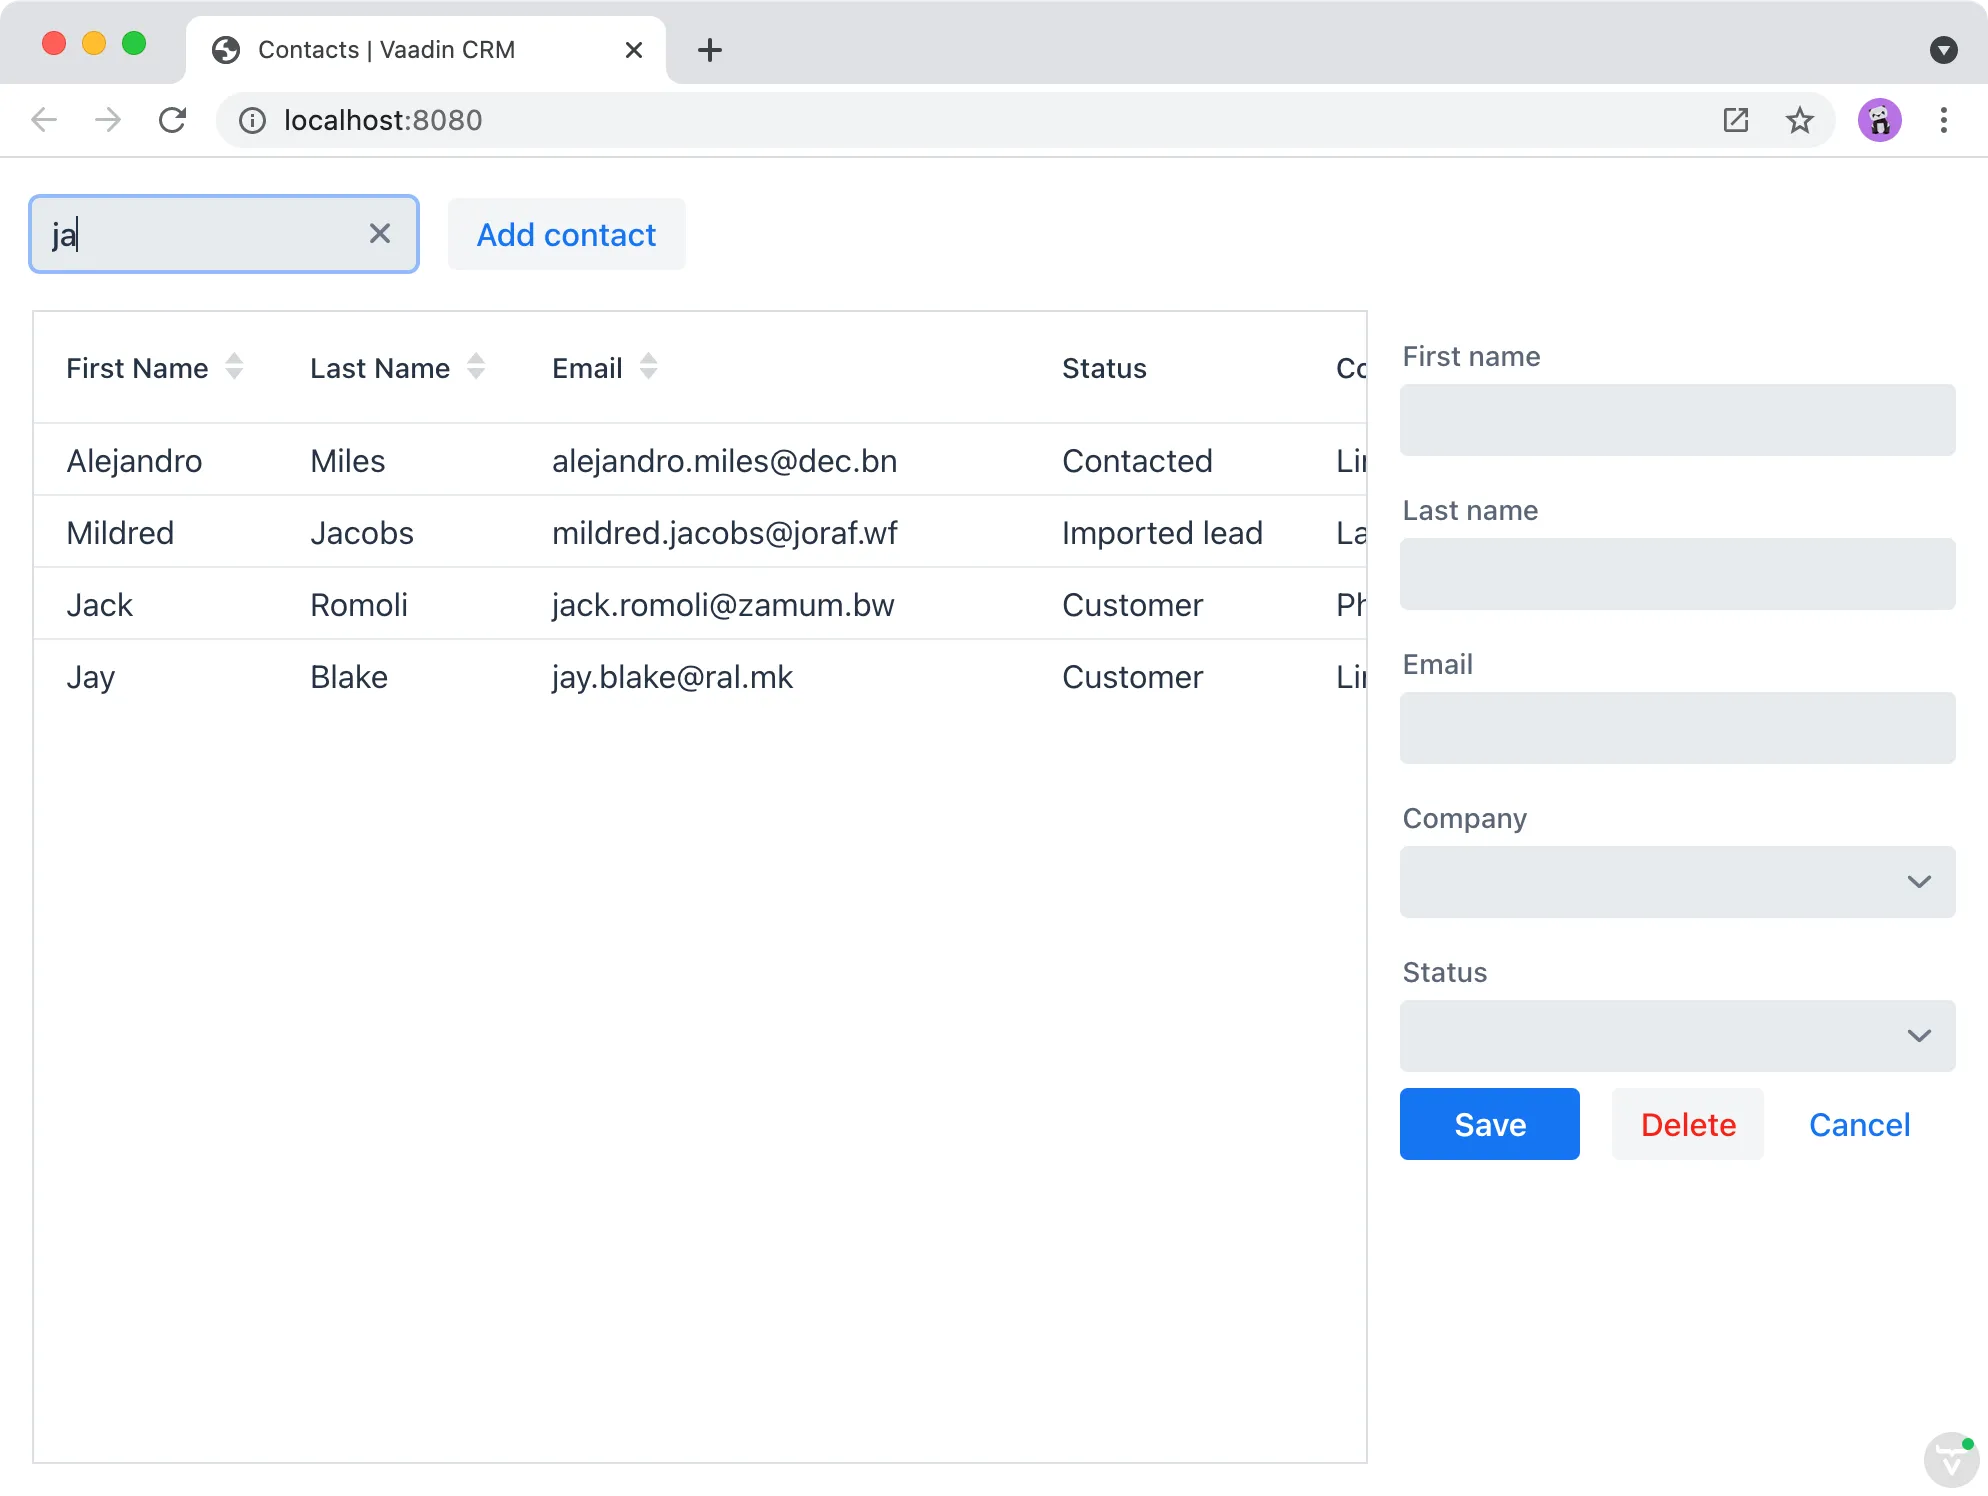
Build the project, refresh the browser, and verify that you can now see contacts in the grid. Try filtering the contents by typing into the filter text field.

Source code
render-banner.ts
render-banner.ts
1EA60808-40B7-4F0C-8B71-C0CB905299D2