Connecting Main View to Java
When you build a view with Designer, there are two main files for each view:
-
main-view.ts: This is the template file where you lay out the components and define everything that’s static. -
MainView.java: This is the Java class that uses the template, adds UI logic, and configures all parts that are dynamic. We refer to this file as the companion file for the template.
When we created the views earlier in the tutorial, we checked the Create Java Companion file option in the New Vaadin 10+ Design dialog.
This is why the MainView.java and ContactForm.java files were generated automatically.
Adding Java code to your views isn’t visible in the template in Designer, but it’s used when you run your application.
For the main view, in the companion file, we need to
-
Load data to the grid.
-
Filter data based on the text field.
-
Populate the contact form when the user selects a row in the grid.
-
Enable adding new contacts using the Add contact button.
In the contact form, we need to
-
Bind fields with a contact object given by the main view.
-
Implement the save, delete and close buttons.
We start with loading data into the grid.
Exporting Components to Java
First, we export the components which require data or interaction logic to Java. To do this, we need to tell Designer which components should be available from Java code. For the main view, we need the grid to display data, the text field to filter data and the button to add new contacts.
-
In Designer, open
main-view.ts. -
Select the "Filter by name…" text field.
-
In the properties view, go to the attributes panel, find the id attribute and give the text field the
filterTextid. This is what the component is called in the Java companion file. -
In the outline, hover over the selected
vaadin-text-fieldand click the icon that appears in the row on the right. This allows you to connect the component to Java and makes the field available from your Java code.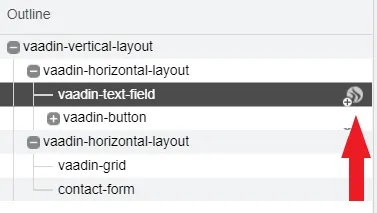
-
Repeat this process (steps 2–4) for the:
-
vaadin-button: id attribute =addContactButton. -
vaadin-grid: id attribute =grid. -
contact-form: id attribute =contactForm.
-
All the fields should now be available from your Java code.
To check this, open the src/main/java/com.example.application.MainView class.
Source code
MainView.java
MainView.java@Tag("main-view")
@JsModule("./src/views/main-view.ts")
@Route("")
public class MainView extends LitTemplate {
@Id("filterText") 1
private TextField filterText; 2
@Id("addContactButton")
private Button addContactButton; 3
@Id("grid")
private Grid grid; 4
@Id("contactForm")
private ContactForm contactForm; 5
public MainView() {
}
}-
The fields are now connected to the template in the
@Id("identifier")annotations. -
The text field uses the
filterTextid. -
The button uses the
addContactButtonid. -
The grid uses the
gridid. -
The contact form uses the
contactFormid.
Add Data to the Grid
Next, we want to load data from the backend and show it inside the grid. The first task is to configure the columns. For each contact we want to show its first name, last name, email, company, and status.
We take advantage of Spring’s dependency injection to get hold of the back-end service, by adding it as a parameter in the constructor.
Spring passes it in when MainView is created.
Modify MainView as follows:
Source code
MainView.java
MainView.java@Tag("main-view")
@JsModule("./src/views/main-view.ts")
@Route("")
public class MainView extends LitTemplate {
@Id("filterText")
private TextField filterText;
@Id("addContactButton")
private Button addContactButton;
@Id("grid")
private Grid<Contact> grid; 1
@Id("contactForm")
private ContactForm contactForm;
ContactRepository contactRepository; 2
public MainView(ContactRepository contactRepository) { 3
this.contactRepository = contactRepository;
grid.addColumn(Contact::getFirstName).setHeader("First name"); 4
grid.addColumn(Contact::getLastName).setHeader("Last name");
grid.addColumn(Contact::getEmail).setHeader("Email");
grid.addColumn(Contact::getCompany).setHeader("Company");
grid.addColumn(Contact::getStatus).setHeader("Status");
grid.getColumns().forEach(col -> col.setAutoWidth(true)); 5
updateList();
}
private void updateList() {
grid.setItems(contactRepository.findAll()); 6
}
}-
Adds the bean type as a type parameter to the grid.
-
Creates a field for storing the service for future access.
-
Spring passes in the service when the view is created using autowiring.
-
Adds and configures columns in the grid.
-
Configures column sizing: all columns are sized based on their content.
-
Fetches items from the service and passes them to the grid.
Next, run the application, or restart if it’s already running.
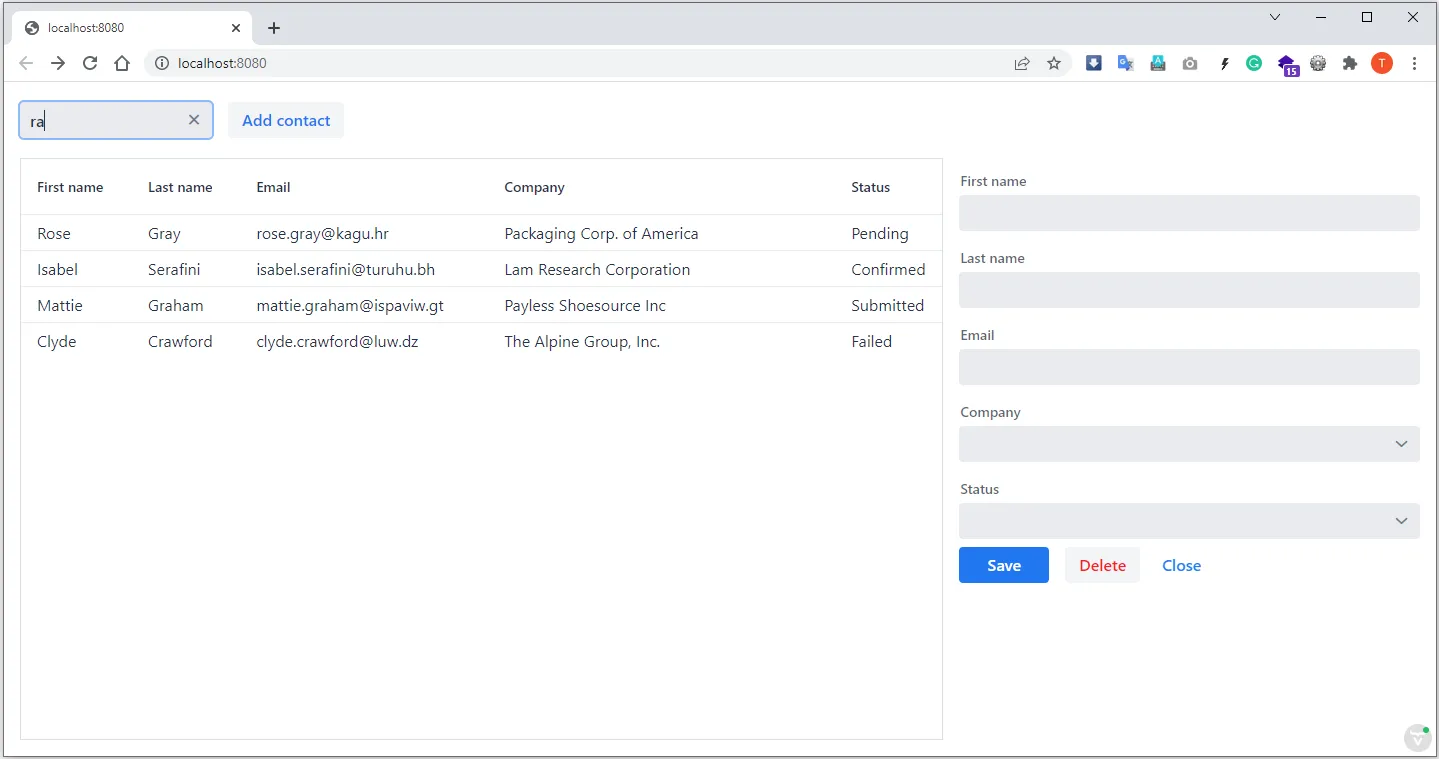
Refresh the http://localhost:8080/ browser tab.
The grid now shows the contacts from the service.

Enabling Filtering
We would like to filter the grid based on the first name and last name when the user types a value in the filter text field. For this, we add a value-change listener to the filtering text field so that we pass the value to the contact service.
Source code
MainView.java
MainView.java@Tag("main-view")
@JsModule("./src/views/main-view.ts")
@Route("")
public class MainView extends LitTemplate {
// Fields omitted
...
public MainView(ContactRepository contactRepository) {
this.contactRepository = contactRepository;
grid.addColumn(Contact::getFirstName).setHeader("First name");
grid.addColumn(Contact::getLastName).setHeader("Last name");
grid.addColumn(Contact::getEmail).setHeader("Email");
grid.addColumn(Contact::getCompany).setHeader("Company");
grid.addColumn(Contact::getStatus).setHeader("Status");
grid.getColumns().forEach(col -> col.setAutoWidth(true));
updateList();
filterText.setValueChangeMode(ValueChangeMode.LAZY); 1
filterText.addValueChangeListener(e -> updateList()); 2
}
private void updateList() {
String filterValue = filterText.getValue();
if (filterValue == null || filterValue.isBlank()) {
grid.setItems(contactRepository.findAll());
} else {
grid.setItems(contactRepository.findByFirstNameOrLastNameContainsIgnoreCase(filterValue, filterValue)); 3
}
}
}-
Puts text field value changes in lazy mode, so that the database isn’t queried on each keystroke.
-
Adds a value-change listener to the text field which tells the grid to update items.
-
If the filtering value is present, call
findByFirstNameOrLastNameContainsIgnoreCase()to fetch the records with first or last name containing the passed string.
Run the application. The grid is now searchable based on the name entered in the text field.
Proceed to the next chapter to connect your Contact Form to Java: Connect your Contact Form.
71BC5FBE-F6AE-428E-A683-F2EE46551A49