Creating a Main View
Applications often have a main view with a menu bar that shows a selection of sub-views. When the user clicks on a menu item, the sub-view is displayed.
The AppLayout component allows you to create typical main views that have a header, a menu, and a content area.
It works with full routing and navigation, making it easier to set these up than wiring them yourself. It’s responsive to changes in the screen size and orientation and adapts to both desktop and mobile browsers.
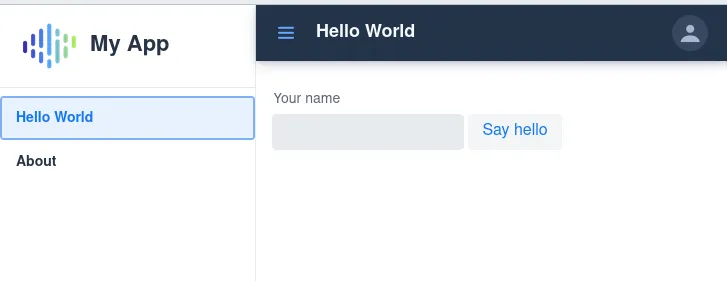
AppLayout is highly flexible and enables a range of main view layouts that can have either horizontal or vertical menus.
These can be displayed statically or opened by clicking, and have many customizable elements.
See the Design System documentation for a showcase of the features.
By default, the starter applications created with Vaadin Start use AppLayout to create the main view.
The Main View
A main view uses AppLayout by extending it and setting up the elements in the constructor.
You need to set the content for the header and the drawer.
You can have an application menu either horizontally in the header (navigation bar) or vertically in the drawer.
The following example shows how to create a main view with a vertical menu in the drawer, and a button to open and close it in the navigation bar:
Source code
MainView.java
package com.vaadin.demo.flow.application.mainview;

import java.util.Optional;

import com.vaadin.flow.component.Component;
import com.vaadin.flow.component.ComponentUtil;
import com.vaadin.flow.component.applayout.AppLayout;
import com.vaadin.flow.component.applayout.DrawerToggle;
import com.vaadin.flow.component.html.Image;
import com.vaadin.flow.component.html.H1;
import com.vaadin.flow.component.orderedlayout.FlexComponent;
import com.vaadin.flow.component.orderedlayout.HorizontalLayout;
import com.vaadin.flow.component.orderedlayout.VerticalLayout;
import com.vaadin.flow.component.tabs.Tab;
import com.vaadin.flow.component.tabs.Tabs;
import com.vaadin.flow.component.tabs.TabsVariant;
import com.vaadin.flow.router.AfterNavigationEvent;
import com.vaadin.flow.router.AfterNavigationObserver;
import com.vaadin.flow.router.PageTitle;
import com.vaadin.flow.router.RouterLink;

/**
 * The main view is a top-level placeholder for other views.
 */
@CssImport("./styles/views/main/main-view.css")
@JsModule("./styles/shared-styles.js")
public class MainView extends AppLayout implements AfterNavigationObserver {
    private final Tabs menu;
    private H1 viewTitle;

    public MainView() {
        // Use the drawer for the menu
        setPrimarySection(Section.DRAWER);

        // Make the nav bar a header
        addToNavbar(true, createHeaderContent());

        // Put the menu in the drawer
        menu = createMenu();
        addToDrawer(createDrawerContent(menu));
    }

    private Component createHeaderContent() {
        HorizontalLayout layout = new HorizontalLayout();

        // Configure styling for the header
        layout.setId("header");
        layout.getThemeList().set("dark", true);
        layout.setWidthFull();
        layout.setSpacing(false);
        layout.setAlignItems(FlexComponent.Alignment.CENTER);

        // Have the drawer toggle button on the left
        layout.add(new DrawerToggle());

        // Placeholder for the title of the current view.
        // The title will be set after navigation.
        viewTitle = new H1();
        layout.add(viewTitle);

        // A user icon
        layout.add(new Image("images/user.svg", "Avatar"));

        return layout;
    }

    private Component createDrawerContent(Tabs menu) {
        VerticalLayout layout = new VerticalLayout();

        // Configure styling for the drawer
        layout.setSizeFull();
        layout.setPadding(false);
        layout.setSpacing(false);
        layout.getThemeList().set("spacing-s", true);
        layout.setAlignItems(FlexComponent.Alignment.STRETCH);

        // Have a drawer header with an application logo
        HorizontalLayout logoLayout = new HorizontalLayout();
        logoLayout.setId("logo");
        logoLayout.setAlignItems(FlexComponent.Alignment.CENTER);
        logoLayout.add(new Image("images/logo.png", "My Project logo"));
        logoLayout.add(new H1("My Project"));

        // Display the logo and the menu in the drawer
        layout.add(logoLayout, menu);
        return layout;
    }

    private Tabs createMenu() {
        final Tabs tabs = new Tabs();
        tabs.setOrientation(Tabs.Orientation.VERTICAL);
        tabs.addThemeVariants(TabsVariant.LUMO_MINIMAL);
        tabs.setId("tabs");
        tabs.add(createMenuItems());
        return tabs;
    }

    private Component[] createMenuItems() {
        return new Tab[] { createTab("Hello World", HelloWorldView.class),
                createTab("Card List", CardListView.class),
                createTab("About", AboutView.class) };
    }

    private static Tab createTab(String text,
            Class<? extends Component> navigationTarget) {
        final Tab tab = new Tab();
        tab.add(new RouterLink(text, navigationTarget));
        ComponentUtil.setData(tab, Class.class, navigationTarget);
        return tab;
    }

    @Override
    public void afterNavigation(AfterNavigationEvent event) {
        // Select the tab corresponding to currently shown view
        getTabForComponent(getContent()).ifPresent(menu::setSelectedTab);

        // Set the view title in the header
        viewTitle.setText(getCurrentPageTitle());
    }

    private Optional<Tab> getTabForComponent(Component component) {
        return menu.getChildren()
                .filter(tab -> ComponentUtil.getData(tab, Class.class)
                        .equals(component.getClass()))
                .findFirst().map(Tab.class::cast);
    }

    private String getCurrentPageTitle() {
        return getContent().getClass().getAnnotation(PageTitle.class).value();
    }
}
You can customize the styling by specifying the path to the CSS files with the @CssImport annotation.
The style sheets should be placed inside the frontend folder in the project.
In a similar way, you can include JavaScript code with the JsModule annotation.
In the example, an included JavaScript file sets shared custom styles.
See Loading Resources for more details on importing the CSS and JavaScript resources.
The main view itself doesn’t have a route, as it’s only a frame for the actual content views.
Creating a Header
The navigation bar of AppLayout is a horizontal element that can contain any component, such as a header or a horizontal menu.
Applications created with the project builder use it to produce a header containing a menu toggle, a view title, and a user image.

You can use a DrawerToggle component to toggle displaying the drawer.
The following example creates such a header, using the viewTitle member in the main view class:
Source code
MainView.java
package com.vaadin.demo.flow.application.mainview;

import java.util.Optional;

import com.vaadin.flow.component.Component;
import com.vaadin.flow.component.ComponentUtil;
import com.vaadin.flow.component.applayout.AppLayout;
import com.vaadin.flow.component.applayout.DrawerToggle;
import com.vaadin.flow.component.html.Image;
import com.vaadin.flow.component.html.H1;
import com.vaadin.flow.component.orderedlayout.FlexComponent;
import com.vaadin.flow.component.orderedlayout.HorizontalLayout;
import com.vaadin.flow.component.orderedlayout.VerticalLayout;
import com.vaadin.flow.component.tabs.Tab;
import com.vaadin.flow.component.tabs.Tabs;
import com.vaadin.flow.component.tabs.TabsVariant;
import com.vaadin.flow.router.AfterNavigationEvent;
import com.vaadin.flow.router.AfterNavigationObserver;
import com.vaadin.flow.router.PageTitle;
import com.vaadin.flow.router.RouterLink;

/**
 * The main view is a top-level placeholder for other views.
 */
@CssImport("./styles/views/main/main-view.css")
@JsModule("./styles/shared-styles.js")
public class MainView extends AppLayout implements AfterNavigationObserver {
    private final Tabs menu;
    private H1 viewTitle;

    public MainView() {
        // Use the drawer for the menu
        setPrimarySection(Section.DRAWER);

        // Make the nav bar a header
        addToNavbar(true, createHeaderContent());

        // Put the menu in the drawer
        menu = createMenu();
        addToDrawer(createDrawerContent(menu));
    }

    private Component createHeaderContent() {
        HorizontalLayout layout = new HorizontalLayout();

        // Configure styling for the header
        layout.setId("header");
        layout.getThemeList().set("dark", true);
        layout.setWidthFull();
        layout.setSpacing(false);
        layout.setAlignItems(FlexComponent.Alignment.CENTER);

        // Have the drawer toggle button on the left
        layout.add(new DrawerToggle());

        // Placeholder for the title of the current view.
        // The title will be set after navigation.
        viewTitle = new H1();
        layout.add(viewTitle);

        // A user icon
        layout.add(new Image("images/user.svg", "Avatar"));

        return layout;
    }

    private Component createDrawerContent(Tabs menu) {
        VerticalLayout layout = new VerticalLayout();

        // Configure styling for the drawer
        layout.setSizeFull();
        layout.setPadding(false);
        layout.setSpacing(false);
        layout.getThemeList().set("spacing-s", true);
        layout.setAlignItems(FlexComponent.Alignment.STRETCH);

        // Have a drawer header with an application logo
        HorizontalLayout logoLayout = new HorizontalLayout();
        logoLayout.setId("logo");
        logoLayout.setAlignItems(FlexComponent.Alignment.CENTER);
        logoLayout.add(new Image("images/logo.png", "My Project logo"));
        logoLayout.add(new H1("My Project"));

        // Display the logo and the menu in the drawer
        layout.add(logoLayout, menu);
        return layout;
    }

    private Tabs createMenu() {
        final Tabs tabs = new Tabs();
        tabs.setOrientation(Tabs.Orientation.VERTICAL);
        tabs.addThemeVariants(TabsVariant.LUMO_MINIMAL);
        tabs.setId("tabs");
        tabs.add(createMenuItems());
        return tabs;
    }

    private Component[] createMenuItems() {
        return new Tab[] { createTab("Hello World", HelloWorldView.class),
                createTab("Card List", CardListView.class),
                createTab("About", AboutView.class) };
    }

    private static Tab createTab(String text,
            Class<? extends Component> navigationTarget) {
        final Tab tab = new Tab();
        tab.add(new RouterLink(text, navigationTarget));
        ComponentUtil.setData(tab, Class.class, navigationTarget);
        return tab;
    }

    @Override
    public void afterNavigation(AfterNavigationEvent event) {
        // Select the tab corresponding to currently shown view
        getTabForComponent(getContent()).ifPresent(menu::setSelectedTab);

        // Set the view title in the header
        viewTitle.setText(getCurrentPageTitle());
    }

    private Optional<Tab> getTabForComponent(Component component) {
        return menu.getChildren()
                .filter(tab -> ComponentUtil.getData(tab, Class.class)
                        .equals(component.getClass()))
                .findFirst().map(Tab.class::cast);
    }

    private String getCurrentPageTitle() {
        return getContent().getClass().getAnnotation(PageTitle.class).value();
    }
}
Creating a Menu
A menu can be displayed either in the navigation bar or in the drawer. In an application created by the project builder, it’s displayed in the drawer, as described here.
Source code
MainView.java
package com.vaadin.demo.flow.application.mainview;

import java.util.Optional;

import com.vaadin.flow.component.Component;
import com.vaadin.flow.component.ComponentUtil;
import com.vaadin.flow.component.applayout.AppLayout;
import com.vaadin.flow.component.applayout.DrawerToggle;
import com.vaadin.flow.component.html.Image;
import com.vaadin.flow.component.html.H1;
import com.vaadin.flow.component.orderedlayout.FlexComponent;
import com.vaadin.flow.component.orderedlayout.HorizontalLayout;
import com.vaadin.flow.component.orderedlayout.VerticalLayout;
import com.vaadin.flow.component.tabs.Tab;
import com.vaadin.flow.component.tabs.Tabs;
import com.vaadin.flow.component.tabs.TabsVariant;
import com.vaadin.flow.router.AfterNavigationEvent;
import com.vaadin.flow.router.AfterNavigationObserver;
import com.vaadin.flow.router.PageTitle;
import com.vaadin.flow.router.RouterLink;

/**
 * The main view is a top-level placeholder for other views.
 */
@CssImport("./styles/views/main/main-view.css")
@JsModule("./styles/shared-styles.js")
public class MainView extends AppLayout implements AfterNavigationObserver {
    private final Tabs menu;
    private H1 viewTitle;

    public MainView() {
        // Use the drawer for the menu
        setPrimarySection(Section.DRAWER);

        // Make the nav bar a header
        addToNavbar(true, createHeaderContent());

        // Put the menu in the drawer
        menu = createMenu();
        addToDrawer(createDrawerContent(menu));
    }

    private Component createHeaderContent() {
        HorizontalLayout layout = new HorizontalLayout();

        // Configure styling for the header
        layout.setId("header");
        layout.getThemeList().set("dark", true);
        layout.setWidthFull();
        layout.setSpacing(false);
        layout.setAlignItems(FlexComponent.Alignment.CENTER);

        // Have the drawer toggle button on the left
        layout.add(new DrawerToggle());

        // Placeholder for the title of the current view.
        // The title will be set after navigation.
        viewTitle = new H1();
        layout.add(viewTitle);

        // A user icon
        layout.add(new Image("images/user.svg", "Avatar"));

        return layout;
    }

    private Component createDrawerContent(Tabs menu) {
        VerticalLayout layout = new VerticalLayout();

        // Configure styling for the drawer
        layout.setSizeFull();
        layout.setPadding(false);
        layout.setSpacing(false);
        layout.getThemeList().set("spacing-s", true);
        layout.setAlignItems(FlexComponent.Alignment.STRETCH);

        // Have a drawer header with an application logo
        HorizontalLayout logoLayout = new HorizontalLayout();
        logoLayout.setId("logo");
        logoLayout.setAlignItems(FlexComponent.Alignment.CENTER);
        logoLayout.add(new Image("images/logo.png", "My Project logo"));
        logoLayout.add(new H1("My Project"));

        // Display the logo and the menu in the drawer
        layout.add(logoLayout, menu);
        return layout;
    }

    private Tabs createMenu() {
        final Tabs tabs = new Tabs();
        tabs.setOrientation(Tabs.Orientation.VERTICAL);
        tabs.addThemeVariants(TabsVariant.LUMO_MINIMAL);
        tabs.setId("tabs");
        tabs.add(createMenuItems());
        return tabs;
    }

    private Component[] createMenuItems() {
        return new Tab[] { createTab("Hello World", HelloWorldView.class),
                createTab("Card List", CardListView.class),
                createTab("About", AboutView.class) };
    }

    private static Tab createTab(String text,
            Class<? extends Component> navigationTarget) {
        final Tab tab = new Tab();
        tab.add(new RouterLink(text, navigationTarget));
        ComponentUtil.setData(tab, Class.class, navigationTarget);
        return tab;
    }

    @Override
    public void afterNavigation(AfterNavigationEvent event) {
        // Select the tab corresponding to currently shown view
        getTabForComponent(getContent()).ifPresent(menu::setSelectedTab);

        // Set the view title in the header
        viewTitle.setText(getCurrentPageTitle());
    }

    private Optional<Tab> getTabForComponent(Component component) {
        return menu.getChildren()
                .filter(tab -> ComponentUtil.getData(tab, Class.class)
                        .equals(component.getClass()))
                .findFirst().map(Tab.class::cast);
    }

    private String getCurrentPageTitle() {
        return getContent().getClass().getAnnotation(PageTitle.class).value();
    }
}
The actual menu is a vertical Tabs component.
It’s filled from a list of Tab components.
Each tab contains a RouterLink to the corresponding view.
Source code
MainView.java
package com.vaadin.demo.flow.application.mainview;

import java.util.Optional;

import com.vaadin.flow.component.Component;
import com.vaadin.flow.component.ComponentUtil;
import com.vaadin.flow.component.applayout.AppLayout;
import com.vaadin.flow.component.applayout.DrawerToggle;
import com.vaadin.flow.component.html.Image;
import com.vaadin.flow.component.html.H1;
import com.vaadin.flow.component.orderedlayout.FlexComponent;
import com.vaadin.flow.component.orderedlayout.HorizontalLayout;
import com.vaadin.flow.component.orderedlayout.VerticalLayout;
import com.vaadin.flow.component.tabs.Tab;
import com.vaadin.flow.component.tabs.Tabs;
import com.vaadin.flow.component.tabs.TabsVariant;
import com.vaadin.flow.router.AfterNavigationEvent;
import com.vaadin.flow.router.AfterNavigationObserver;
import com.vaadin.flow.router.PageTitle;
import com.vaadin.flow.router.RouterLink;

/**
 * The main view is a top-level placeholder for other views.
 */
@CssImport("./styles/views/main/main-view.css")
@JsModule("./styles/shared-styles.js")
public class MainView extends AppLayout implements AfterNavigationObserver {
    private final Tabs menu;
    private H1 viewTitle;

    public MainView() {
        // Use the drawer for the menu
        setPrimarySection(Section.DRAWER);

        // Make the nav bar a header
        addToNavbar(true, createHeaderContent());

        // Put the menu in the drawer
        menu = createMenu();
        addToDrawer(createDrawerContent(menu));
    }

    private Component createHeaderContent() {
        HorizontalLayout layout = new HorizontalLayout();

        // Configure styling for the header
        layout.setId("header");
        layout.getThemeList().set("dark", true);
        layout.setWidthFull();
        layout.setSpacing(false);
        layout.setAlignItems(FlexComponent.Alignment.CENTER);

        // Have the drawer toggle button on the left
        layout.add(new DrawerToggle());

        // Placeholder for the title of the current view.
        // The title will be set after navigation.
        viewTitle = new H1();
        layout.add(viewTitle);

        // A user icon
        layout.add(new Image("images/user.svg", "Avatar"));

        return layout;
    }

    private Component createDrawerContent(Tabs menu) {
        VerticalLayout layout = new VerticalLayout();

        // Configure styling for the drawer
        layout.setSizeFull();
        layout.setPadding(false);
        layout.setSpacing(false);
        layout.getThemeList().set("spacing-s", true);
        layout.setAlignItems(FlexComponent.Alignment.STRETCH);

        // Have a drawer header with an application logo
        HorizontalLayout logoLayout = new HorizontalLayout();
        logoLayout.setId("logo");
        logoLayout.setAlignItems(FlexComponent.Alignment.CENTER);
        logoLayout.add(new Image("images/logo.png", "My Project logo"));
        logoLayout.add(new H1("My Project"));

        // Display the logo and the menu in the drawer
        layout.add(logoLayout, menu);
        return layout;
    }

    private Tabs createMenu() {
        final Tabs tabs = new Tabs();
        tabs.setOrientation(Tabs.Orientation.VERTICAL);
        tabs.addThemeVariants(TabsVariant.LUMO_MINIMAL);
        tabs.setId("tabs");
        tabs.add(createMenuItems());
        return tabs;
    }

    private Component[] createMenuItems() {
        return new Tab[] { createTab("Hello World", HelloWorldView.class),
                createTab("Card List", CardListView.class),
                createTab("About", AboutView.class) };
    }

    private static Tab createTab(String text,
            Class<? extends Component> navigationTarget) {
        final Tab tab = new Tab();
        tab.add(new RouterLink(text, navigationTarget));
        ComponentUtil.setData(tab, Class.class, navigationTarget);
        return tab;
    }

    @Override
    public void afterNavigation(AfterNavigationEvent event) {
        // Select the tab corresponding to currently shown view
        getTabForComponent(getContent()).ifPresent(menu::setSelectedTab);

        // Set the view title in the header
        viewTitle.setText(getCurrentPageTitle());
    }

    private Optional<Tab> getTabForComponent(Component component) {
        return menu.getChildren()
                .filter(tab -> ComponentUtil.getData(tab, Class.class)
                        .equals(component.getClass()))
                .findFirst().map(Tab.class::cast);
    }

    private String getCurrentPageTitle() {
        return getContent().getClass().getAnnotation(PageTitle.class).value();
    }
}
Handling Navigation
When the user navigates to a view, the tab for the view should be highlighted by setting it as selected. You can also set the view title in header.
You can do both these things by overriding afterNavigation() in AppLayout, as follows:
Source code
MainView.java
package com.vaadin.demo.flow.application.mainview;

import java.util.Optional;

import com.vaadin.flow.component.Component;
import com.vaadin.flow.component.ComponentUtil;
import com.vaadin.flow.component.applayout.AppLayout;
import com.vaadin.flow.component.applayout.DrawerToggle;
import com.vaadin.flow.component.html.Image;
import com.vaadin.flow.component.html.H1;
import com.vaadin.flow.component.orderedlayout.FlexComponent;
import com.vaadin.flow.component.orderedlayout.HorizontalLayout;
import com.vaadin.flow.component.orderedlayout.VerticalLayout;
import com.vaadin.flow.component.tabs.Tab;
import com.vaadin.flow.component.tabs.Tabs;
import com.vaadin.flow.component.tabs.TabsVariant;
import com.vaadin.flow.router.AfterNavigationEvent;
import com.vaadin.flow.router.AfterNavigationObserver;
import com.vaadin.flow.router.PageTitle;
import com.vaadin.flow.router.RouterLink;

/**
 * The main view is a top-level placeholder for other views.
 */
@CssImport("./styles/views/main/main-view.css")
@JsModule("./styles/shared-styles.js")
public class MainView extends AppLayout implements AfterNavigationObserver {
    private final Tabs menu;
    private H1 viewTitle;

    public MainView() {
        // Use the drawer for the menu
        setPrimarySection(Section.DRAWER);

        // Make the nav bar a header
        addToNavbar(true, createHeaderContent());

        // Put the menu in the drawer
        menu = createMenu();
        addToDrawer(createDrawerContent(menu));
    }

    private Component createHeaderContent() {
        HorizontalLayout layout = new HorizontalLayout();

        // Configure styling for the header
        layout.setId("header");
        layout.getThemeList().set("dark", true);
        layout.setWidthFull();
        layout.setSpacing(false);
        layout.setAlignItems(FlexComponent.Alignment.CENTER);

        // Have the drawer toggle button on the left
        layout.add(new DrawerToggle());

        // Placeholder for the title of the current view.
        // The title will be set after navigation.
        viewTitle = new H1();
        layout.add(viewTitle);

        // A user icon
        layout.add(new Image("images/user.svg", "Avatar"));

        return layout;
    }

    private Component createDrawerContent(Tabs menu) {
        VerticalLayout layout = new VerticalLayout();

        // Configure styling for the drawer
        layout.setSizeFull();
        layout.setPadding(false);
        layout.setSpacing(false);
        layout.getThemeList().set("spacing-s", true);
        layout.setAlignItems(FlexComponent.Alignment.STRETCH);

        // Have a drawer header with an application logo
        HorizontalLayout logoLayout = new HorizontalLayout();
        logoLayout.setId("logo");
        logoLayout.setAlignItems(FlexComponent.Alignment.CENTER);
        logoLayout.add(new Image("images/logo.png", "My Project logo"));
        logoLayout.add(new H1("My Project"));

        // Display the logo and the menu in the drawer
        layout.add(logoLayout, menu);
        return layout;
    }

    private Tabs createMenu() {
        final Tabs tabs = new Tabs();
        tabs.setOrientation(Tabs.Orientation.VERTICAL);
        tabs.addThemeVariants(TabsVariant.LUMO_MINIMAL);
        tabs.setId("tabs");
        tabs.add(createMenuItems());
        return tabs;
    }

    private Component[] createMenuItems() {
        return new Tab[] { createTab("Hello World", HelloWorldView.class),
                createTab("Card List", CardListView.class),
                createTab("About", AboutView.class) };
    }

    private static Tab createTab(String text,
            Class<? extends Component> navigationTarget) {
        final Tab tab = new Tab();
        tab.add(new RouterLink(text, navigationTarget));
        ComponentUtil.setData(tab, Class.class, navigationTarget);
        return tab;
    }

    @Override
    public void afterNavigation(AfterNavigationEvent event) {
        // Select the tab corresponding to currently shown view
        getTabForComponent(getContent()).ifPresent(menu::setSelectedTab);

        // Set the view title in the header
        viewTitle.setText(getCurrentPageTitle());
    }

    private Optional<Tab> getTabForComponent(Component component) {
        return menu.getChildren()
                .filter(tab -> ComponentUtil.getData(tab, Class.class)
                        .equals(component.getClass()))
                .findFirst().map(Tab.class::cast);
    }

    private String getCurrentPageTitle() {
        return getContent().getClass().getAnnotation(PageTitle.class).value();
    }
}
The selected tab should correspond to the displayed content (the view).
You can retrieve it as follows:
Source code
MainView.java
package com.vaadin.demo.flow.application.mainview;

import java.util.Optional;

import com.vaadin.flow.component.Component;
import com.vaadin.flow.component.ComponentUtil;
import com.vaadin.flow.component.applayout.AppLayout;
import com.vaadin.flow.component.applayout.DrawerToggle;
import com.vaadin.flow.component.html.Image;
import com.vaadin.flow.component.html.H1;
import com.vaadin.flow.component.orderedlayout.FlexComponent;
import com.vaadin.flow.component.orderedlayout.HorizontalLayout;
import com.vaadin.flow.component.orderedlayout.VerticalLayout;
import com.vaadin.flow.component.tabs.Tab;
import com.vaadin.flow.component.tabs.Tabs;
import com.vaadin.flow.component.tabs.TabsVariant;
import com.vaadin.flow.router.AfterNavigationEvent;
import com.vaadin.flow.router.AfterNavigationObserver;
import com.vaadin.flow.router.PageTitle;
import com.vaadin.flow.router.RouterLink;

/**
 * The main view is a top-level placeholder for other views.
 */
@CssImport("./styles/views/main/main-view.css")
@JsModule("./styles/shared-styles.js")
public class MainView extends AppLayout implements AfterNavigationObserver {
    private final Tabs menu;
    private H1 viewTitle;

    public MainView() {
        // Use the drawer for the menu
        setPrimarySection(Section.DRAWER);

        // Make the nav bar a header
        addToNavbar(true, createHeaderContent());

        // Put the menu in the drawer
        menu = createMenu();
        addToDrawer(createDrawerContent(menu));
    }

    private Component createHeaderContent() {
        HorizontalLayout layout = new HorizontalLayout();

        // Configure styling for the header
        layout.setId("header");
        layout.getThemeList().set("dark", true);
        layout.setWidthFull();
        layout.setSpacing(false);
        layout.setAlignItems(FlexComponent.Alignment.CENTER);

        // Have the drawer toggle button on the left
        layout.add(new DrawerToggle());

        // Placeholder for the title of the current view.
        // The title will be set after navigation.
        viewTitle = new H1();
        layout.add(viewTitle);

        // A user icon
        layout.add(new Image("images/user.svg", "Avatar"));

        return layout;
    }

    private Component createDrawerContent(Tabs menu) {
        VerticalLayout layout = new VerticalLayout();

        // Configure styling for the drawer
        layout.setSizeFull();
        layout.setPadding(false);
        layout.setSpacing(false);
        layout.getThemeList().set("spacing-s", true);
        layout.setAlignItems(FlexComponent.Alignment.STRETCH);

        // Have a drawer header with an application logo
        HorizontalLayout logoLayout = new HorizontalLayout();
        logoLayout.setId("logo");
        logoLayout.setAlignItems(FlexComponent.Alignment.CENTER);
        logoLayout.add(new Image("images/logo.png", "My Project logo"));
        logoLayout.add(new H1("My Project"));

        // Display the logo and the menu in the drawer
        layout.add(logoLayout, menu);
        return layout;
    }

    private Tabs createMenu() {
        final Tabs tabs = new Tabs();
        tabs.setOrientation(Tabs.Orientation.VERTICAL);
        tabs.addThemeVariants(TabsVariant.LUMO_MINIMAL);
        tabs.setId("tabs");
        tabs.add(createMenuItems());
        return tabs;
    }

    private Component[] createMenuItems() {
        return new Tab[] { createTab("Hello World", HelloWorldView.class),
                createTab("Card List", CardListView.class),
                createTab("About", AboutView.class) };
    }

    private static Tab createTab(String text,
            Class<? extends Component> navigationTarget) {
        final Tab tab = new Tab();
        tab.add(new RouterLink(text, navigationTarget));
        ComponentUtil.setData(tab, Class.class, navigationTarget);
        return tab;
    }

    @Override
    public void afterNavigation(AfterNavigationEvent event) {
        // Select the tab corresponding to currently shown view
        getTabForComponent(getContent()).ifPresent(menu::setSelectedTab);

        // Set the view title in the header
        viewTitle.setText(getCurrentPageTitle());
    }

    private Optional<Tab> getTabForComponent(Component component) {
        return menu.getChildren()
                .filter(tab -> ComponentUtil.getData(tab, Class.class)
                        .equals(component.getClass()))
                .findFirst().map(Tab.class::cast);
    }

    private String getCurrentPageTitle() {
        return getContent().getClass().getAnnotation(PageTitle.class).value();
    }
}
You can get the view title from the PageTitle annotation given to the view (see Creating a View).
Source code
MainView.java
package com.vaadin.demo.flow.application.mainview;

import java.util.Optional;

import com.vaadin.flow.component.Component;
import com.vaadin.flow.component.ComponentUtil;
import com.vaadin.flow.component.applayout.AppLayout;
import com.vaadin.flow.component.applayout.DrawerToggle;
import com.vaadin.flow.component.html.Image;
import com.vaadin.flow.component.html.H1;
import com.vaadin.flow.component.orderedlayout.FlexComponent;
import com.vaadin.flow.component.orderedlayout.HorizontalLayout;
import com.vaadin.flow.component.orderedlayout.VerticalLayout;
import com.vaadin.flow.component.tabs.Tab;
import com.vaadin.flow.component.tabs.Tabs;
import com.vaadin.flow.component.tabs.TabsVariant;
import com.vaadin.flow.router.AfterNavigationEvent;
import com.vaadin.flow.router.AfterNavigationObserver;
import com.vaadin.flow.router.PageTitle;
import com.vaadin.flow.router.RouterLink;

/**
 * The main view is a top-level placeholder for other views.
 */
@CssImport("./styles/views/main/main-view.css")
@JsModule("./styles/shared-styles.js")
public class MainView extends AppLayout implements AfterNavigationObserver {
    private final Tabs menu;
    private H1 viewTitle;

    public MainView() {
        // Use the drawer for the menu
        setPrimarySection(Section.DRAWER);

        // Make the nav bar a header
        addToNavbar(true, createHeaderContent());

        // Put the menu in the drawer
        menu = createMenu();
        addToDrawer(createDrawerContent(menu));
    }

    private Component createHeaderContent() {
        HorizontalLayout layout = new HorizontalLayout();

        // Configure styling for the header
        layout.setId("header");
        layout.getThemeList().set("dark", true);
        layout.setWidthFull();
        layout.setSpacing(false);
        layout.setAlignItems(FlexComponent.Alignment.CENTER);

        // Have the drawer toggle button on the left
        layout.add(new DrawerToggle());

        // Placeholder for the title of the current view.
        // The title will be set after navigation.
        viewTitle = new H1();
        layout.add(viewTitle);

        // A user icon
        layout.add(new Image("images/user.svg", "Avatar"));

        return layout;
    }

    private Component createDrawerContent(Tabs menu) {
        VerticalLayout layout = new VerticalLayout();

        // Configure styling for the drawer
        layout.setSizeFull();
        layout.setPadding(false);
        layout.setSpacing(false);
        layout.getThemeList().set("spacing-s", true);
        layout.setAlignItems(FlexComponent.Alignment.STRETCH);

        // Have a drawer header with an application logo
        HorizontalLayout logoLayout = new HorizontalLayout();
        logoLayout.setId("logo");
        logoLayout.setAlignItems(FlexComponent.Alignment.CENTER);
        logoLayout.add(new Image("images/logo.png", "My Project logo"));
        logoLayout.add(new H1("My Project"));

        // Display the logo and the menu in the drawer
        layout.add(logoLayout, menu);
        return layout;
    }

    private Tabs createMenu() {
        final Tabs tabs = new Tabs();
        tabs.setOrientation(Tabs.Orientation.VERTICAL);
        tabs.addThemeVariants(TabsVariant.LUMO_MINIMAL);
        tabs.setId("tabs");
        tabs.add(createMenuItems());
        return tabs;
    }

    private Component[] createMenuItems() {
        return new Tab[] { createTab("Hello World", HelloWorldView.class),
                createTab("Card List", CardListView.class),
                createTab("About", AboutView.class) };
    }

    private static Tab createTab(String text,
            Class<? extends Component> navigationTarget) {
        final Tab tab = new Tab();
        tab.add(new RouterLink(text, navigationTarget));
        ComponentUtil.setData(tab, Class.class, navigationTarget);
        return tab;
    }

    @Override
    public void afterNavigation(AfterNavigationEvent event) {
        // Select the tab corresponding to currently shown view
        getTabForComponent(getContent()).ifPresent(menu::setSelectedTab);

        // Set the view title in the header
        viewTitle.setText(getCurrentPageTitle());
    }

    private Optional<Tab> getTabForComponent(Component component) {
        return menu.getChildren()
                .filter(tab -> ComponentUtil.getData(tab, Class.class)
                        .equals(component.getClass()))
                .findFirst().map(Tab.class::cast);
    }

    private String getCurrentPageTitle() {
        return getContent().getClass().getAnnotation(PageTitle.class).value();
    }
}
The same title is automatically set as the page title in the browser, so you don’t need to handle that.
Creating a View
Like any view, a view displayed in an AppLayout needs a route defined with the @Route annotation.
The route needs to be linked to the main view by using the layout parameter to pass the class object of the main view.
Source code
HelloWorldView.java
package com.vaadin.demo.flow.application.mainview;

import com.vaadin.flow.component.button.Button;
import com.vaadin.flow.component.notification.Notification;
import com.vaadin.flow.component.orderedlayout.HorizontalLayout;
import com.vaadin.flow.component.textfield.TextField;
import com.vaadin.flow.router.Route;
import com.vaadin.flow.router.PageTitle;
import com.vaadin.flow.router.RouteAlias;

@Route(value = "hello", layout = MainView.class)

@PageTitle("Hello World")

@CssImport("./styles/views/helloworld/hello-world-view.css")

@RouteAlias(value = "", layout = MainView.class)

public class HelloWorldView extends HorizontalLayout {
    private TextField name;
    private Button sayHello;

    public HelloWorldView() {
        setId("hello-world-view");
        name = new TextField("Your name");
        sayHello = new Button("Say hello");
        add(name, sayHello);
        setVerticalComponentAlignment(Alignment.END, name, sayHello);

        // Handle clicks
        sayHello.addClickListener(e -> {
            Notification.show("Hello " + name.getValue());
        });
    }

}
The main view itself didn’t have a route. To have an entry point to the main view, and often to the entire application, you need to define a default view. You do this using a route alias, as described in Default View.
Page Title
You can set the page title shown in the browser window or tab using the @PageTitle annotation.
Source code
HelloWorldView.java
package com.vaadin.demo.flow.application.mainview;

import com.vaadin.flow.component.button.Button;
import com.vaadin.flow.component.notification.Notification;
import com.vaadin.flow.component.orderedlayout.HorizontalLayout;
import com.vaadin.flow.component.textfield.TextField;
import com.vaadin.flow.router.Route;
import com.vaadin.flow.router.PageTitle;
import com.vaadin.flow.router.RouteAlias;

@Route(value = "hello", layout = MainView.class)

@PageTitle("Hello World")

@CssImport("./styles/views/helloworld/hello-world-view.css")

@RouteAlias(value = "", layout = MainView.class)

public class HelloWorldView extends HorizontalLayout {
    private TextField name;
    private Button sayHello;

    public HelloWorldView() {
        setId("hello-world-view");
        name = new TextField("Your name");
        sayHello = new Button("Say hello");
        add(name, sayHello);
        setVerticalComponentAlignment(Alignment.END, name, sayHello);

        // Handle clicks
        sayHello.addClickListener(e -> {
            Notification.show("Hello " + name.getValue());
        });
    }

}
You can use the page title in a view header or breadcrumbs, as shown in Handling Navigation.
Styling a View
You can define custom styling for the view with the @CssImport annotation.
Source code
HelloWorldView.java
package com.vaadin.demo.flow.application.mainview;

import com.vaadin.flow.component.button.Button;
import com.vaadin.flow.component.notification.Notification;
import com.vaadin.flow.component.orderedlayout.HorizontalLayout;
import com.vaadin.flow.component.textfield.TextField;
import com.vaadin.flow.router.Route;
import com.vaadin.flow.router.PageTitle;
import com.vaadin.flow.router.RouteAlias;

@Route(value = "hello", layout = MainView.class)

@PageTitle("Hello World")

@CssImport("./styles/views/helloworld/hello-world-view.css")

@RouteAlias(value = "", layout = MainView.class)

public class HelloWorldView extends HorizontalLayout {
    private TextField name;
    private Button sayHello;

    public HelloWorldView() {
        setId("hello-world-view");
        name = new TextField("Your name");
        sayHello = new Button("Say hello");
        add(name, sayHello);
        setVerticalComponentAlignment(Alignment.END, name, sayHello);

        // Handle clicks
        sayHello.addClickListener(e -> {
            Notification.show("Hello " + name.getValue());
        });
    }

}
Default View
Most applications need an entry point.
You can define a view as the default view by defining the route of the main view with @RouteAlias.
The value defining the route needs to be empty for the root route.
You also need to define the enclosing main view with the layout parameter, as for the earlier route.
Source code
HelloWorldView.java
package com.vaadin.demo.flow.application.mainview;

import com.vaadin.flow.component.button.Button;
import com.vaadin.flow.component.notification.Notification;
import com.vaadin.flow.component.orderedlayout.HorizontalLayout;
import com.vaadin.flow.component.textfield.TextField;
import com.vaadin.flow.router.Route;
import com.vaadin.flow.router.PageTitle;
import com.vaadin.flow.router.RouteAlias;

@Route(value = "hello", layout = MainView.class)

@PageTitle("Hello World")

@CssImport("./styles/views/helloworld/hello-world-view.css")

@RouteAlias(value = "", layout = MainView.class)

public class HelloWorldView extends HorizontalLayout {
    private TextField name;
    private Button sayHello;

    public HelloWorldView() {
        setId("hello-world-view");
        name = new TextField("Your name");
        sayHello = new Button("Say hello");
        add(name, sayHello);
        setVerticalComponentAlignment(Alignment.END, name, sayHello);

        // Handle clicks
        sayHello.addClickListener(e -> {
            Notification.show("Hello " + name.getValue());
        });
    }

}
You could also have /main for the main view and then /main/hello for the sub-view.
Finishing the View
Otherwise a view displayed in AppLayout is like any other view or a composite component.
Source code
HelloWorldView.java
package com.vaadin.demo.flow.application.mainview;

import com.vaadin.flow.component.button.Button;
import com.vaadin.flow.component.notification.Notification;
import com.vaadin.flow.component.orderedlayout.HorizontalLayout;
import com.vaadin.flow.component.textfield.TextField;
import com.vaadin.flow.router.Route;
import com.vaadin.flow.router.PageTitle;
import com.vaadin.flow.router.RouteAlias;

@Route(value = "hello", layout = MainView.class)

@PageTitle("Hello World")

@CssImport("./styles/views/helloworld/hello-world-view.css")

@RouteAlias(value = "", layout = MainView.class)

public class HelloWorldView extends HorizontalLayout {
    private TextField name;
    private Button sayHello;

    public HelloWorldView() {
        setId("hello-world-view");
        name = new TextField("Your name");
        sayHello = new Button("Say hello");
        add(name, sayHello);
        setVerticalComponentAlignment(Alignment.END, name, sayHello);

        // Handle clicks
        sayHello.addClickListener(e -> {
            Notification.show("Hello " + name.getValue());
        });
    }

}
7CAF8324-78D4-46E3-8825-FD4A6E45DB62