Sending email from Java Applications
- Introduction
- How does Email Work?
- Configuring a Test SMTP Server
- JavaMail API
- Apache Commons Email
- Spring Email Support
- An Example Web Application
- Which Approach to Use?
Introduction
Sending email is a common feature required in many business applications. From simple notifications containing plain text to complex reports with links and multiple attachments, email is a common way of asynchronous communication with end users.
This tutorial shows how to send email messages in two different ways:
-
Using the Apache Commons Email library which offers a simplified API on top of the JavaMail API.
-
Using Spring Mail Support, a utility library that encapsulates the specifics of the mailing system, also implemented on top of the JavaMail API.
Although email operations include sending, receiving, deleting, setting flags, and others depending on the specific email server in use, this tutorial only discusses email sending through SMTP.
How does Email Work?
Let’s start with a quick overview of the email communication process. It all begins with the end user composing a message using a client desktop or web application. The message is sent through multiple networking devices until it reaches its destination at the recipient’s machine. The relevant elements of this process are depicted in the following figure:
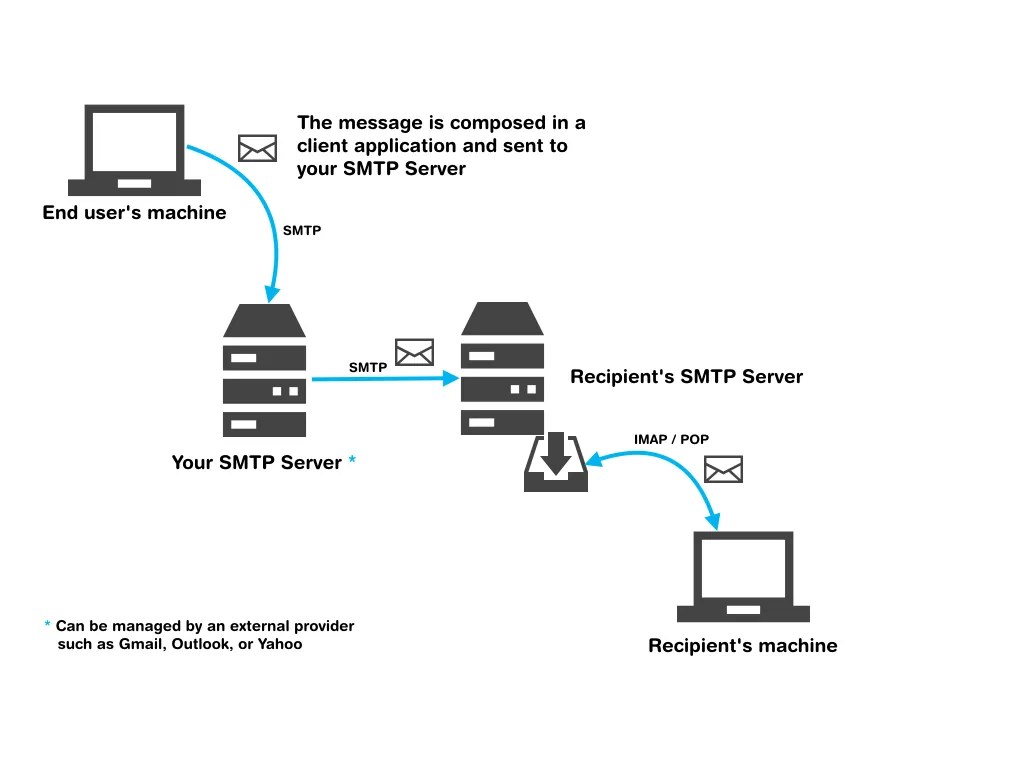
Once the end user has triggered the action to send the email, the client application connects to its configured email server, the SMTP Server, which can be described as a program capable of communicating with other SMTP Servers using the Simple Mail Transfer Protocol (SMTP). This SMTP Server can be your own server running software, such as Apache James Server, Postfix, Sendmail, qmail, or a server managed by a third party, such as Gmail, Outlook, and Yahoo Mail.
Your SMTP Server (managed by yourself or by a third party) sends the email message to the recipient’s SMTP Server. Once the message reaches its destination, it is stored in the recipient’s inbox at the recipient’s SMTP Server. Finally, the recipient can read the message by requesting it from the SMTP Server.
Nowadays, SMTP is used to send email messages and IMAP (Internet Message Access Protocol) or POP (Post Office Protocol) to receive messages. In this case, your client application will use SMTP to send the message and the recipient’s SMTP Server will use SMTP to receive the message and IMAP or POP to serve the message when the recipient requests it. You don’t need to understand the specifics of these protocols in order to send email from a Java application but you might want to understand them deeper, if you are planning to implement operations such as receiving, deleting, and setting flags, or if your applications require sending zillions of emails in a batch.
Configuring a Test SMTP Server
For the purposes of this tutorial, we are going to use FakeSMTP, a free email server that offers a convenient GUI for testing email sending. You can download it from the following website: https://nilhcem.github.io/FakeSMTP/download.html
Extract the content of the downloaded zip file and execute the extracted jar. You can configure a port in the Listening port option (we will use 9090 in this tutorial). Once ready, click the Start server button to start getting emails.
Please note that with FakeSMTP you don’t need to provide any authentication values (they will be ignored).
JavaMail API
The JavaMail API is defined by the JSR 919 and is included in Java EE (but not in EJB Lite nor Java EE Web Profile). It provides an abstraction over mail systems which makes its API more verbose than those of Apache Commons Email and Spring Mail Support. We are not covering JavaMail in this tutorial. However, we provide an example application that uses JavaMail to send emails. You can get the code from the following link: https://github.com/alejandro-du/java-email-tutorial/blob/master/javamail-example/src/main/java/com/example/javamail/JavaMailService.java
Apache Commons Email
Apache Commons Email is built on top of JavaMail and hides much of its complexity. Therefore, it offers an API that simplifies the code to implement email sending from Java applications.
You must download the Commons Email jar file from the following link: https://commons.apache.org/proper/commons-email/download_email.cgi, or add the dependency using a dependency management system. For example, if you are using Maven, you can add the following to your pom.xml:
Source code
XML
<dependency>
   <groupId>org.apache.commons</groupId>
   <artifactId>commons-email</artifactId>
   <version>1.4</version>
</dependency>
With Commons
Email, you can send emails with HTML content using the HtmlEmail class.
This class offers an abstraction to send emails with attachments. For
example, during testing you can configure the HtmlEmail instance as
follows:
Source code
Java
HtmlEmail email = new HtmlEmail();
email.setHostName("localhost");
email.setSmtpPort(9090);
email.setAuthentication("sender@test.com", "password");
Or if you want to use Gmail:
Source code
Java
HtmlEmail email = new HtmlEmail();
email.setHostName("smtp.gmail.com");
email.setSmtpPort(465);
email.setSSLOnConnect(true);
email.setAuthentication("your-account-name@gmail.com", "your-password");
Keep in mind that hard-coding connection parameters like this is not good practice. Instead, you should read the values from an external source (such as a properties file) so that you can use different configurations for different environments (development, testing, production).
You can use the email instance to set the sender’s email address, add recipients, and set the subject and the text of the message:
Source code
Java
email.setFrom("sender@test.com");
email.addTo("recipient1@test.com", "recipient2@test.com");
email.setSubject("The subject");
email.setHtmlMsg("This is the message.");
The HtmlEmail
class also exposes the attach method to add attachments to the message.
You can provide these attachments as an InputStream so that its content
can be dynamically generated at runtime if required (FileInputStream is
always an option in case you have File instances instead):
Source code
Java
ByteArrayDataSource dataSource = new ByteArrayDataSource(inputStream, "text/plain");
DataHandler dataHandler = new DataHandler(dataSource);
email.attach(dataSource, "attachment.txt", "description");
The attach
method is overloaded with multiple implementations offering different
ways to attach files. The one used in the previous example requires to
specify a description for the attachment.
You can find a complete implementation of a utility class that implements email sending using the Commons Email in the following link: https://github.com/alejandro-du/java-email-tutorial/blob/master/commons-email-example/src/main/java/com/example/javamail/CommonsEmailService.java
Spring Email Support
Similarly to
the Apache Commons Email library, Spring offers an API on top of
JavaMail which abstracts away the details of the mailing system. You
need to add the spring-context-support dependency using Maven or Gradle.
There is no official download site for this dependency, but you can
download it directly from the following link if required: https://mvnrepository.com/artifact/org.springframework/spring-context-support/4.2.4.RELEASE.
If you are using Maven you can add the following dependency to your pom.xml:
Source code
XML
<dependency>
  <groupId>org.springframework</groupId>
  <artifactId>spring-context-support</artifactId>
  <version>4.2.4.RELEASE</version>
</dependency>
You start by
obtaining an implementation of the MailSender interface. Spring provides
the JavaMailSenderImpl class that implements MailSender. You can obtain
an instance of this class either by configuring and injecting a bean, if
you are already using Spring Framework and have configured an
application context, or by direct instantiation:
Source code
Java
JavaMailSenderImpl mailSender = new JavaMailSenderImpl();The
connection to the SMTP server is configured using properties. The
following example shows how to configure the mailSender to connect to
Gmail’s SMTP server:
Source code
Java
Properties properties = new Properties();
properties.put("mail.smtp.host", "smtp.gmail.com");
properties.put("mail.smtp.port", "465");
properties.put("mail.smtp.ssl.enable", "true");

mailSender.setJavaMailProperties(properties);
Alternatively,
you can use methods defined in the MailSender interface to configure the
host and port, but in the case of SMTP servers using SSL, you will have
to provide at least the mail.smtp.ssl.enable property through a
Properties object. For this reason, we prefer to configure all the
settings using properties in this example.
The authentication credentials are configured using the MailSender instance
as follows:
Source code
Java
mailSender.setUsername("sender@test.com");
mailSender.setPassword("password");
The next step is to create a MimeMessage and a MimeMessageHelper:
Source code
Java
MimeMessage message = mailSender.createMimeMessage();
MimeMessageHelper helper = new MimeMessageHelper("The message body", true);
The second
parameter is set to true to create a multipart message that will allow
us to add attachments later. The MimeMessageHelper exposes a handful of
methods to directly set up the message:
Source code
Java
helper.setFrom("sender@test.com");
helper.setSubject("subject");
helper.setText(text, true); // true to activate multipart
helper.addTo("recipient@test.com");
There are
several overloaded methods in the MimeMessageHelper that provide
different ways to attach files. The following example uses the
ByteArrayDataSource class to provide an attachment from an InputStream:
Source code
Java
ByteArrayDataSource dataSource = new ByteArrayDataSource(inputStream, "text/plain");
helper.addAttachment("file.txt", dataSource);
Finally, you can send the email using the MailSender instance:
Source code
Java
mailSender.send(message);You can find a complete implementation of a utility class that implements email sending using Spring Email Support in the following link: https://github.com/alejandro-du/java-email-tutorial/blob/master/spring-mail-example/src/main/java/com/example/javamail/SpringEmailService.java
An Example Web Application
Let’s create a Java web application to test this functionality. The application consists of a text field where users can type an email address and a button that will send an email with an attachment to the specified address.
We are going to use the Vaadin Framework which allows us to quickly create a web application by using only the Java Programming Language. This way, we don’t need to worry about writing any HTML or JavaScript at all.
Although most IDEs have plugins to easily generate a new Vaadin project, we are going to use a Maven archetype to generate the project that you can later import into your favorite IDE. You can create a new Vaadin project with Maven using the following command line:
Source code
mvn archetype:generate -DarchetypeGroupId=com.vaadin -DarchetypeArtifactId=vaadin-archetype-application -DarchetypeVersion=7.6.2After
specifying a group and artifact id, you can run mvn clean install to
compile the project and mvn jetty:run to deploy and run the application.
Open your browser and navigate to http://localhost:8080 to see the application
running.
Open the MyUI.java file (it should be the only Java file in the project) and change the init method to the following:
Source code
Java
//... imports mostly from com.vaadin package

public class MyUI extends UI {
   @Override
   protected void init(VaadinRequest vaadinRequest) {
       // the text field where users will specify their email address
       TextField textField = new TextField("Your email:");

       // a button with a click listener that sends the email
       Button button = new Button("Send me the PDF", e -> sendEmail(textField.getValue()));

       // a layout containing the previous components
       VerticalLayout layout = new VerticalLayout(textField, button);
       layout.setMargin(true);
       layout.setSpacing(true);

       setContent(layout); // sets the content for this UI
   }
   ...
}
Add the missing sendEmail method and implement it as follows:
Source code
Java
private void sendEmail(String to) {
    try {
        // all values as variables to clarify its usage
        InputStream inputStream = getClass().getResourceAsStream("/dock-magazine.pdf");
        String from = "sender@test.com";
        String subject = "Your PDF";
        String text = "Here there is your <b>PDF</b> file!";
        String fileName = "file.pdf";
        String mimeType = "application/pdf";

        CommonsEmailService.send(from, to, subject, text, inputStream, fileName, mimeType);

        Notification.show("Email sent");
    } catch (MessagingException | IOException e) {
        e.printStackTrace();
        Notification.show("Error sending the email", Notification.Type.ERROR_MESSAGE);
    }
}
At this point
you might want to create the missing CommonsEmailService class (or
SpringMailService class) and implement the send method as an exercise.
But if you prefer, you can take the example implementation from the
following link: https://github.com/alejandro-du/java-email-tutorial/blob/master/commons-email-example/src/main/java/com/example/javamail/CommonsEmailService.java
Finally, add a PDF file with the name file.pdf in the resources directory of your Maven project. You may want to use a small file so that SMTP servers would be able to accept it.
Stop the Jetty server if necessary, run mvn clean install again, and reload the
web page in the browser.
If you have FakeSMTP running, you should be able to see the email messages sent through the web application.
Which Approach to Use?
Choosing an option depends on different factors. However, I would recommend to use Spring Email Support if you are developing a Spring application. If not, go with Apache Commons Email, it offers the most intuitive API. Also, Apache Commons Email jar is lighter than the spring-context-support jar, as the later includes more than just the email support classes. Using the JavaMail API directly may be convenient only when you need lower level interaction with the mailing system.
You can experiment with the code by downloading the example web applications from GitHub:
Source code
$ git clone https://github.com/alejandro-du/java-email-tutorial
$ cd java-email-tutorial
$ cd commons-email-example
# (Or cd spring-mail-example)

$ mvn clean install
$ mvn jetty:run
Don’t forget to configure run FakeSMTP before using the web application deployed at http://localhost:8080.