Starting It Simple With Eclipse
Let us first take the easy way and create a simple component with Eclipse. While you can develop new widgets with any IDE or even without, you may find Eclipse and the Vaadin Plugin for it useful, as it automates all the basic routines of widget development, most importantly the creation of new widgets.
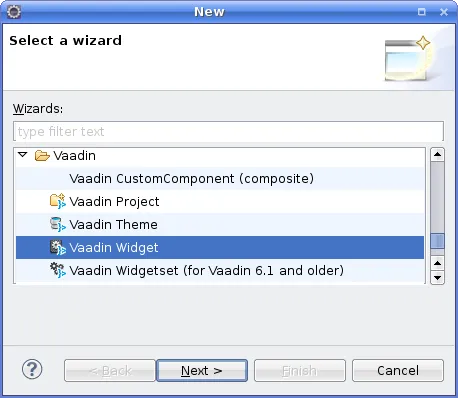
Creating a Widget
-
Right-click the project in the Project Explorer and select .
-
In the wizard selection, select and click .
-
In the New Component Wizard, make the following settings.
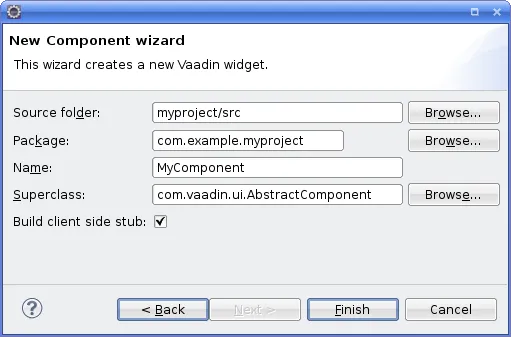
- Source folder
-
The root folder of the entire source tree. The default value is the default source tree of your project, and you should normally leave it unchanged unless you have a different project structure.
- Package
-
The parent package under which the new server-side component should be created. If the project does not already have a widget set, one is created under this package in the widgetset subpackage. The subpackage will contain the .gwt.xml descriptor that defines the widget set and the new widget stub under the widgetset.client subpackage.
- Name
-
The class name of the new server-side component. The name of the client-side widget stub will be the same but with "- Widget" suffix, for example, MyComponentWidget. You can rename the classes afterwards.
- Superclass
-
The superclass of the server-side component. It is AbstractComponent by default, but com.vaadin.ui.AbstractField or com.vaadin.ui.AbstractSelect are other commonly used superclasses. If you are extending an existing component, you should select it as the superclass. You can easily change the superclass later.
- Template
-
Select which template to use. The default is Full fledged, which creates the server-side component, the client-side widget, the connector, a shared state object, and an RPC object. The Connector only leaves the shared state and RPC objects out.
Finally, click to create the new component.
The wizard will:
-
Create a server-side component stub in the base package
-
If the project does not already have a widget set, the wizard creates a GWT module descriptor file ( .gwt.xml) in the base package and modifies the servlet class or the web.xml deployment descriptor to specify the widget set class name parameter for the application
-
Create a client-side widget stub (along with the connector and shared state and RPC stubs) in the client.componentname package under the base package
The structure of the server-side component and the client-side widget, and the serialization of component state between them, is explained in the subsequent sections of this chapter.
To compile the widget set, click the button in the Eclipse toolbar. See Compiling the Widget Set for details. After the compilation finishes, you should be able to run your application as before, but using the new widget set. The compilation result is written under the WebContent/VAADIN/widgetsets folder. When you need to recompile the widget set in Eclipse, see Compiling the Widget Set. For detailed information on compiling widget sets, see "Compiling a Client-Side Module".
The following setting is inserted in the web.xml deployment descriptor to enable the widget set:
Source code
<init-param>
    <description>Application widgetset</description>
    <param-name>widgetset</param-name>
    <param-value>com.example.myproject.widgetset.MyprojectApplicationWidgetset</param-value>
</init-param>
You can refactor the package structure if you find need for it, but GWT compiler requires that the client-side code must always be stored under a package named " client" or a package defined with a source element in the widget set descriptor.
Compiling the Widget Set
After you edit a widget, you need to compile the widget set. The Vaadin Plugin for Eclipse automatically suggests to compile the widget set in various situations, such as when you save a client-side source file. If this gets annoying, you can disable the automatic recompilation in the Vaadin category in project settings, by selecting the Suspend automatic widgetset builds option.
You can compile the widget set manually by clicking the button in the Eclipse toolbar, shown in The Button in Eclipse Toolbar, while the project is open and selected. If the project has multiple widget set definition files, you need to select the one to compile in the Project Explorer.

The compilation progress is shown in the Console panel in Eclipse, illustrated in Compiling a Widget Set. You should note especially the list of widget sets found in the class path.
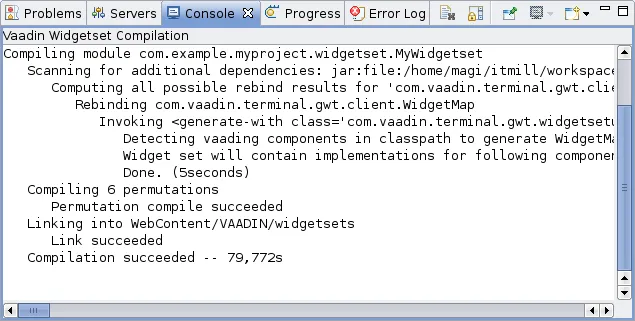
The compilation output is written under the WebContent/VAADIN/widgetsets folder, in a widget set specific folder.
You can speed up the compilation significantly by compiling the widget set only for your browser during development. The generated .gwt.xml descriptor stub includes a disabled element that specifies the target browser. See "Limiting Compilation Targets" for more details on setting the user-agent property.
For more information on compiling widget sets, see "Compiling a Client-Side Module". Should you compile a widget set outside Eclipse, you need to refresh the project by selecting it in Project Explorer and pressing F5.