MVC Basics in IT Mill Toolkit
The Goal

We want to create a simple UI following the MVC pattern using the IT Mill Toolkit. The project components need to have low coupling and follow an enterprise design. In our example we also want to retrieve information from a database and display it in the view. The different parts of the UI need also to be able to communicate with each other.
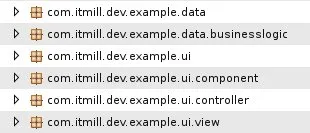
We have divided the project in two layers; A UI layer, which purpose is to display information to the user, and a Data layer which has no knowledge of the Toolkit and which is only responsible for retrieving and storing data. The reason for dividing the project up in these layers is so that, if we choose, we can easily use multiple servers.
The Data layer
For the example we have created a ''Database.java'' class which will function as our database. We will never call upon this database directly from the UI. To access the data we will have the UI controllers contact the ''Authentication.java'' or ''Channel.java'' which will retrieve it for us.


The UI layer
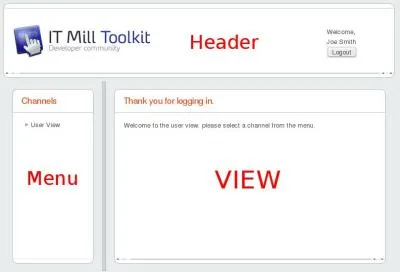
First off lets discuss what we mean with ''View''. The Toolkit is such an flexible tool that the term needs to be defined on pretty much a case by case basis. In this example we have decided to let the center portion of the UI be the View.
In our example the UI consists of the Header, Menu and View. When the user chooses a item from the menu we need to easily update the View or in our case, switch View completely. We want to do this in such a way that we don’t couple the different UI components together so that we can easily add extra components if needed. To achieve this we use the Observer pattern which is easily implemented in the Toolkit using ''Events''.
The Controller
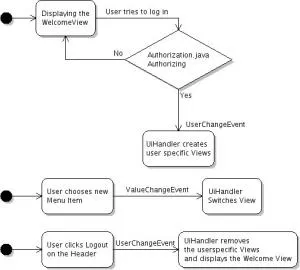
We started off by creating the ''UiHandler.java'' class where we define which components we want to add to our UI. This class will also work as the mediator for the different components by adding ''Listeners'' and monitoring for events in the components.
Source code
Java
public class UiHandler extends VerticalLayout {
  // Portions of the application that exist at all times.
  private Header header;
  private WelcomeView defaultView;

  // The views that are shown to logged users.
  private UserView userView;
  private ChannelView itmillView;
  private ChannelView ubuntuView;

  private Menu menu;
  private SplitPanel menusplit;

  // Used to keep track of the current main view.
  private HashMap<String, AbstractView> viewList = new HashMap<String, AbstractView>();

...
}
We want to listen for changes in the menu which indicates that the user has chosen a new item and wants to change view. The menu consists of a Tree component which generates a ''ValueChangeEvent'' when a new item is selected from the tree. We catch these types of events in the UiHandler by adding a UserChangeListener in the ExampleApplication.java init() method.
Source code
Java
public class ExampleApplication extends Application implements TransactionListener {
  public UiHandler ui;

  @Override
  public void init() {
    // sets the current application to ThreadLocal.
    setProject(this);

    // Creates the Main Window and then hands over all UI work to the
    // UiHandler
    setMainWindow(new Window("MVC Example Application"));

    setTheme("MVCExampleDefault");

    ui = new UiHandler(getMainWindow());

    // Adds a TransactionListener for this class.
    getContext().addTransactionListener(this);

    // Register user change listener for UiHandler.
    addListener(ui);
  }
}
Source code
Java
public class UiHandler extends VerticalLayout implements UserChangeListener {
  public void applicationUserChanged(UserChangeEvent event) {
    // The value is null if the user logs out.
    if (event.getNewUser() == null) {
      userLoggedOut();
    } else {
      userLoggedIn();
    }
  }
}
The menu is now isolated with no knowledge about other components. This gives us great flexibility with adding new instances of the menu if needed.
The View
Following the MVC-pattern we have removed all control logic from the Views and transferred it to the controllers. The Views now consist only of the elements needed to display the data while the controllers handle the retrieving and manipulating of said data. The separation between control logic and View is done so that, if needed, we may have many different views displaying the same data without having to copy code. We can now simply add a controller to each new View to gain the same data functionality as any other View.
Source code
Java
public class ChannelView extends AbstractView {
  protected Window confirm;
  private ChannelController controller;

  public void sendMessage() {
    // Let the controller modify the current text on the inputline and
    // insert it into the channel text table.
    controller.writeToChannel(inputLine.getValue(), textTable);
    ...
  }
}
When creating a project you may want to have different views displayed at different times sosetting the view is an easy task. We are using the SplitPanel component to create two sections in the UI. Adding components to the ''SplitPanel'' is achieved with ''setFirstComponent(c)'' to add on the left side and ''setSecondComponent(c)'' to add on the right side of the split. By our definition, our view is the area on the right side of the split. Had we been using the Layout component we could have achieved the same result using ''replaceComponent(oldComponent, newComponent)''.
Source code
Java
// Set the menu on the left side of the split.
menusplit.setFirstComponent(menu);

// Set the user welcome View on the right side.
setMainView(userView);

...

public void setMainView(AbstractView c) {
  menusplit.setSecondComponent(c);
}
Setting/Switching the View is now as easy as simply replacing the second component in the the SplitPanel using ''setMainView''.
The source code for this project can be found in the MVCBasicsProject.zip file where we’ve added the .project and .classpath for your convinience, in case you are a Eclipse user. Remove these files if you use some other IDE.