Navigating in an Application
Plain Vaadin applications do not have normal web page navigation as they usually run on a single page, as all Ajax applications do. Quite commonly, however, applications have different views between which the user should be able to navigate. Also users often need to have direct links to specific views. The Navigator in Vaadin can be used for most cases of navigation. Views managed by the navigator automatically get a distinct URI, which can be used to be able to bookmark the views and their states and to go back and forward in the browser history.
Setting Up for Navigation
The Navigator class manages a collection of views that implement the View interface. The views can be either registered beforehand or acquired from a view provider. When registering, the views must have a name identifier and be added to a navigator with addView(). You can register new views at any point. Once registered, you can navigate to them with navigateTo().
Navigator manages navigation in a component container, which can be either a ComponentContainer (most layouts) or a SingleComponentContainer ( UI, Panel, or Window). The component container is managed through a ViewDisplay. Two view displays are defined: ComponentContainerViewDisplay and SingleComponentContainerViewDisplay, for the respective component container types. Normally, you can let the navigator create the view display internally, as we do in the example below, but you can also create it yourself to customize it.
Let us consider the following UI with two views: start and main. Here, we define their names with enums to be typesafe. We manage the navigation with the UI class itself, which is a SingleComponentContainer.
Source code
Java
public class NavigatorUI extends UI {
    Navigator navigator;
    protected static final String MAINVIEW = "main";

    @Override
    protected void init(VaadinRequest request) {
        getPage().setTitle("Navigation Example");

        // Create a navigator to control the views
        navigator = new Navigator(this, this);

        // Create and register the views
        navigator.addView("", new StartView());
        navigator.addView(MAINVIEW, new MainView());
    }
}
The Navigator automatically parses the URI to identify and show the View. The browser navigation back and forward are also handled by it.
Starting from 8.2.0 there is also PushState based navigation. This new way for the Navigator to manage URLs is described here as well. To enable this feature, add the PushStateNavigation annotation to your UI.
View Providers
You can create new views dynamically using a view provider that implements the ViewProvider interface. A provider is registered in Navigator with addProvider().
The ClassBasedViewProvider is a view provider that can dynamically create new instances of a specified view class based on the view name.
The StaticViewProvider returns an existing view instance based on the view name. The addView() in Navigator is actually just a shorthand for creating a static view provider for each registered view.
View Change Listeners
You can handle view changes also by implementing a ViewChangeListener and adding it to a Navigator. When a view change occurs, a listener receives a ViewChangeEvent object, which has references to the old and the activated view, the name of the activated view, as well as the parameters (the part of of URI after the viewname).
Implementing a View
Views can be any objects that implement the View interface. When the navigateTo() is called for the navigator, or the application is opened with the URI associated with the view, the navigator switches to the view and calls its enter() method.
To continue with the example, consider the following simple start view that just lets the user to navigate to the main view. It only pops up a notification when the user navigates to it and displays the navigation button.
Source code
Java
/** A start view for navigating to the main view */
public class StartView extends VerticalLayout implements View {
    public StartView() {
        setSizeFull();

        Button button = new Button("Go to Main View",
                new Button.ClickListener() {
            @Override
            public void buttonClick(ClickEvent event) {
                navigator.navigateTo(MAINVIEW);
            }
        });
        addComponent(button);
        setComponentAlignment(button, Alignment.MIDDLE_CENTER);
    }

    @Override
    public void enter(ViewChangeEvent event) {
        Notification.show("Welcome to the Animal Farm");
    }
}
You can initialize the view content in the constructor, as was done in the example above, or in the enter() method. The advantage with the latter method is that the view is attached to the view container as well as to the UI at that time, which is not the case in the constructor.
Handling Path Parameters
By default the URLs managed through the Navigator have a URI fragment that contains the identifier of the View. The URI fragment is separated from the rest of the URL by a # character.
If the PushStateNavigation annotation is present on the UI the HTML5 History API is used. When using the PushState, the identifier is separated from the root path by a / like a real URL.
In addition to the View identifier, URI can contain additional parameters to be passed to views. The parameters are the part of the URI after the longest matching view identifier, separated by /. These parameters together with the identifier form the navigation state.
The navigation state can be used with Navigator in two ways: for navigating to a view and to a state within a view. The navigation state accepted by navigateTo() can have the view name at the root, followed by fragment parameters after a slash (" /"). These parameters are passed to the enter() method in the View.
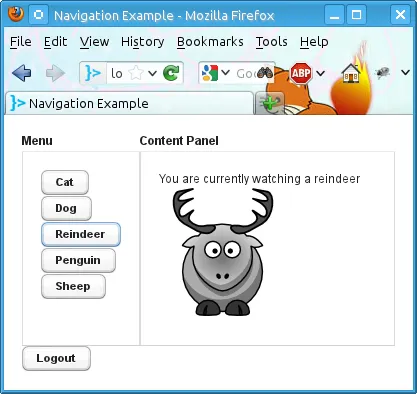
In the following example, we implement within-view navigation. Here we use the following declarative design for the view:
Source code
HTML
<vaadin-vertical-layout size-full>
  <vaadin-horizontal-layout size-full :expand>
    <vaadin-panel caption="List of Equals" height-full width-auto>
      <vaadin-vertical-layout _id="menuContent" width-auto margin/>
    </vaadin-panel>

    <vaadin-panel _id="equalPanel" caption="An Equal" size-full :expand/>
  </vaadin-horizontal-layout>

  <vaadin-button _id="logout">Logout</vaadin-button>
</vaadin-vertical-layout>
The view’s logic code would be as follows:
Source code
Java
/** Main view with a menu (with declarative layout design) */
@DesignRoot
public class MainView extends VerticalLayout implements View {
    // Menu navigation button listener
    class ButtonListener implements Button.ClickListener {
        String menuitem;
        public ButtonListener(String menuitem) {
            this.menuitem = menuitem;
        }

        @Override
        public void buttonClick(ClickEvent event) {
            // Navigate to a specific state
            navigator.navigateTo(MAINVIEW + "/" + menuitem);
        }
    }

    VerticalLayout menuContent;
    Panel equalPanel;
    Button logout;

    public MainView() {
        Design.read(this);

        menuContent.addComponent(new Button("Pig",
                  new ButtonListener("pig")));
        menuContent.addComponent(new Button("Cat",
                  new ButtonListener("cat")));
        menuContent.addComponent(new Button("Dog",
                  new ButtonListener("dog")));
        menuContent.addComponent(new Button("Reindeer",
                  new ButtonListener("reindeer")));
        menuContent.addComponent(new Button("Penguin",
                  new ButtonListener("penguin")));
        menuContent.addComponent(new Button("Sheep",
                  new ButtonListener("sheep")));

        // Allow going back to the start
        logout.addClickListener(event ->
            navigator.navigateTo(""));
    }

    @DesignRoot
    class AnimalViewer extends VerticalLayout {
        Label watching;
        Embedded pic;
        Label back;

        public AnimalViewer(String animal) {
            Design.read(this);

            watching.setValue("You are currently watching a " +
                              animal);
            pic.setSource(new ThemeResource(
                "img/" + animal + "-128px.png"));
            back.setValue("and " + animal +
                " is watching you back");
        }
    }

    @Override
    public void enter(ViewChangeEvent event) {
        if (event.getParameters() == null
            || event.getParameters().isEmpty()) {
            equalPanel.setContent(
                new Label("Nothing to see here, " +
                          "just pass along."));
            return;
        } else
            equalPanel.setContent(new AnimalViewer(
                event.getParameters()));
    }
}
The animal sub-view would have the following declarative design:
Source code
HTML
<vaadin-vertical-layout size-full>
  <vaadin-label _id="watching" size-auto :middle :center/>
  <vaadin-embedded _id="pic" :middle :center :expand/>
  <vaadin-label _id="back" size-auto :middle :center/>
</vaadin-vertical-layout>
The main view is shown in Navigator Main View. At this point, the URL would be http://localhost:8080/myapp/main/reindeer.