Developing Vaadin Portlets for Liferay
- Developing Vaadin Portlets for Liferay 6.2
- Defining Liferay Profile for Maven
- Creating a Portlet Project with Maven
- Creating a Portlet Project in Liferay IDE
- Removing the Bundled Installation
- Installing Vaadin Resources
A Vaadin portlet requires resources such as the server-side Vaadin libraries, a theme, and a widget set. You have three basic ways to deploy these: either globally in Liferay so that the resources are shared between all Vaadin portlets, as self-contained WARs where each portlet carries their own resources or as OSGi bundles in Liferay 7.
For Liferay 7 and OSGi portlets, see "OSGi Portlets on Liferay 7". This is the recommended approach when using Vaadin 8.1 or later and Liferay 7. Currently, the latest Maven archetype supports the OSGi approach.
The material below applies mostly to non-OSGi portlets.
Developing Vaadin Portlets for Liferay 6.2
In non-OSGi environments, the self-contained approach to static resources is easier and more flexible, as the different portlets may have different versions of the resources.
Using shared resources is not recommended as it forces all portlets on a page to use the same Vaadin version and resources. If using this approach, you can install the shared resources as described in Installing Vaadin Resources.
At the time of writing, the latest Liferay release 6.2 is bundled with a version of Vaadin release 6. If you want to use Vaadin 8 portlets with shared resources, you first need to remove the old ones as described in Removing the Bundled Installation.
Defining Liferay Profile for Maven
When creating a Liferay portlet project with a Maven archetype or the Liferay IDE, you need to define a Liferay profile. With the Liferay IDE, you can create it when you create the project, as described in Creating a Portlet Project in Liferay IDE, but for creating a project from the Maven archetype, you need to define in manually.
Defining Profile in settings.xml
Liferay profile can be defined either in the user or in the global settings.xml file for Maven. The global settings file is located in ${MAVEN_HOME}/conf/settings.xml and the user settings file in ${USER_HOME}/.m2/settings.xml. To create a user settings file, copy at least the relevant headers and root element from the global settings file.
Source code
…
<profile>
<id>liferay</id>
<properties>
<liferayinstall>/opt/liferay-portal-6.2-ce-ga2
</liferayinstall>
<plugin.type>portlet</plugin.type>
<liferay.version>6.2.1</liferay.version>
<liferay.maven.plugin.version>6.2.1
</liferay.maven.plugin.version>
<liferay.auto.deploy.dir>${liferayinstall}/deploy
</liferay.auto.deploy.dir>
<!-- Application server version - here for Tomcat -->
<liferay.tomcat.version>7.0.42</liferay.tomcat.version>
<liferay.tomcat.dir>
${liferayinstall}/tomcat-${liferay.tomcat.version}
</liferay.tomcat.dir>
<liferay.app.server.deploy.dir>${liferay.tomcat.dir}/webapps
</liferay.app.server.deploy.dir>
<liferay.app.server.lib.global.dir>${liferay.tomcat.dir}/lib/ext
</liferay.app.server.lib.global.dir>
<liferay.app.server.portal.dir>${liferay.tomcat.dir}/webapps/ROOT
</liferay.app.server.portal.dir>
</properties>
</profile>The parameters are as follows:
- liferayinstall
-
Full (absolute) path to the Liferay installation directory.
- liferay.version
-
Liferay version by the Maven version numbering scheme. The first two (major and minor) numbers are same as in the installation package. The third (maintenance) number starts from 0 with first GA (general availability) release.
- liferay.maven.plugin.version
-
This is usually the same as the Liferay version.
- liferay.auto.deploy.dir
-
The Liferay auto-deployment directory. It is by default deploy under the Liferay installation path.
- liferay.tomcat.version(optional)
-
If using Tomcat, its version number.
- liferay.tomcat.dir
-
Full (absolute) path to Tomcat installation directory. For Tomcat bundled with Liferay, this is under the Liferay installation directory.
- liferay.app.server.deploy.dir
-
Directory where portlets are deployed in the application server used for Liferay. This depends on the server - for Tomcat it is the webapps directory under the Tomcat installation directory.
- liferay.app.server.lib.global.dir
-
Library path where libraries globally accessible in the application server should be installed.
- liferay.app.server.portal.dir
-
Deployment directory for static resources served by the application server, under the root path of the server.
If you modify the settings after the project is created, you need to touch the POM file in the project to have the settings reloaded.
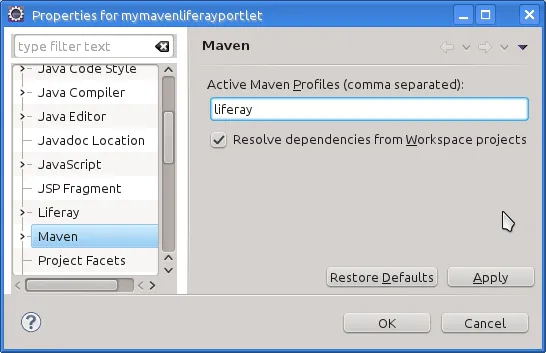
Activating the Maven Profile
The Maven 2 Plugin for Eclipse (m2e) must know which Maven profiles you use in a project. This is configured in the section of the project properties. In the Active Maven Profiles field, enter the profile ID defined in the settings.xml file, as illustrated in Activating Maven Liferay Profile.
Creating a Portlet Project with Maven
Creation of Vaadin a Maven project is described in "Using Vaadin with Maven". For a Liferay project, you should use the vaadin-archetype-liferay-portlet.
Note: For creating Liferay 6.2 projects for Vaadin Framework 8.1, use the 8.0 version of the archetype and then update the dependency versions for Vaadin Framework.
Archetype Parameters
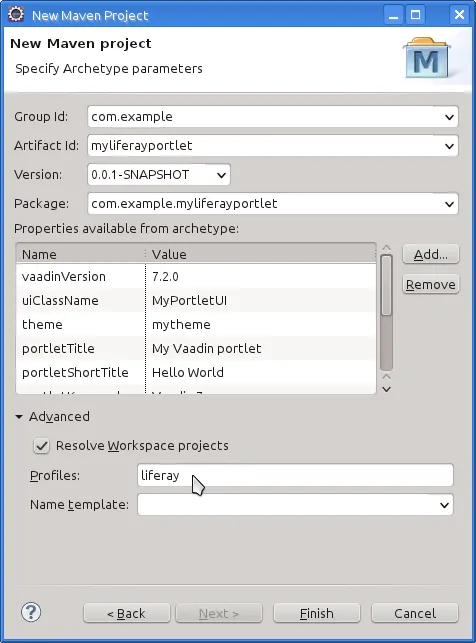
The archetype has a number of parameters. If you use Maven Plugin for Eclipse (m2e) to create the project, you get to enter the parameters after selecting the archetype, as shown in Liferay Project Archetype Parameters.
Minimally, you just need to enter the artifact ID. To activate the Maven profile created as described earlier in Defining Liferay Profile for Maven, you need to specify the profile in the Profiles field under the Advanced section.
The other parameters are the following:
- vaadinVersion
-
Vaadin release version for the Maven dependency.
- uiClassName
-
Class name of the UI class stub to be created.
- theme
-
Theme to use. You can use either a project theme, which must be compiled before deployment, or use one of the default themes.
- portletTitle
-
Title shown in the portlet title bar.
- portletShortTitle
-
Title shown in contexts where a shorter title is preferred.
- portletKeywords
-
Keywords for finding the portlet in Liferay.
- portletDescription
-
A description of the portlet.
- portletName
-
Identifier for the portlet, used for identifying it in the configuration files.
- portletDisplayName
-
Name of the portlet for contexts where it is displayed.
Creating a Portlet Project in Liferay IDE
Liferay IDE, which you install in Eclipse as plugins just like the Vaadin plugin, enables a development environment for Liferay portlets. Liferay IDE allows integrated deployment of portlets to Liferay, just like you would deploy servlets to a server in Eclipse. The project creation wizard supports creation of Vaadin portlets.
Loading widget sets, themes, and the Vaadin JAR from a portlet is possible as long as you have a single portlet, but causes a problem if you have multiple portlets. To solve this, Vaadin portlets need to use a globally installed widget set, theme, and Vaadin libraries.
Liferay 6.2 comes bundled with an older Vaadin 6 version. If you want to use Vaadin 8, you need to remove the bundled version and install the newer one manually as described in this chapter.
In these instructions, we assume that you use Liferay bundled with Apache Tomcat, although you can use almost any other application server with Liferay just as well. The Tomcat installation is included in the Liferay installation package, under the tomcat-x.x.x directory.
Removing the Bundled Installation
Before installing a new Vaadin version, you need to remove the version bundled with Liferay. You need to remove the Vaadin library JAR from the library directory of the portal and the VAADIN directory from under the root context. For example, with Liferay bundled with Tomcat, they are usually located as follows:
-
tomcat-x.x.x/webapps/ROOT/html/VAADIN
-
tomcat-x.x.x/webapps/ROOT/WEB-INF/lib/vaadin.jar
Installing Vaadin Resources
To use common resources needed by multiple Vaadin portlets, you can install them globally as shared resources as described in the following.
If you are installing Vaadin in a Liferay version that comes bundled with an older version of Vaadin, you first need to remove the resources as described in Removing the Bundled Installation.
In the following, we assume that you use only the built-in "reindeer" theme in Vaadin and the default widget set.
-
Get the Vaadin installation package from the Vaadin download page
-
Extract the following Vaadin JARs from the installation package: vaadin-server.jar and vaadin-shared.jar, as well as the vaadin-shared-deps.jar and jsoup.jar dependencies from the lib folder
-
Rename the JAR files as they were listed above, without the version number
-
Put the libraries in tomcat-x.x.x/webapps/ROOT/WEB-INF/lib/
-
Extract the VAADIN folders from vaadin-server.jar, vaadin-themes.jar, and vaadin-client-compiled.jar and copy their contents to tomcat-x.x.x/webapps/ROOT/html/VAADIN.
Source code
$ cd tomcat-x.x.x/webapps/ROOT/htmlSource code
$ unzip path-to/vaadin-server-8.1.0.jar 'VAADIN/*'Source code
$ unzip path-to/vaadin-themes-8.1.0.jar 'VAADIN/*'Source code
$ unzip path-to/vaadin-client-compiled-8.1.0.jar 'VAADIN/*'
You need to define the widget set, the theme, and the JAR in the portal-ext.properties configuration file for Liferay, as described earlier. The file should normally be placed in the Liferay installation directory. See Liferay documentation for details on the configuration file.
Below is an example of a portal-ext.properties file:
Source code
# Path under which the VAADIN directory is located.
# (/html is the default so it is not needed.)
# vaadin.resources.path=/html

# Portal-wide widget set
vaadin.widgetset=com.vaadin.server.DefaultWidgetSet

# Theme to use
# This is the default theme if nothing is specified
vaadin.theme=valo
The allowed parameters are:
- vaadin.resources.path
-
Specifies the resource root path under the portal context. This is /html by default. Its actual location depends on the portal and the application server; in Liferay with Tomcat it would be located at webapps/ROOT/html under the Tomcat installation directory.
- vaadin.widgetset
-
The widget set class to use. Give the full path to the class name in the dot notation. If the parameter is not given, the default widget set is used.
- vaadin.theme
-
Name of the theme to use. If the parameter is not given, the default theme is used, which is valo.
You will need to restart Liferay after creating or modifying the portal-ext.properties file.