Creating a Project with the NetBeans IDE
In the following, we walk you through the creation of a Vaadin project in NetBeans and show how to run it.
Installation of NetBeans and the Vaadin plugin is covered in "Installing the NetBeans IDE and Plugin".
Without the plugin, you can most easily create a Vaadin project as a Maven project using a Vaadin archetype. You can also create a Vaadin project as a regular web application project, but it requires many manual steps to install all the Vaadin libraries, create the UI class, configure the servlet, create theme, and so on.
Creating a Project
-
Select from the main menu or press Ctrl+Shift+N.
-
In the New Project window that opens, select the Vaadin category and one of the Vaadin archetypes from the right.
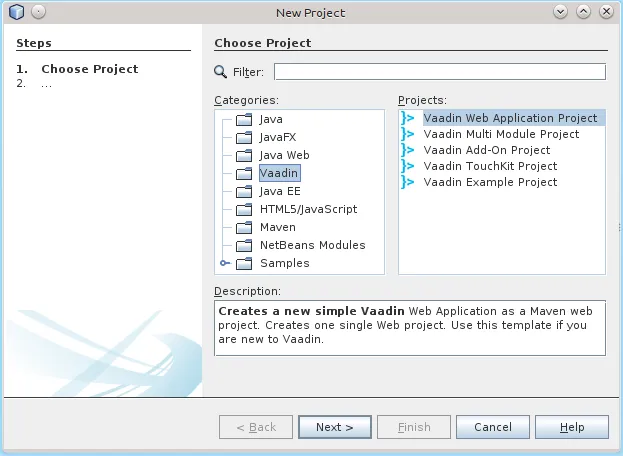
The archetypes are described in more detail in "Overview of Maven Archetypes".
-
In the Name and Location step, enter the project parameters.
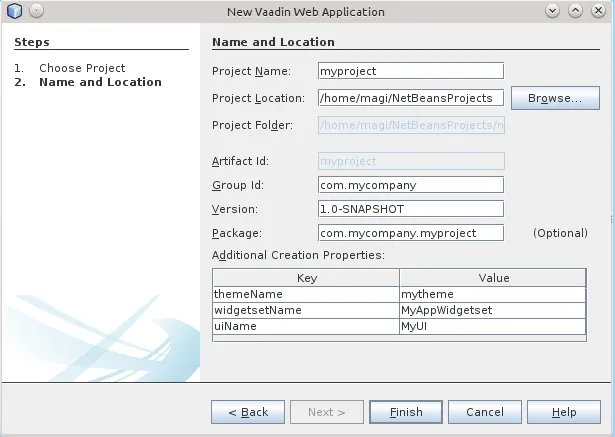
- Project Name
-
A project name. The name must be a valid identifier that may only contains alphanumerics, minus, and underscore. It is appended to the group ID to obtain the Java package name for the sources.
- Project Location
-
Path to the folder where the project is to be created.
- Group Id
-
A Maven group ID for your project. It is normally your organization domain name in reverse order, such as
com.example. The group ID is also used as a prefix for the Java source package, so it should be Java-compatible package name. - Version
-
Initial version of your application. The number must obey the Maven version numbering format.
- Package
-
The Java package name to put sources in.
- Additional Creation Properties
-
The properties control various names. They are specific to the archetype you chose.
Click .
Creating the project can take a while as Maven loads all the needed dependencies.
Exploring the Project
The project wizard has done all the work for you: a UI class skeleton has been written to the src directory. The project hierarchy shown in the Project Explorer is shown in A new Vaadin project in NetBeans.
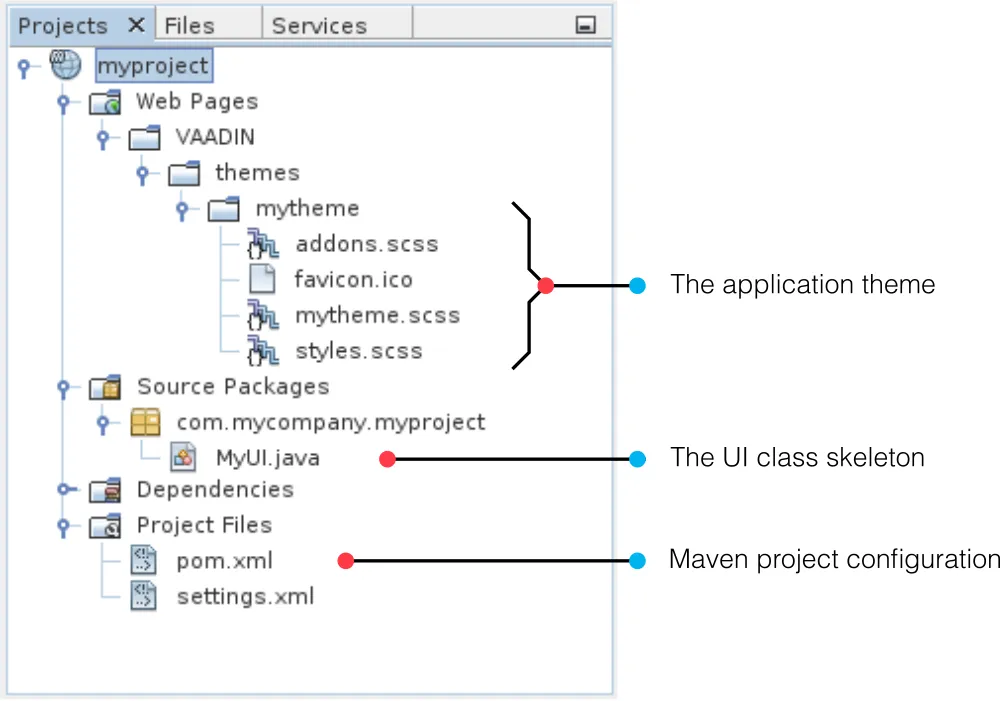
- mytheme
-
The theme of the UI. See "Themes" for information about themes.
- MyUI.java
-
The UI class, which is the main entry-point of your application. See "Server-Side Applications" for information about the basic structure of Vaadin applications.
The Vaadin libraries and other dependencies are managed by Maven. Notice that the libraries are not stored under the project folder, even though they are listed in the virtual folder.
Running the Application
Once created, you can run it in a server as follows.
-
In Projects tab, select the project and click in the Run Project button in the tool bar (or press F6).
-
In the Select deployment server window, select a server from the Server list. It should show either GlassFish or Apache Tomcat or both, depending on what you chose in NetBeans installation.
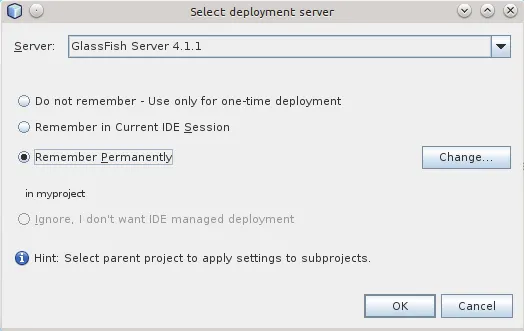
Also, select Remember Permanently if you want to use the same server also in future while developing applications.
Click .
The widget set will be compiled at this point, which may take a while.
If all goes well, NetBeans starts the server in port 8080 and, depending on your system configuration, launches the default browser to display the web application. If not, you can open it manually, for example, at http://localhost:8080/myproject. The project name is used by default as the context path of the application.
Now when you edit the UI class in the source editor and save it, NetBeans will automatically redeploy the application. After it has finished after a few seconds, you can reload the application in the browser.