Creating a Project with IntelliJ IDEA
With both Community Edition and Ultimate Edition, you can create a Vaadin application most easily with a Maven archetype and deploy it to a server with a Maven run/debug configuration.
Creating a Maven Project
You can choose to create a Maven project in IntelliJ IDEA. You will not have the application server integration, but can deploy the application to an application server using a run/debug configuration.
-
Select
-
In the New Project window, select
-
Select the Java SDK to be used for the project. Vaadin requires at least Java 8.
-
Check Create from archetype checkbox
-
If the Vaadin archetype is not in the list, click , enter GroupId com.vaadin, ArtifactId vaadin-archetype-application, and Version LATEST (or a specific version number).
Click in the dialog.
-
Select the archetype
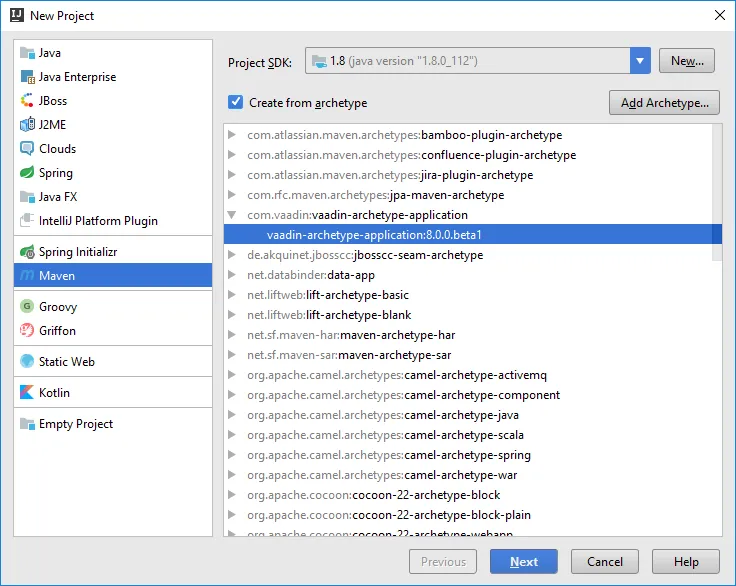
Click .
-
Give a Maven GroupID, ArtifactID, and a Version for the project, or use the defaults.
-
Review the general Maven settings and settings for the new project. You may need to override the settings, especially if you are creating a Maven project for the first time.
-
Finish the wizard.
Creating the Maven project takes some time as Maven fetches the dependencies. Once done, the project is created and the Maven POM is opened in the editor.
Fort more detailed instructions, refer to https://www.jetbrains.com/help/idea/
Compiling the Project
To compile a Vaadin application using Maven, you can define a run/debug configuration to execute a goal such as package to build the deployable WAR package. It will also compile the widget set and theme, if necessary. See "Compiling and Running the Application" for more details.
Compilation is included in the following instructions for deploying the application.
Deploying to a Server
There exists Maven plugins for deploying to various application servers. For example, to deploy to Apache Tomcat, you can to configure the tomcat-maven-plugin and then execute the tomcat:deploy goal. See the documentation of the plugin that you use for more details. If no Maven plugin exists for a particular server, you can always use some lower-level method to deploy the application, such as running an Ant task.
In the following, we create a run/debug configuration to build, deploy, and launch a Vaadin Maven application on the light-weight Jetty web server.
-
Select .
-
Click and select Maven to create a new Maven run/debug configuration.
-
Enter a Name for the run configuration. For the Command line, enter
package jetty:runto first compile and package the project, and then launch Jetty to run it.Click .
-
Select the run configuration in the toolbar and click the button beside it.
Compiling the project takes some time on the first time, as it compiles the widget set and theme. Once the run console pane informs that Jetty Server has been started, you can open the browser at the default URL http://localhost:8080/.