Vaadin Flow Quick Start
Vaadin Flow helps you quickly to build web applications in pure Java — without writing any HTML or JavaScript. This guide shows how to build a small, but fully functional ToDo application using Vaadin Flow.
Requirements
To start, you’ll need JDK 17 or higher (e.g., Eclipse Temurin JDK). Next, you’ll need to download the quick start project. You can do so by clicking on the button here:
Once you’ve done that, unpack the downloaded ZIP file into a local folder. Then import the project into an IDE.
Add Code
Next, you’ll add code. Open the MainView.java file, located in the src/main/java/com/example/application/views/main/ directory. Replace the code in that file with the following:
package com.example.application.views.main;

import com.vaadin.flow.component.Key;
import com.vaadin.flow.component.button.Button;
import com.vaadin.flow.component.checkbox.Checkbox;
import com.vaadin.flow.component.html.H1;
import com.vaadin.flow.component.orderedlayout.HorizontalLayout;
import com.vaadin.flow.component.orderedlayout.VerticalLayout;
import com.vaadin.flow.component.textfield.TextField;
import com.vaadin.flow.router.Route;

@Route("") // (1)
public class MainView extends VerticalLayout { // (2)

  public MainView() {
    VerticalLayout todosList = new VerticalLayout(); // (3)
    TextField taskField = new TextField(); // (4)
    Button addButton = new Button("Add"); // (5)
    addButton.addClickListener(click -> { // (6)
      Checkbox checkbox = new Checkbox(taskField.getValue());
      todosList.add(checkbox);
    });
    addButton.addClickShortcut(Key.ENTER); // (7)

    add( // (8)
      new H1("Vaadin Todo"),
      todosList,
      new HorizontalLayout(
        taskField,
        addButton
      )
    );
  }
}-
The
@Routeannotation makes the view accessible to the end user, in this case using the empty `` route. -
As the
MainViewclass extendsVerticalLayout, components added to it are ordered vertically. -
The
todosListis a vertical layout that displays a list of the tasks along with checkboxes. -
The
taskFieldis a text input field to enter the description of new tasks. -
The
addButtonis a button for adding a new task. -
In the listener for the button click, first create a new checkbox with the value from the
taskFieldas its label. Then add the checkbox to thetodosList. -
Add a shortcut for the
addButtoncomponent when the Enter key is pressed. -
Call
add()on theVerticalLayoutto display the components, vertically. Notice thattaskFieldandaddButtonare in aHorizontalLayout. That puts them next to each other.
Run the Application
What you’ve done so far may not seem like much, but it’s enough to be able to run the application. To run it in your IDE, launch Application.java, located in the src/main/java/org/vaadin/example directory.
Alternatively, you can run the project from the command-line by entering ./mvnw on macOS or Linux systems, mvnw on Windows. Then, in your browser, open localhost:8080. You should see the following:
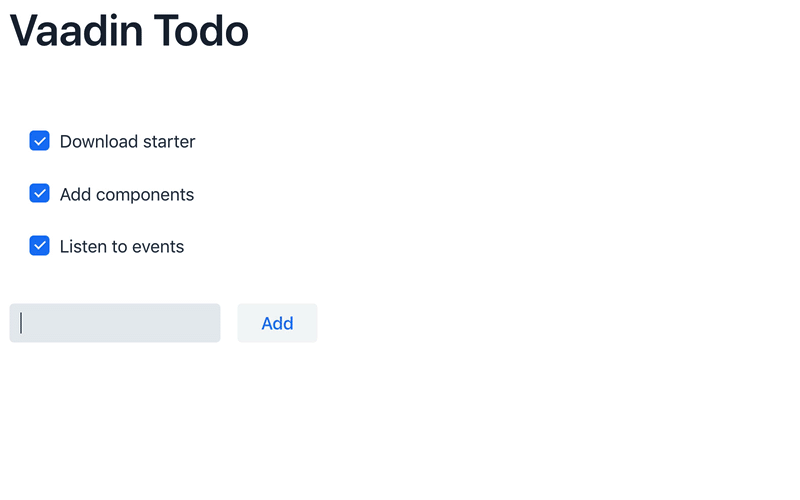
The source code of this ToDo project is available at GitHub.
Learn More
Now that you’ve seen how Vaadin Flow empowers you to build web applications — quickly and in pure Java, without writing any HTML or JavaScript — you’re ready to learn more.
Continue learning about Vaadin Flow by reading and watching the in-depth 2-hour course — or create another application with custom views with Vaadin Start.
4762E8FE-6BAA-405E-8C48-E62042C55239