
In this article, Microservices: UI composition, we'll learn how to implement two separate independent Vaadin applications rendered in a single web page. We have covered service discovery, externalized configuration, stateless services, and fault tolerance. In this article, we’ll learn how to implement a composition of two separate independent Vaadin applications rendered in a single web page.
Why do we need this?
As discussed in my earlier blog post, there are two general approaches when it comes to implementing UIs in microservices applications: Separate web applications that serve specific audiences, and “mash-ups” that aggregate several UIs. Implementing separate web applications is straightforward and doesn’t require significant considerations. However, sometimes it might be desirable or required to render one or more external web applications in a single view.
How does it work?
There are several approaches to render multiple Vaadin web applications into a single one. You can use Portlets to implement individual web applications integrated through a portal solution such as Liferay. You can also embed Vaadin applications into any web application by using the technique described in the documentation.
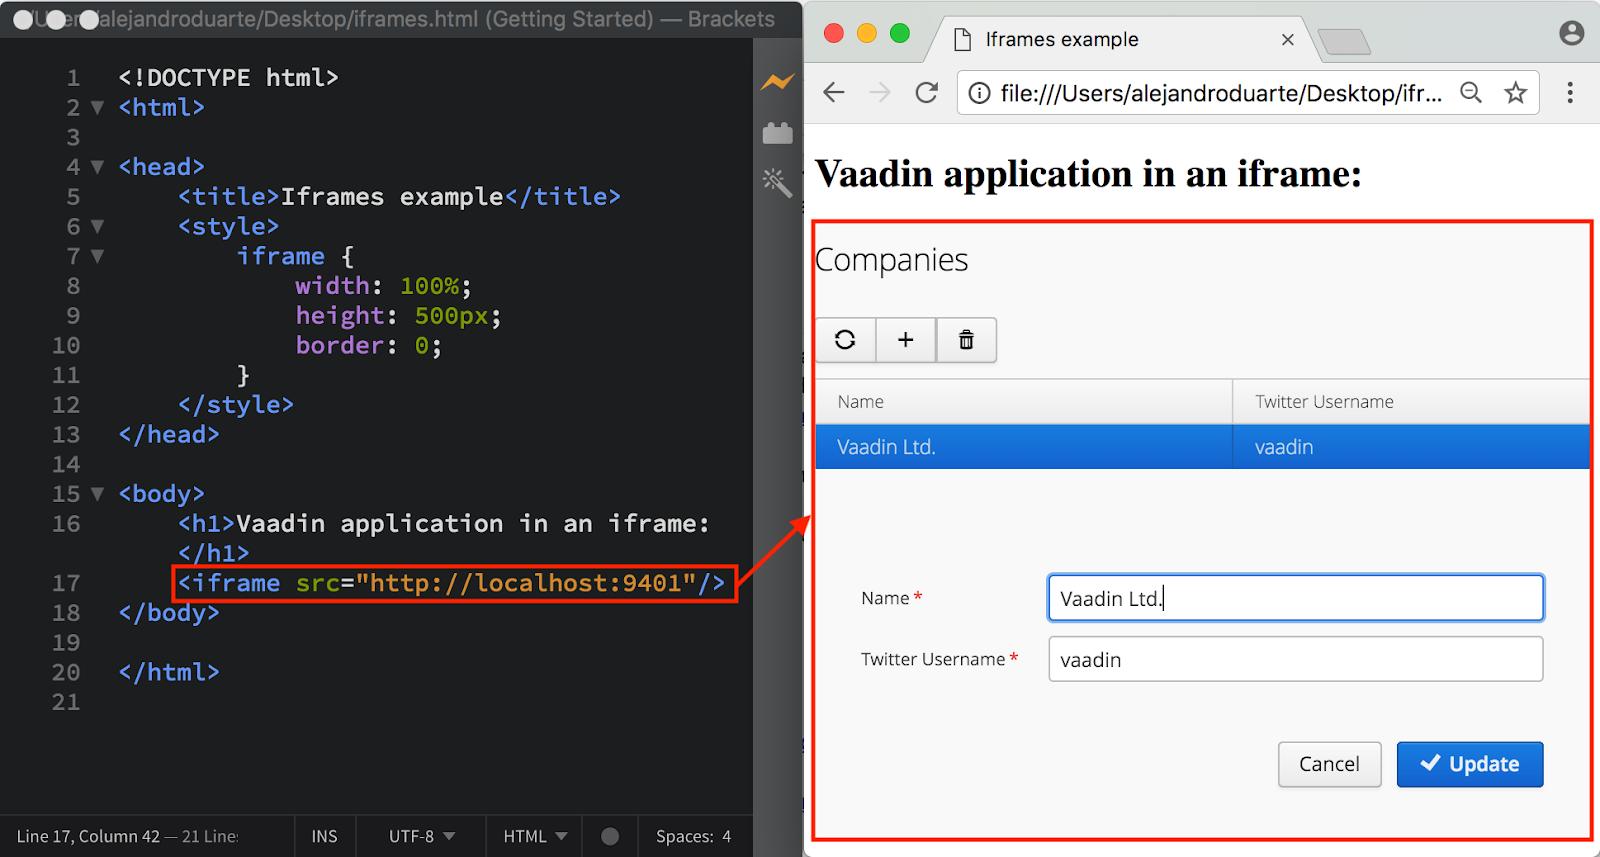
The simplest way to render multiple web applications into a single one is by using HTML iframes. This requires minimal additional configuration and allows you to mix technologies, CSS styles, and Vaadin versions. The following screenshot illustrates the concept:
One of the critical aspects in microservices is that instances of an application go up and down as manual or automatic scaling and deployment happen. Since a microservice can be replicated dozens or hundreds of times, its location is not fixed in the network. An iframe element requires one URL pointing to the web application. Since there are probably many instances of the web application, we need a mechanism to route a single URL to instances of the correct web application. This can be done by introducing a router. The following screenshot illustrates the concept:
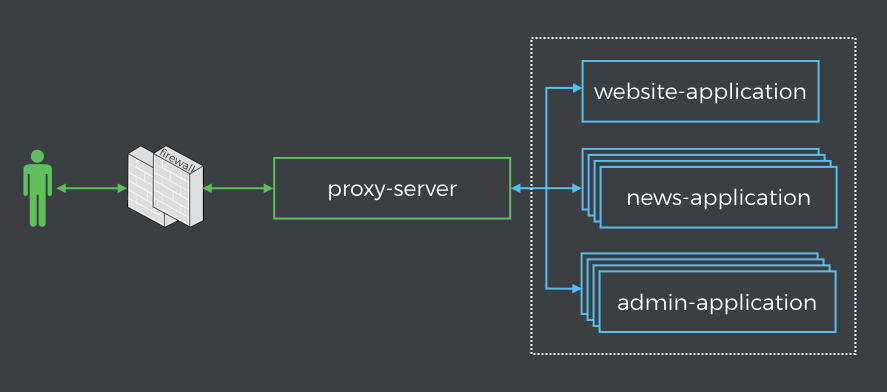
The proxy-server application takes requests from a client and proxies them to a web application, using the service discovery and according to a set of rules. In the example application, the proxy-server, which is configured to listen to port 8080, routes calls to http://localhost:8080/admin/companies to instances of the admin-application. With this in place, an HTML iframe can simply point to http://localhost:8080/admin/companies and let the proxy-server and discovery-server take care of routing and picking an instance of the admin-application.
Usually, you don’t want to expose instances of the web applications to the world. A firewall can be configured to accept external connections only to the proxy-server application, making the web applications look like single instances to external observers.
Implementing a proxy server with Zuul
Zuul is an edge service developed and used by Netflix as the “front door” for all backend service calls. It provides, among other things, routing capabilities and can be easily integrated with Spring Cloud, which provides an embedded reverse proxy suitable for proxying requests to other services, including web applications developed with Vaadin Framework.
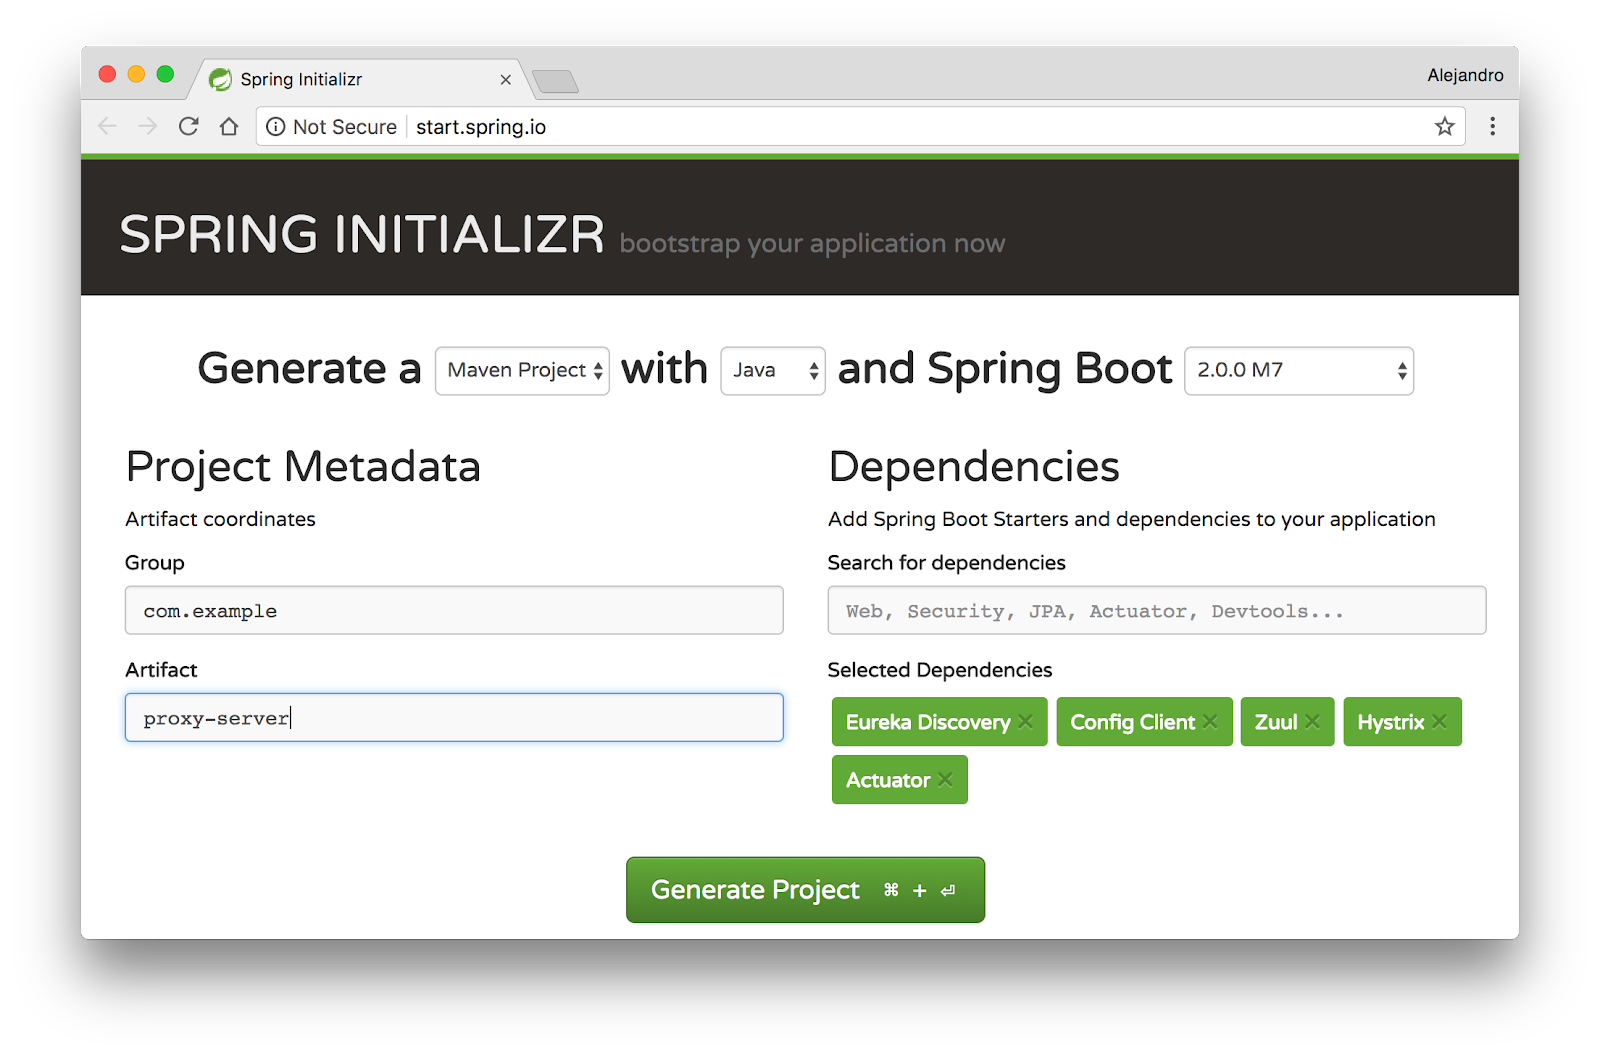
Use the Spring Initializr to create a new Spring Boot application named config-server and include the Eureka Discovery, Config Client, Zuul, Hystrix, and Actuator (optional) dependencies:
Open up the ProxyServerApplication class and activate the discovery client, circuit breaker, and Zuul proxy by using the following annotations:
@SpringBootApplication
@EnableDiscoveryClient
@EnableCircuitBreaker
@EnableZuulProxy
public class ProxyServerApplication { ... }
Remove the application.properties file and create a new bootstrap.yml file with the following content:
spring:
  application.name: proxy-server
  cloud.config:
    discovery:
      enabled: true
      serviceId: config-server

eureka:
  client:
    serviceUrl:
      defaultZone: http://localhost:7001/eureka/
    registryFetchIntervalSeconds: 1
  instance:
    leaseRenewalIntervalInSeconds: 1
This configures the application name, Eureka client, and configuration server, where the rest of the configuration is read from. By default, the configuration server will read the files from GitHub (see this article to learn how to use your local Git repository). Here we are interested in the routing configuration in the proxy-server.yml configuration file:
zuul:
  ignoredServices: '*'
  routes:
    website-application:
      path: /**
      serviceId: website-application
      sensitiveHeaders:
    news-application:
      path: /news/**
      serviceId: news-application
      sensitiveHeaders:
    admin-application:
      path: /admin/**
      serviceId: admin-application
      sensitiveHeaders:
The zuul.ignoredServices property is needed to avoid exposing all the services registered with Eureka. The rest of the configuration maps paths to services by application name. For example, http://localhost:8080/admin/ is routed to an instance of the admin-application. The sensitiveHeaders property is a blacklist with the headers that shouldn’t be sent. By default this blacklist is not empty, we need to explicitly set it to an empty list in order to forward all headers, especially to allow Vaadin instances read session cookies.
You also need to provide a FallbackProvider implementation used when a service is not available. You can find a simple implementation on GitHub.
Implementing the UI composition
Since we are routing several Vaadin applications with Zuul, we need to use custom URL for the VaadinServlet mappings. With Spring Boot, you can configure this by defining a bean of type ServletRegistrationBean and setting the mapping using the constructor as follows:
public class AdminApplication {
    ...

    @Bean
    public ServletRegistrationBean<SpringVaadinServlet> springVaadinServlet() {
        SpringVaadinServlet servlet = new SpringVaadinServlet();
        ServletRegistrationBean<SpringVaadinServlet> registrationBean = new ServletRegistrationBean<>(servlet, "/companies/*");
        registrationBean.setLoadOnStartup(1);
        registrationBean.setName("VaadinServlet");
        return registrationBean;
    }
}
We also need to configure a custom name for the session cookies since each Vaadin application has its own HTTP session. You can do this by defining a CookieSerializer bean:
@Bean
public CookieSerializer cookieSerializer() {
    DefaultCookieSerializer serializer = new DefaultCookieSerializer();
    serializer.setCookieName("ADMIN-SESSION");
    serializer.setCookiePath("/");
    serializer.setDomainNamePattern("^.+?\\.(\\w+\\.[a-z]+)$");
    return serializer;
}
Implementing a UI composition with Vaadin Framework is pretty straightforward. You can create BrowserFrames per each application and add them to any layout. For example, you can add the admin-application and news-application in a single layout as follows:
BrowserFrame news = new BrowserFrame(
    "News", new ExternalResource("http://localhost:8080/admin/companies"));
BrowserFrame admin = new BrowserFrame(
    "Admin", new ExternalResource("http://localhost:8080/news/twitter"));

HorizontalSplitPanel layout = new HorizontalSplitPanel(admin, news);
This is done in the website-application module. Notice how we point the BrowserFrames to the URLs configured in the proxy-server.
In the next articles of this series, we’ll explore more about high availability of Vaadin applications and monitoring in microservices.