In the previous article of this series, we explored a demo application designed with a microservices architecture and implemented with Spring Boot and Vaadin Framework 8. The demo application is available on GitHub and you can follow the instructions there to run it by yourself.
In this article, we’ll explore the concept of service registration and discovery, a mechanism that enables microservices to consume other microservices without knowing their exact location (usually a URL).
Why do we need this?
Without this, the services’ locations would be coupled to each other, causing a hard to maintain system. The basic problem is evident: How do services know the IP and port of a service they need to consume? In a simple architecture, a static configuration works pretty well. Each service is deployed at the same location and it rarely changes. But this is not the case in microservices architectures.
One of the objectives of microservices is to enable the development teams to deploy and scale their applications independently. As more services and instances are added to the system, service locations start to change frequently: partly because of manual or automatic scaling, partly because of continuous delivery processes. Instances will start to go up and down frequently as scaling and deployment happen. Clearly, a static configuration of the location of services is not a viable solution. A dynamic configuration is needed.
How does it work?
The dynamic configuration containing the location of available services is held in a discovery service. Each microservice only needs to know about the location of the discovery service and will use it to get the location of other microservices. In the demo application, the discovery service is implemented in the discovery-server application.
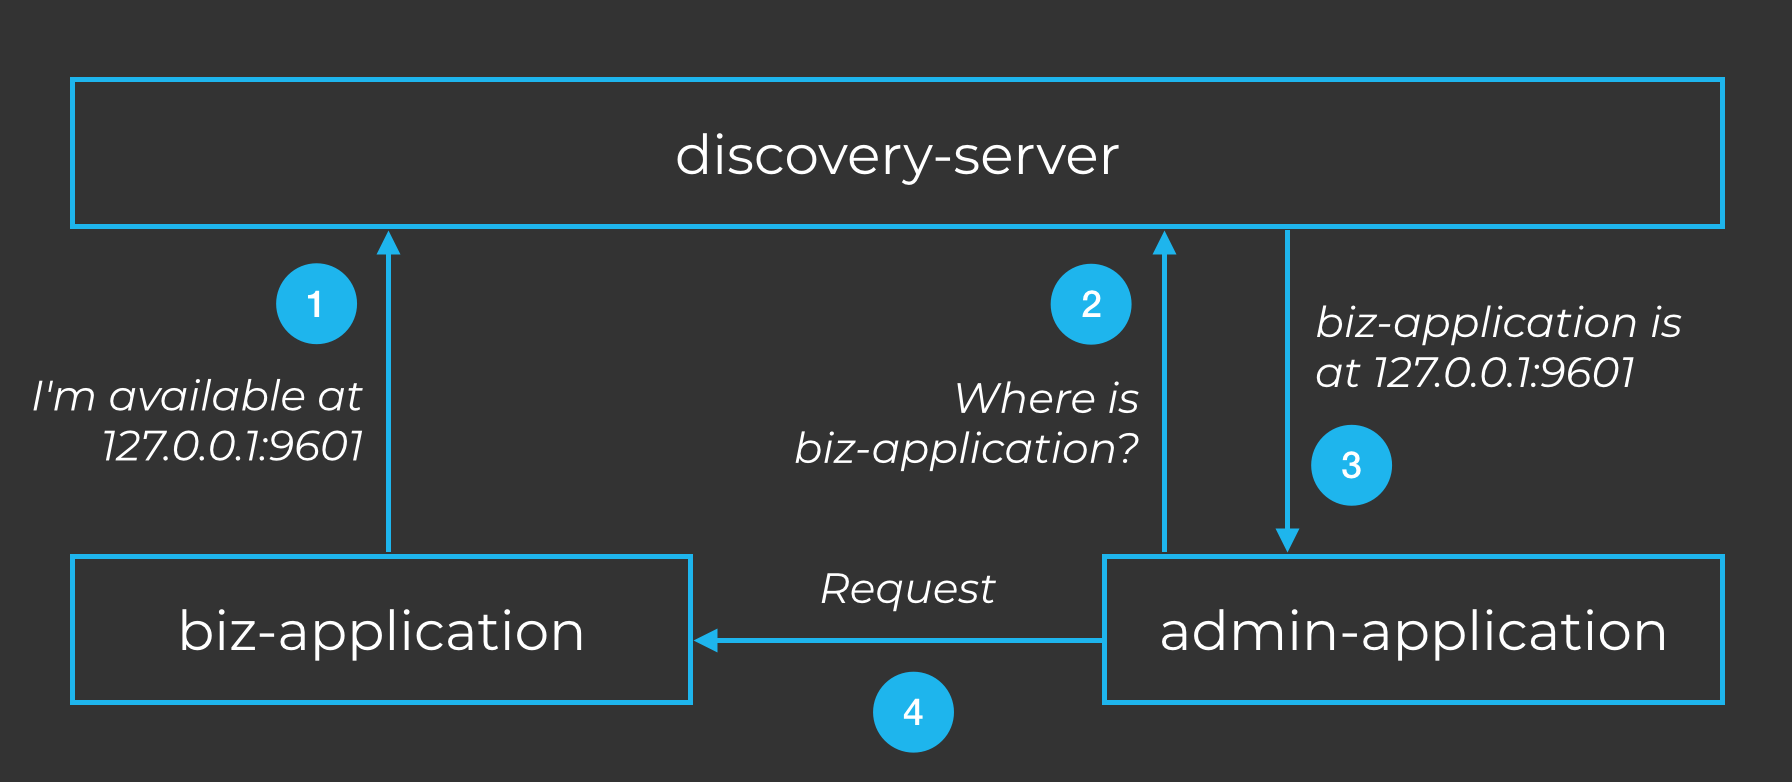
Let’s take two of the microservices in the demo application as an example: The admin-application (a web Vaadin application) and the biz-application (a Spring Data REST web service). The admin-application needs the biz-application for reading and writing data. The following diagram shows the communication flow:

1. The biz-application starts up and tells the discovery-server it is available.
2. The admin-application starts up and asks the discovery-server for the location of the biz-application.
3. The discovery-server looks-up in its internal database and returns the location of the biz-application.
4. The admin-application can now make direct requests to the biz-application.
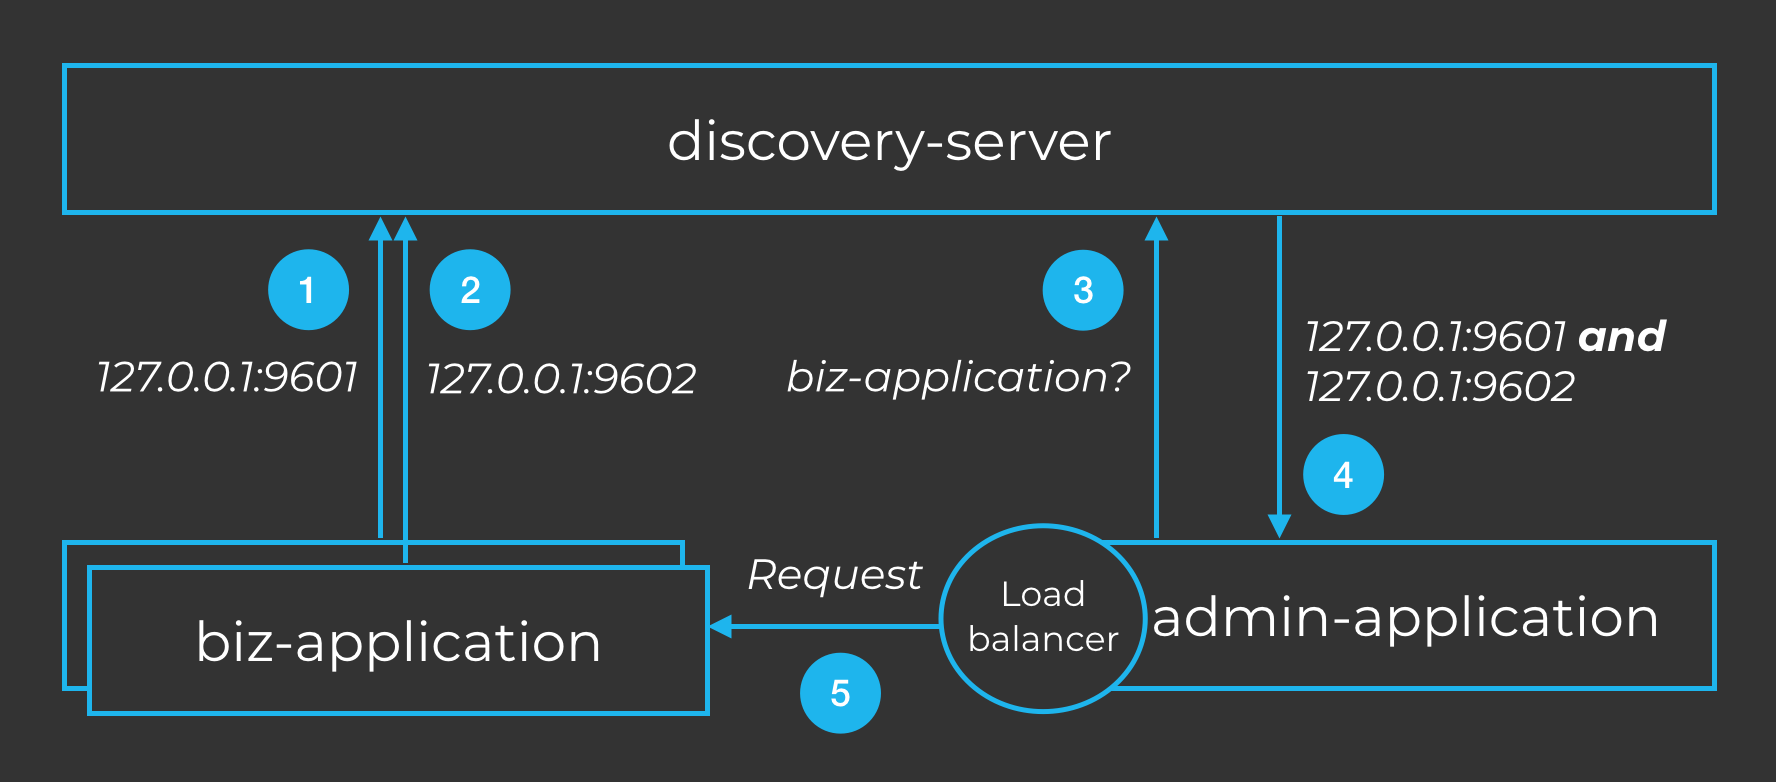
What happens when more instances of the biz-application are added? The process is shown in the following diagram:

Notice how each biz-application instance registers itself (1 and 2) and how the discovery-server returns all available locations to the admin-application (4) which in turn selects one of them to make requests (5). Which instance to select is done through a client-side load balancer with fault tolerance features. This article focuses on service registration and discovery. Load balancing and fault tolerance are covered in a later article of this series.
Implementing a Discovery Server with Eureka
There are many implementations suitable for service discovery. SmartStack, Zookeeper, Etcd, Consul, NSQ, Serf, and Doozer, are all good examples. The demo application uses the battle-proven Eureka by Netflix.
Spring Cloud offers excellent integration with Eureka (and with Netflix OSS in general) through Spring Cloud Netflix. Thanks to Spring Boot’s autoconfiguration features, implementing a discovery service with Eureka is extremely easy.
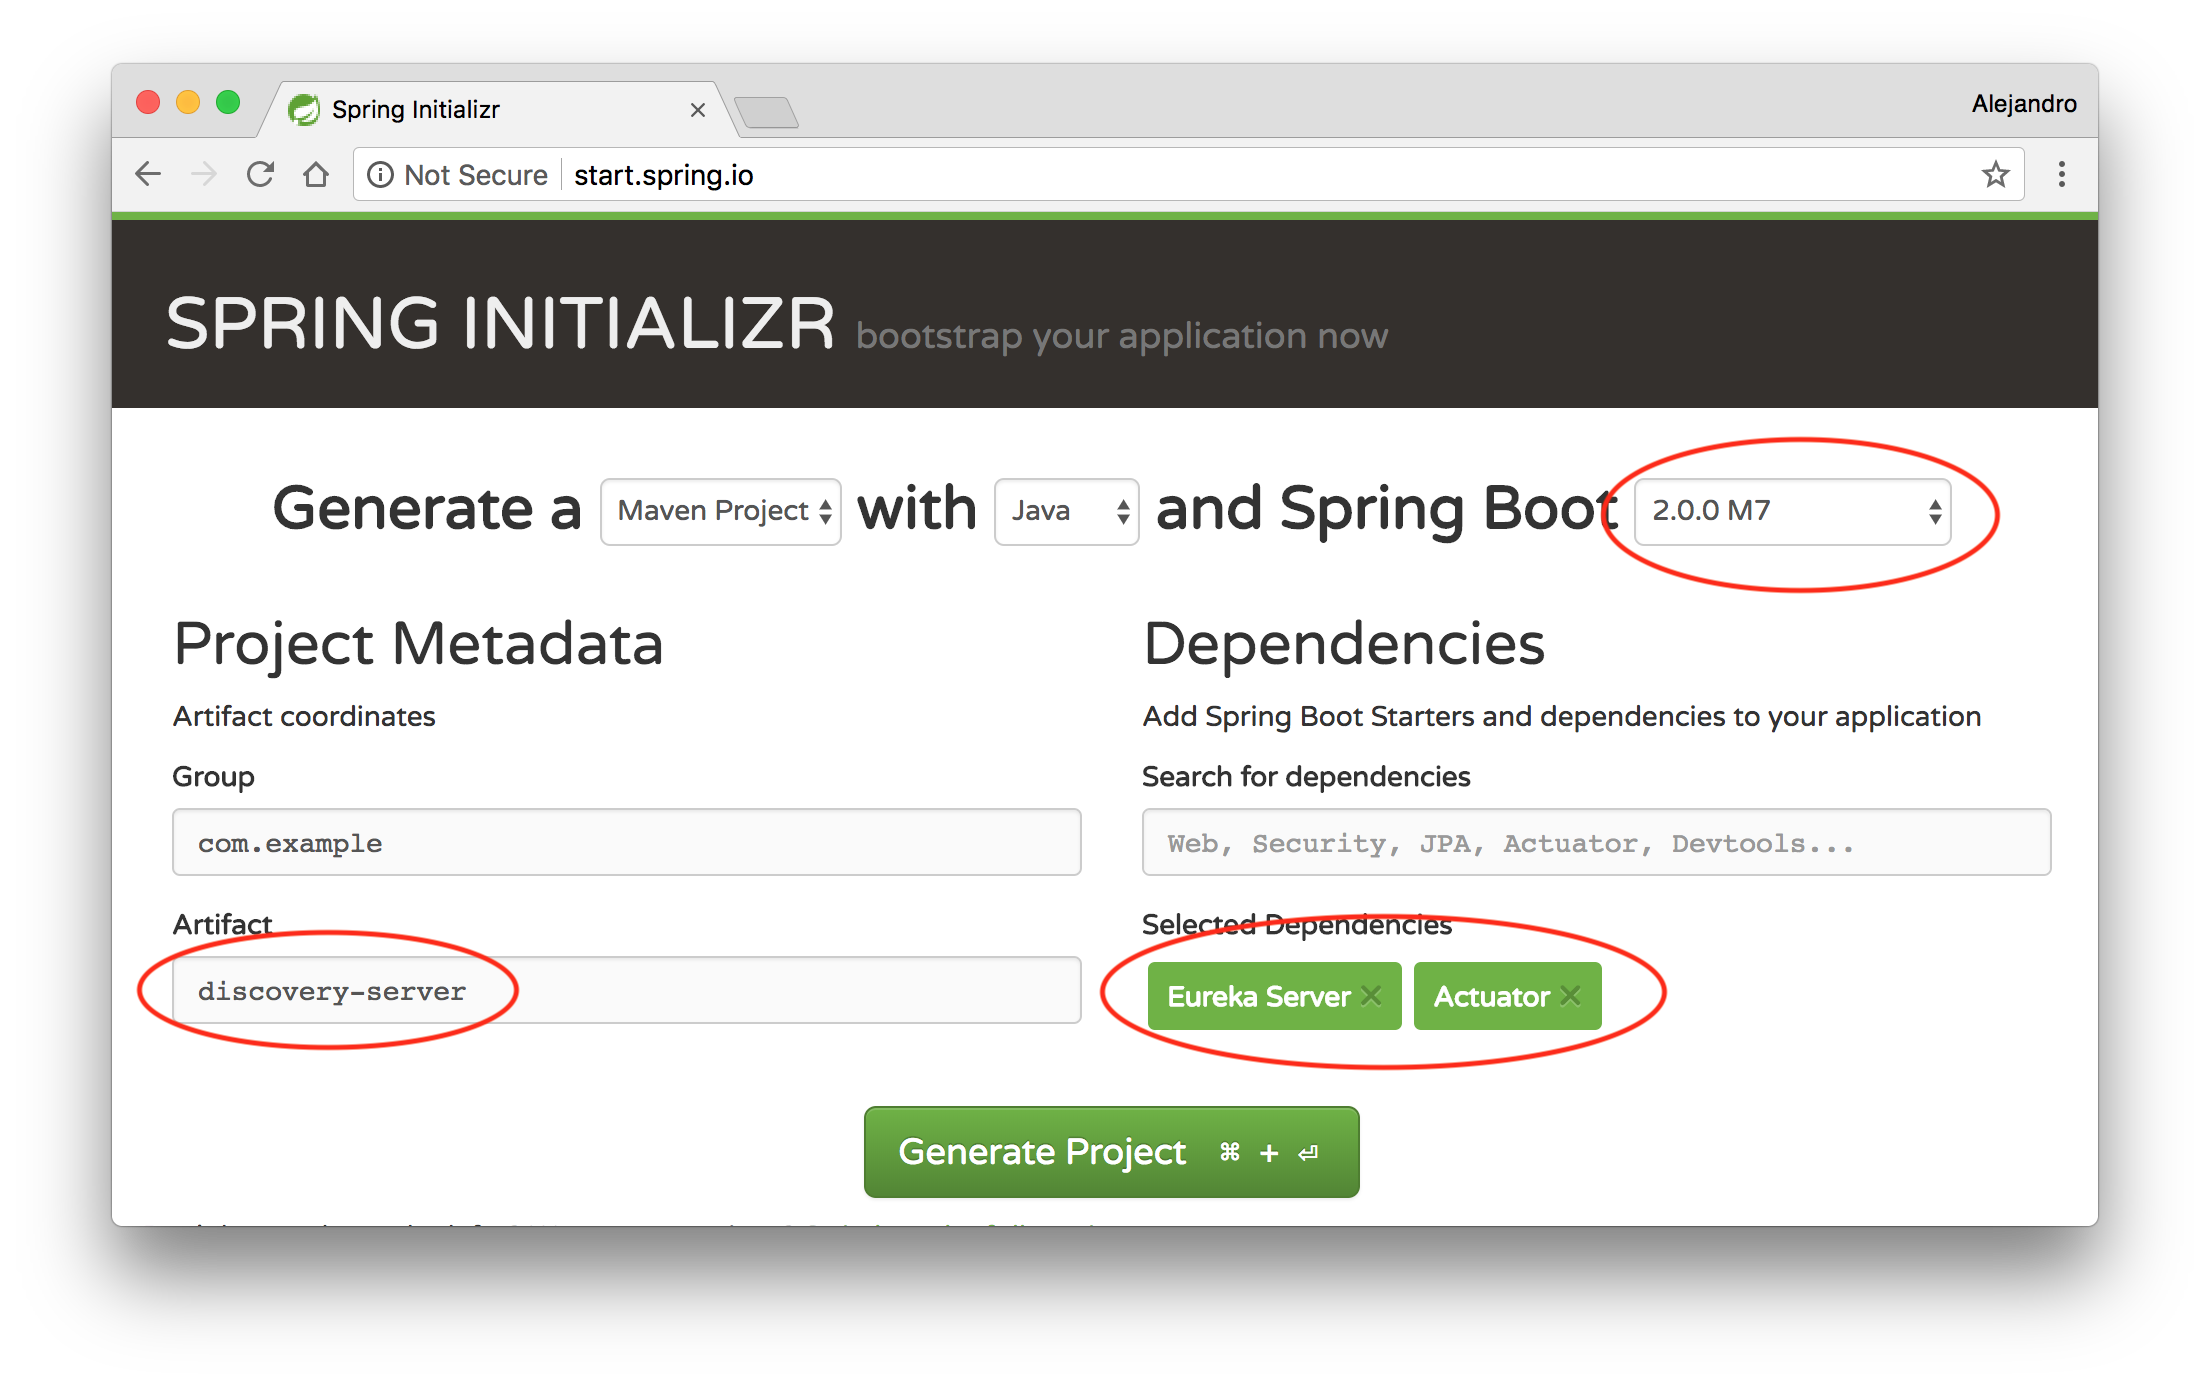
Use the Spring Initializr to create a new Spring Boot application named discovery-server and include the Eureka Server and Actuator (optional) dependencies:

Make sure to use version 2.0.0 (a milestone version at the time of writing) of Spring Boot. Click Generate Project, extract the generated file, and import the Maven project into your favorite IDE.
Open up the DiscoveryServerApplication class and annotate it with @EnableEurekaServer:
@SpringBootApplication
@EnableEurekaServer
public class DiscoveryServerApplication {
   ...
}
Remove the application.properties file and create an application.yml file with the following content:
server.port: 7001
spring.application.name: discovery-server

eureka:
 instance:
   hostname: localhost
   leaseRenewalIntervalInSeconds: 2
   leaseExpirationDurationInSeconds: 2
 server:
   evictionIntervalTimerInMs: 1000
   response-cache-update-interval-ms: 1000
 client:
   registerWithEureka: false
   fetchRegistry: false
This file configures the application to use port 7001 and the name discovery-server. It also contains the configuration for Eureka. Notice the last two lines. They are needed to avoid the discovery-server from registering with itself.
The rest of the configuration is not intended to serve a production system. It’s adjusted to handle only a few instances of each microservice and to allow you to quickly see changes while trying the application. In production deployments, you should tune it according to your specific requirements. See Eureka’s documentation for more information on this.
Compile and package the application using Maven and run it as a standard Java program using the command line (or your IDE):
cd discovery-server
mvn package
java -jar target/discovery-server-0.0.1-SNAPSHOT.jar
Go to http://localhost:7001 to see the dashboard included with Eureka. At this point, no instances are listed yet, but we’ll get to that in the next articles of this series.
