
When building business web apps, one of the most common tasks is data entry, that is, lots of webforms bound to domain objects or POJOs, validated against sometimes complex logic and finally persisted in a database or perhaps over REST to a remote server.
In this tutorial, we walk through the creation of a basic form that binds to a plain Java object, applies validation to the input fields, and dynamically changes based on the state of the form.
In this example, we are building a snack ordering system. The form requires the user to enter their name and the number of snacks. They then use a dropdown to select the type of snack, which enables and populates a second dropdown with snacks of that type. Once submitted, the populated object is added to a list and displayed in a data grid.
The UI fields are bound to a Java object through the Vaadin data binding API Binder. The Vaadin framework will take care of all HTML creation and communication between the server and the browser, so there is no need to introduce additional REST services.
Tools needed
This tutorial uses the Vaadin framework, Maven, and plain Java.
To start, download the basic Vaadin starter.
Import the project in your IDE of choice (see the instructions for IntelliJ IDEA, Eclipse, and NetBeans).
Once imported, remove all files except for MainView.java. Clear out the implementation of that file. You should have the following left:
MainView.java
@Route("")
public class MainView extends VerticalLayout {

  public MainView() {

  }
}
We now have a good, clean slate to start working on: a VerticalLayout that displays its contents stacked on top of each other that responds to the empty route, that is the context root.
In addition to the UI class, we need a POJO to serve as the data model. Create a new Java class SnackOrder.java in the same package as MainLayout.java.
SnackOrder.java
public class SnackOrder {
  private String name = "";
  private String snack = "";
  private Integer quantity = 1;

  public String getName() {
    return name;
  }

  public void setName(String name) {
    this.name = name;
  }

  public String getSnack() {
    return snack;
  }

  public void setSnack(String snack) {
    this.snack = snack;
  }

  public Integer getQuantity() {
    return quantity;
  }

  public void setQuantity(Integer quantity) {
    this.quantity = quantity;
  }
}
Creating the components for the form and grid
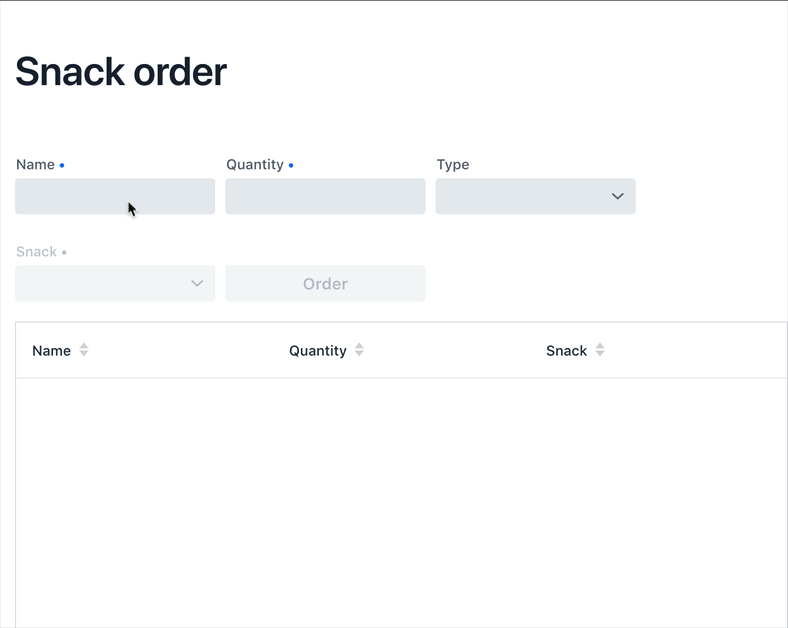
Start by creating and putting all the necessary UI components on the screen. The UI consists of two main parts: the form and the data grid. In addition to those, we have a heading.
MainView.java
@Route("")
public class MainView extends VerticalLayout {

  private Grid<SnackOrder> snackOrderGrid = new Grid<>(SnackOrder.class);

  public MainView() {
    add(
        new H1("Snack order"),
        buildForm(),
        snackOrderGrid);
  }

  private Component buildForm() {
    // Create UI components (2)
    TextField nameField = new TextField("Name");
    TextField quantityField = new TextField("Quantity");
    ComboBox<String> snackTypeSelect = new ComboBox<>("Type", Collections.emptyList());
    ComboBox<String> snackSelect = new ComboBox<>("Snack", Collections.emptyList());
    Button orderButton = new Button("Order");
    Div errorsLayout = new Div();

    // Configure UI components
    orderButton.setThemeName("primary");

    // Wrap components in layouts (3)
    HorizontalLayout formLayout = new HorizontalLayout(nameField, quantityField, snackTypeSelect, snackSelect, orderButton);
    Div wrapperLayout = new Div(formLayout, errorsLayout);
    formLayout.setDefaultVerticalComponentAlignment(Alignment.BASELINE);
    wrapperLayout.setWidth("100%");

    return wrapperLayout;
  }
}-
On the top level, we have three components: the heading, the form, and the grid. The form creation is complicated, so we move that into a separate method.
-
Create UI components for each of the properties in
SnackOrder. -
Define how the components should get laid out.
HorizontalLayoutdisplays all the fields next to each other, and theDivwrapping the form and error messages puts them on top of each other.
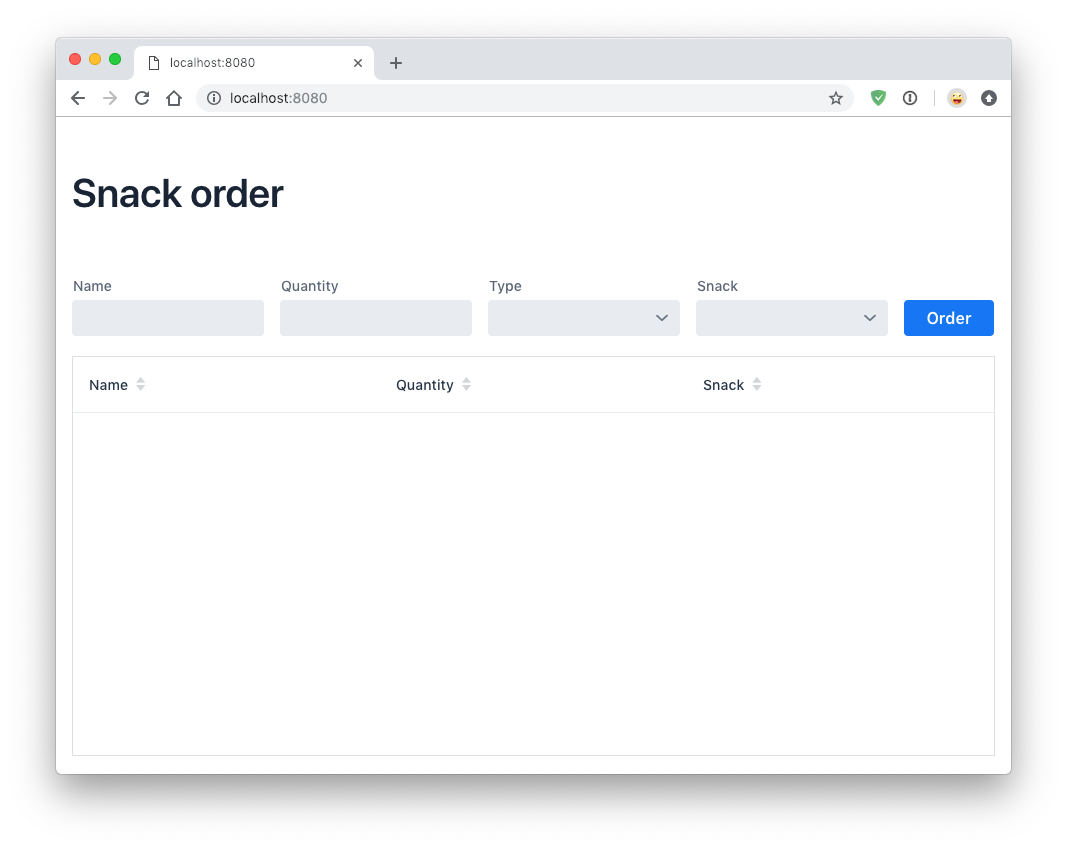
Run the application through maven:
mvn package jetty:runNavigate to http://localhost:8080, and you should now see the following:
Dynamically populate a select based on a form value
We need some options for snacks to order. Add the following Map of snack options at the beginning of the buildForm method:
MainView.java
  private Component buildForm() {

    Map<String, List<String>> snacks = new HashMap<>();
    snacks.put("Fruits", Arrays.asList("Banana", "Apple", "Orange", "Avocado"));
    snacks.put("Candy", Arrays.asList("Chocolate bar", "Gummy bears", "Granola bar"));
    snacks.put("Drinks", Arrays.asList("Soda", "Water", "Coffee", "Tea"));

    // remainder omitted ...
  }
Then update the snack type select to display the different types of snacks.
- ComboBox<String> snackTypeSelect = new ComboBox<>("Type", Collections.emptyList());
+ ComboBox<String> snackTypeSelect = new ComboBox<>("Type", snacks.keySet());
Next, disable the snack selection ComboBox initially, and add a listener on the snack type select that can be used to enable it with the correct options based on the type selection.
MainView.java
  private Component buildForm() {
    // Field creation

    // Only enable snack selection after a type has been selected.
    // Populate the snack alternatives based on the type.
    snackSelect.setEnabled(false);
    snackTypeSelect.addValueChangeListener(e -> {
      String type = e.getValue();
      boolean enabled = type != null && !type.isEmpty();
      snackSelect.setEnabled(enabled);
      if (enabled) {
        snackSelect.setValue("");
        snackSelect.setItems(snacks.get(type));
      }
    });

  }
Now, if you re-run the application, you can see that the snacks are dynamically updated based on the selection in the type select.
Binding a Java object to form inputs
With the UI components in place and snack type selection working, the next task is to bind them to the SnackOrder model and define validation rules. We do this using Vaadin’s Binder API.
MainView.java
  private Component buildForm() {
    // Inputs and select logic

    Binder<SnackOrder> binder = new Binder<>(SnackOrder.class);
    binder.forField(nameField)
        .asRequired("Name is required")
        .bind(SnackOrder::getName, SnackOrder::setName);
    binder.forField(quantityField)
        .asRequired()
        .withConverter(new StringToIntegerConverter("Quantity must be a number"))
        .withValidator(new IntegerRangeValidator("Quantity must be at least 1", 1, Integer.MAX_VALUE))
        .bind(SnackOrder::getQuantity, SnackOrder::setQuantity);
    binder.forField(snackSelect)
        .asRequired("Please choose a snack")
        .bind(SnackOrder::getSnack, SnackOrder::setSnack);
    binder.readBean(new SnackOrder());
  }
First, we create a Binder of type SnackOrder. We then use it to bind each field to a property on SnackOrder. The properties are bound with method references for type safety.
For each binding, you can configure whether or not it is required, and optionally add converters or validators. Converters convert between the underlying data value, for instance Integer for order, and the presentation value which is String. Validators validate the input against a given rule. Vaadin comes with several ready-made converters and validators for common use cases, and you can write your own for more complex validation or custom conversion.
Finally, call readBean with a new SnackOrder, so the binder has a place to write values.
Only enable the submit button when the form is valid
When possible, it’s good practice to help the user do the right thing. When creating a form, we can guide the user by not enabling the Order button before the form is valid.
We can accomplish this by adding a StatusChangeListener on the Binder. Add the following right after the previous code, inside the buildForm method.
MainView.java
binder.addStatusChangeListener(status -> {
      // Workaround for https://github.com/vaadin/flow/issues/4988
      boolean emptyFields = Stream.of("name", "quantity", "snack")
          .flatMap(prop -> binder.getBinding(prop).stream())
          .anyMatch(binding -> binding.getField().isEmpty());
      orderButton.setEnabled(!status.hasValidationErrors() && !emptyFields);
    }
);
In the listener, you want to toggle the enabled property of the button based on status.hasValidationErrors(). Because of a bug in the current version of Vaadin, you also need to check that all required fields are non-empty. This will not be necessary once the bug has been fixed.
Save form values into a Java object and display form values in a data grid
The final part of the logic is saving the form data into a Java object and display the order in the data grid we created at the start.
Continue on the buildForm method by adding a listener to the order button.
MainView.java
orderButton.addClickListener(click -> {
  try {
    errorsLayout.setText(""); (1)
    SnackOrder savedOrder = new SnackOrder();
    binder.writeBean(savedOrder); (2)
    addOrder(savedOrder); (3)
    binder.readBean(new SnackOrder()); (4)
    snackTypeSelect.setValue(""); (5)
  } catch (ValidationException e) {
    errorsLayout.add(new Html(e.getValidationErrors().stream()
        .map(res -> "<p>" + res.getErrorMessage() + "</p>")
        .collect(Collectors.joining("\n")))); (6)
  }
});-
Clear out any errors that may be present from before.
-
Write the form contents into a new
SnackOrderobject. -
Call a (yet to be defined) method for adding the order to the grid.
-
Reset the bound form values by reading a new, empty,
SnackOrderobject -
Reset the type select separately, as it is not one of the bound fields.
-
Collect any validation error messages and display them in the error layout.
Add a list of SnackOrders as a field on MainView to keep track of the orders.
MainView.java
private List<SnackOrder> snackOrders = new LinkedList<>();|
Note
|
In a real application you would probably save the order to a database and read the list of orders from a database. |
Finally, implement addOrder for adding the newly created order to the table.
MainView.java
private void addOrder(SnackOrder order) {
  snackOrders.add(order);
  snackOrderGrid.setItems(snackOrders);
}
Run the application and test it out. You should now be able to add new orders to the grid with the dynamic form you created.
Conclusion
You now know how to build a web form for populating a Java object and displaying it. You can find the full source code in GitHub.