SuperDevMode is a new bleeding edge feature in GWT, enabling you to debug GWT Java code in the browser without the need for any plugins and enabling you to quickly redeploy changes you have done to your widget code. On my computer a full compilation of the default widget set from Vaadin with one additional widget takes around two minutes (for all browsers), a little under a minute for one browser while recompilation after a change using SuperDevMode takes less than 10s.
To use SuperDevMode with your Vaadin application you need to:
- Get a trunk build of GWT, for example this one built today.
- Create a new Vaadin Project in Eclipse (or use whatever you want and modify these instructions as needed)
- Use Vaadin 7.0.0.alpha2 (Download -> Show pre-release versions -> 7.0.0.alpha2)
- Modify the generated Root class to contain a button or some other interactive component, e.g. add addComponent(new Button("Hello"));
- Extract gwt-dev.jar, gwt-user.jar, gwt-codeserver.jar, json*.jar, validation*.jar from the downloaded GWT zip to WebContent/WEB-INF/lib
- Configure the project build path and remove the GWT jars that Vaadin has automatically added (Java Build Path -> Libraries -> Remove VAADIN_DOWNLOAD*)
- Create a widgetset by clicking the compile widget set button in Eclipse. It's ok to immediately abort the compilation, we first need the .gwt.xml file so we can modify it.
- Open the generated .gwt.xml file and add <set-configuration-property name="devModeRedirectEnabled" value="true" /> after the <inherits> tag
- Make a note of the fully qualified name of the widgetset, e.g. com.example.myproject.widgetset.MyprojectWidgetset
- Click the compile widget set button again and let it compile.
Starting the SuperDevMode Code Server:
- Create a new launch configuration for com.google.gwt.dev.codeserver.CodeServer (Run -> Debug Configurations... -> Java Application -> New).
- Select your project and set the main class to be com.google.gwt.dev.codeserver.CodeServer
- Go to "Arguments" and add the fully qualified widget set name as a program argument, e.g. com.example.myproject.widgetset.MyprojectWidgetset
- Go to "JRE" and ensure that you are using JDK6 for this configuration.
- Start the CodeServer. This will do an initial compile of the widget set and might take a while.
- When the initial compilation has finished, it will output an URL for the code server, something like:
The code server is ready.
Next, visit: http://localhost:9876/
Debugging in the browser
- Open the URL in Chrome, and you will see two buttons (Dev Mode On/Off). Drag these buttons to the bookmark bar.
- Start your Vaadin application in a server of your choice, e.g. Tomcat
- Open the Vaadin application in Chrome, e.g. http://localhost:8080/MyProject
- Click the "Dev Mode On" bookmark you added earlier. This will popup a dialog in which you can click "compile". This will do a quick recompile of the widget set (should be fast) and then you get back to the application.
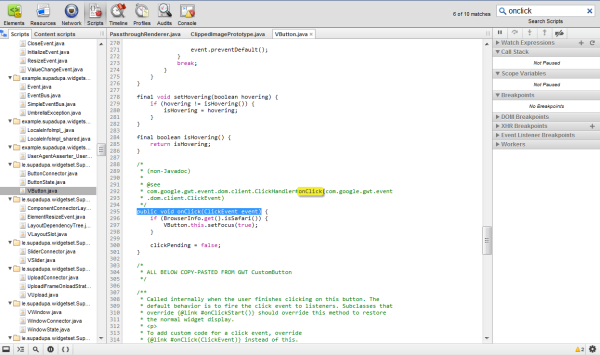
- To debug the application you still need to enable source maps in Chrome. This is done as right click -> Inspect Element -> Click the settings icon in the lower corner of the window and check "Scripts -> Enable source maps"
- Go to the Scripts tab in the inspector. In the scripts tab to the left you should see your Java source files (at least after pressing Ctrl-R). Click on a file, start typing VButton and you will find the source for the Vaadin Button widget.
- You can now use the Chrome debugger to set breakpoints, step through code etc in the same way as you would otherwise debug Javascript code.
- If you locate "public void onClick(ClickEvent event)" in the code and set a breakpoint at the first line in the method (does not seem to work to set a breakpoint on the method itself) you should see that the browser stops there when you click the button.

Making changes in Java code
Debugging is one thing that is always fun to do. However, when you find your problem, or want to modify the behavior of your widgets, you edit the Java code in Eclipse. After editing the Java code you need to click "Dev mode Off", "Dev Mode On" and "Compile" again for the changes to take effect. The compile at this point is a fast process compared to the full compilation of the widget set. In my simple test project the super dev mode recompilation took less than 10s after modifying my widget class.