
How to make your custom component a robust building block of your UI.
In this tutorial, I will share some more ideas in the domain of creating custom components. My previous blog post was about creating a custom component with Lit, this is the next chapter of the story. This time we will learn some aspects of testing custom components in Vaadin applications. Over time I have noticed that testing user stories in the application can be quite different from testing a component. Additionally, we must have thoroughly tested components before we can effectively test the application's user stories.
The basics
Defense in depth is another name for the mindset I prefer to use when it comes to software quality assurance. It simply means that we will use a variety of methodologies in our testing and coding to find bugs and stop regressions. In this instance, I'll essentially list four possible approaches in order of significance.
For demonstration purposes, I have created a simple custom component, ColorPicker. It consists of a web component implemented using Lit and its Java API. You can find the whole project in my GitHub repository.
Here are the features of the component. These are the behaviors I need to know when creating the tests.
- Java API implements necessary contracts of Vaadin field component
- One can pick a color from a palette; there is an input element as part of the component
- One can define a set of named preset colors, which can be picked from a combo box
- One can set the color by typing CSS compatible color string into the search field of the combo box
- In case of invalid input, the field will get an invalid state and has a value of null
- In compact mode the combo box is not shown, furthermore Lumo theme variants of text field based components can be applied
- The component has the usual functionalities of a field
- Label
- Helper text
- Error styles when set invalid, error message
- Can be disabled or read-only
The preceding activities must be organically carefully documented, for example, using JavaDocs and any related documentation I have created in the component. They are the promises, and my quality assurance procedures ensure that they are kept.
Ensure contracts
For example, if a method cannot take arbitrary values based just on type, I must enforce contracts. In our color picker, a good example of this is the value of the color, which is a String. But when I set the value of the color picker in Java, all Strings are not valid. The input element of color type accepts only six digits hex values like “#ffffff”, which is white. On the other hand, null is an accepted value.
We will check the format in the setter method and throw IllegalArgumentException with a message that is clear to understand. Otherwise, calling the method with an invalid String would be interpreted in the browser as black without an error message. The tactic of failing quickly will help users of the component to detect logic errors.
    @Override
    public void setValue(String value) {
        if (value == null) {
            super.setValue(null);
        } else if (value.matches("#......")) {
            super.setValue(value);
        } else {
            throw new IllegalArgumentException(
                    "Color must be in format #......");
        }
    }
Just noting here that inherited JavaDoc already includes throws IllegalArgumentException, so I do not need to copy that in my code. On the contrary, the existing JavaDoc mandates me to do the format checking and throw an exception.
    /**
     * Sets the value of this object. If the new value is not equal to
     * {@code getValue()}, fires a value change event. May throw
     * {@code IllegalArgumentException} if the value is not acceptable.
     * <p>
     * <i>Implementation note:</i> the implementing class should document
     * whether null values are accepted or not, and override
     * {@link #getEmptyValue()} if the empty value is not {@code null}.
     *
     * @param value
     *            the new value
     * @throws IllegalArgumentException
     *             if the value is invalid
     */
In Java, there are helpful utilities to enforce contracts, like Objects.requireNonNull.
Objects.requireNonNull(color, "color can't be null");
The above could also be written as an assert.
assert color != null : "color can't be null";
Asserts are run only when the application is run-as-asserts enabled, for example, “jvm -ea”. Hence if the checking of the contract would have too much negative impact on performance in normal conditions, you should consider this option.
Unit testing
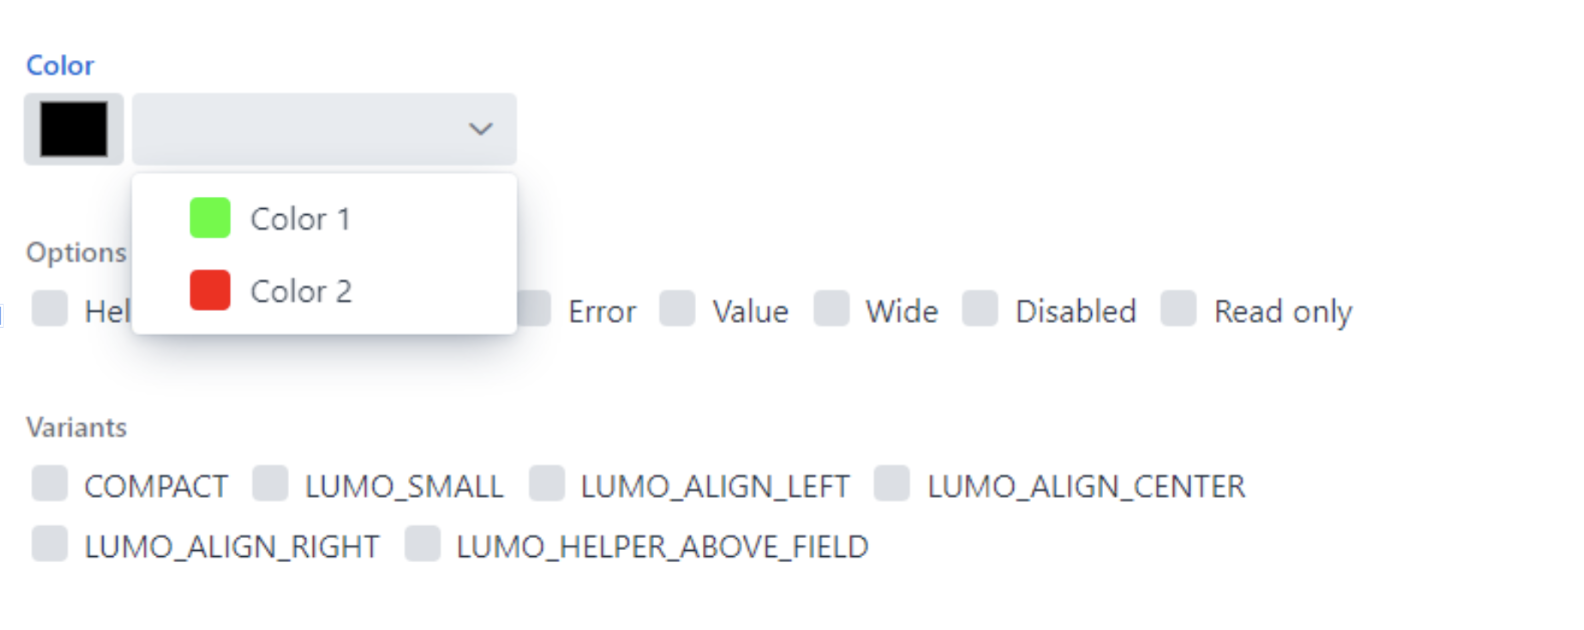
The first level of actual automated testing is unit testing. In Java, JUnit is a great tool for this. In this component project, there is a class ColorPickerTest. There is a collection of unit tests whose purpose is to verify that Java API works as expected. For example, there is a class ColorPreset in the component, which is used to define a preset. Furthermore, there is ColorPicker#setPresets(List<ColorPreset>) method that takes List<ColorPreset> as a parameter. This list is serialized to JsonArray and set to presets property of the web component itself. The following unit test verifies that serialization was correct.
    @Test
    public void setPresets_propertyIsSet() {
        ColorPicker colorPicker = new ColorPicker();
        colorPicker
                .setPresets(Arrays.asList(new ColorPreset("#00ff00", "Color 1"),
                        new ColorPreset("#ff0000", "Color 2")));
        JsonArray presetsJson = (JsonArray) colorPicker.getElement()
                .getPropertyRaw("presets");
        Assert.assertEquals("Array should have 2 items", 2,
                presetsJson.length());
        JsonObject colorJson = presetsJson.get(0);
        Assert.assertEquals("Color is not correct", "#00ff00",
                colorJson.getString("color"));
        Assert.assertEquals("Caption is not correct", "Color 1",
                colorJson.getString("caption"));
        colorJson = presetsJson.get(1);
        Assert.assertEquals("Color is not correct", "#ff0000",
                colorJson.getString("color"));
        Assert.assertEquals("Caption is not correct", "Color 2",
                colorJson.getString("caption"));
    }
Furthermore, I overrode the setValue method, hence I need to test if it is still functioning correctly.
    @Test
    public void setValue_valueChangeIsTriggered() {
        ColorPicker colorPicker = new ColorPicker();
        AtomicInteger count = new AtomicInteger(0);
        colorPicker.addValueChangeListener(event -> {
            count.addAndGet(1);
        });
        colorPicker.setValue("#ffffff");
        Assert.assertEquals("Value change was not triggered", 1, count.get());
        Assert.assertEquals("Value is not #ffffff", "#ffffff", colorPicker.getValue());
    }
In this test, I am using side effects to verify that the value change listener is really dispatched by incrementing a counter in the value change event. When the component is relatively simple, like in our case, there often isn't a need for mocking Vaadin’s internal classes. I can also rely on the fact that the Vaadin framework has an extensive set of unit and integration tests, so I decided not to replicate those. I am not writing tests for things where I am relying on a default implementation. I am focusing on testing functionality that I have either created from scratch or modified. Thus in the test bank, there is no test for HasHelper.
Testing this path is, however, not enough. Thus I have also added unit tests for cases of misuse. A good example of this is the earlier mentioned ColorPicker#setValue(String) with an illegal value. It is possible to check that an expected exception is thrown in JUnit. Thus I wrote a test to verify that IllegalArgumentException is thrown when the String does not match the accepted pattern.
    @Test(expected = IllegalArgumentException.class)
    public void colorPicker_setValue_wrongFormat() {
        ColorPicker colorPicker = new ColorPicker();
        colorPicker.setValue("blue");
    }
One general contract in the Vaadin framework is that all classes need to be serializable. In my case, I have added ColorPreset POJO there, which is defined inside the class. Thus I have a couple of tests that verify I have not broken this contract.
@Test
    public void colorPresetSerializable() throws IOException {
        ColorPreset preset = new ColorPreset("#00ff00", "Color 1");
        new ObjectOutputStream(new ByteArrayOutputStream()).writeObject(preset);
    }
These are only a few examples of the project's 15 unit tests. You may verify them by inspecting the source code. They restate the preceding notions. The tests are written in such a way that they are concise and minimal. I've written tests for each behavior separately.
My last point is about code coverage. The figures provided by code coverage tools are just suggestive. I got to 100% and then added a few extra assertions to cover various behaviors. For example, eliminating this from the first unit test will not reduce the code coverage of my tests.
Assert.assertEquals("Array should have 2 items", 2, presetsJson.length()); Enumerating various use cases and behaviors of the component is more important than code coverage. As a result, although I do not claim that this unit test suite is flawless, it is most likely adequate.
Integration testing
The most important part of the implementation is the web component itself. The unit tests explained above hardly touch that. I do not even need to start the test application to run the unit tests. So they are executed even without the actual web component being present, which is defined by color-picker.ts.

In order to cover testing of the web component’s behaviors, I am adding some integration tests or what sometimes are called end-to-end tests. This means that tests are performed by operating an actual UI application with an actual browser. This adds a third method to my repertoire of assuring the quality of the ColorPicker component.
Vaadin has a product called TestBench that extends Selenium for testing Vaadin UIs and components. I decided to use that. Thus the project needs to have a test scope dependency to vaadin-testbench. The artifact will give transitive dependencies to JUnit and Selenium, so I do not need to add them.
  <dependency>
       <groupId>com.vaadin</groupId>
       <artifactId>vaadin-testbench</artifactId>
       <scope>test</scope>
 </dependency>
In order to efficiently test the component, I need to create a test UI, a fixture that allows me to modify the component state on the fly. When testing a component in isolation from the application, I can create a UI from the perspective of testing instead of serving a purpose in the actual application. This has some benefits, one of them being that tests can be written in a very concise manner.

The project also uses a web driver manager, so I do not need to maintain the right version of the browser driver manually. A browser driver is a piece of software that remotely controls the browser during the test.
When the test starts, some setup is needed. I have isolated this in AbstractViewTest class. Furthermore, I have written a ColorPickerElement class to operate the component when tested.
@Element("color-picker")
public class ColorPickerElement extends TestBenchElement implements HasHelper {
    // Check the full implementation in github.com/tatulund/ColorPicker
}
It is extending the basic TestBenchElement base class. All Vaadin framework stock components have similar classes.
After this pre-work, I can start writing integration tests. The first example I have is verifying that the value set on the server side is getting applied to the component. The UI has CheckBoxGroup, where I have various options. For example, if you select “Value”, it will call colorPicker.setValue(“#ffffff”) in the Java code.
    @Test
    public void setValueFromServerWorks() {
        options.selectByText("Value");
        NotificationElement notification = $(NotificationElement.class).last();
        Assert.assertEquals("Value change did not have right color", "#ffffff",
                notification.getText());
        Assert.assertEquals("Color property was not set", "#ffffff",
                colorPicker.getProperty("color"));
        Assert.assertEquals("Color value was not propagated to picker",
                "#ffffff", colorPicker.getPicker().getPropertyString("value"));
    }
Another simple test case is to verify that a compact theme variant is being applied. This builds on top of the unit test that verifies the handling of the attribute in the Java code. On top of that, I need to verify that the compact theme is observed in the web component. Also, I can verify that ComboBox is actually getting hidden.
    @Test
    public void setVariantsWorks() {
        variants.selectByText("COMPACT");
        Assert.assertEquals("compact", colorPicker.getAttribute("theme"));
        ComboBoxElement combo = colorPicker.getComboBox();
        waitForElementInvisible(combo);
    }
Similarly to my unit testing, I also need to add various test cases for abuse scenarios. Here are two examples. The first one is a simple test for selecting a preset when the field is disabled. This naturally should not produce a value change event. The test UI has a value change listener that updates the count of received events in an element whose id is “events.”
    @Test
    public void presetNotSelectedWhenDisabled() {
        options.selectByText("Disabled");
        colorPicker.selectPreset("Color 2");
        WebElement events = findElement(By.id("events"));
        Assert.assertEquals("No event should be triggered", "",
                events.getText());
    }
A more complex example is that the field should turn invalid when the wrong input is typed. I start by first setting a value to the field. Then I input a random string. In this scenario, the new value should be null, and the field should have an invalid attribute set.
    @Test
    public void invalidCssInputIsDetected() {
        options.selectByText("Value");
        colorPicker.focus();
        colorPicker.sendKeys("weriuouwqero");
        blur();
        NotificationElement notification = $(NotificationElement.class).last();
        Assert.assertEquals("Invalid input was not detected", "null",
                notification.getText());
        Assert.assertEquals("New value should be null", null,
                colorPicker.getPropertyString("color"));
        Assert.assertEquals("Field should be invalid", "",
                colorPicker.getPropertyString("invalid"));
        colorPicker.focus();
        colorPicker.sendKeys("blue");
        blur();
        Assert.assertEquals("New value should be null", null,
                colorPicker.getPropertyString("invalid"));
    }
Note the last step of the test. I am applying valid input after an invalid one to verify that the field no longer has an invalid attribute set.
Again these examples are scratching just the surface. I recommend checking the repository for the rest of the cases, there are a total of 17 of them. Also, note that I have no test covering picking color from the input elements popup. This is simply not possible with Selenium, as that popup is a native browser implementation. On the other hand, I should trust that the Chrome team has tested for that.
Visual testing
The last tool I am presenting in this tutorial is visual testing or screenshot testing. In my case, this is also performed with the TestBench tool.
The integration tests I presented in the previous chapter rely on DOM-level inspection. I can verify with them that the component has certain child elements and that they have properties and attributes set in a certain way. This is very powerful but still has its limitations.
Visual tests are very simple to set up and powerful in order to verify the visual looks of the component in different states. There are two ways to use compareScreen, either with the full viewport, like in this example, or just with the elements like the next one.
   @Test
    public void colorPickerOpenScreenshotTest() throws IOException {
        colorPicker.openPopup();
        sleep();
        Assert.assertTrue(testBench().compareScreen(ImageFileUtil
                .getReferenceScreenshotFile("color-picker-popup.png")));
    }
The issue with a full-view port is that all other UI components may interfere with testing. CSS animations, for example, might have timing difficulties. As a result, I prefer to do snapshot testing using the element itself. This test ensures that invalid styles are applied similarly in the input element and the ComboBox.
    @Test
    public void colorPickerInvalidScreenshotTest() throws IOException {
        options.selectByText("Invalid");
        Assert.assertTrue(colorPicker.compareScreen(ImageFileUtil
                .getReferenceScreenshotFile("color-picker-invalid.png")));
    }
How did I obtain the reference screenshots shown here? It is easy. Just run the test and let it fail, as there is no reference shot. Each time compareScreen fails, it will produce a new candidate reference screenshot. Just check if the file is acceptable, and then move it to the folder of reference screenshots.

Both tests might be performed by examining the CSS values of the element and child elements. However, this will result in a rather lengthy code.
Why am I not implementing all my tests as visual tests? As you see, I have seven visual tests in my test bank. Well, the drawback is that they are flakier. Minor rendering discrepancies, especially due to browser version upgrades, may cause the tests to fail even if nothing is wrong. This increases the amount of time spent on maintenance.
I have in my setup parameters tuned so that there is more tolerance, and the viewport is fixed to a certain size so that results would be more predictable.
 // We do screenshot testing and adjust settings to ensure less flakiness
        Parameters.setScreenshotComparisonTolerance(0.05);
        Parameters.setScreenshotComparisonCursorDetection(true);
        testBench().resizeViewPortTo(800, 600);
        Parameters.setMaxScreenshotRetries(3);
        Parameters.setScreenshotRetryDelay(1000);
Integration tests and visual tests are also slower to execute than unit tests. When you check out my project and run the tests, you will notice that unit tests take a few seconds, while TestBench tests run one to two minutes. However, if you were to do all the tasks in these tests manually, it would take even longer.
Final thoughts
In order to ensure the quality of the ColorPicker component, I used a combination of strategies. I began with the most basic method and progressed from there when the technique I was using diminished. The idea is that several approaches detect faults in different ways, providing maximum coverage. My coverage metric is not code coverage since it is unsuitable for bespoke Vaadin components. I've shown via unit tests that I can get 100% code coverage before running out of unit test ideas. I hadn't even touched color-picker.ts at that time. My custom component employs both Java server-side and TypeScript client-side code. Relationships between TypeScript implementations and Java test code cannot be established by analysis tools. My unit tests, integration tests, and visual tests also have some overlap.
Can I develop custom components in a true TDD fashion, which means first writing a failing test and then developing against it? Unfortunately not. I am writing Java API and TypeScript implementations in parallel. The Java API is developed against the component, not just against possible unit tests. And both sides of the implementation are usually refactored in the process.
Writing integration tests requires inspecting the DOM with browser developer tools, which means that you usually need to have some draft implementation of the component before it is possible to write integration tests. Before automating the test cases, you must manually write them and modify the test UI. Writing tests as part of the process will however compel you to think about use cases and, as a result, the design more comprehensively. You'll also wind up documenting your work more extensively.
Is the ColorPicker now free of flaws? Obviously not. It is surely well-documented and well-tested. But both are limited by the imagination of possible use cases. It is a good rule of thumb that once the component is in the hands of another developer, they will design additional use cases that you may have not considered. Some are legitimate, while others may not be.