
Note: This post has been updated to use Vaadin 8.
This guide walks you through the process of connecting to MySQL databases from Java web applications using JDBC and Spring Framework. The UI part will be built using Vaadin Framework that allows you to build modern single-page web apps with only Java.
When connecting to databases from Java applications you have two main options: using an ORM, such as JPA, or using low level JDBC. ORM frameworks are a better option if you are developing an application from scratch. The approach shown in this guide suits cases in which you have an existing and probably old database which might not really be compatible with an ORM, such as JPA.
Prerequisites
This guide assumes you have previously installed MySQL Server, your favorite IDE, and Maven. No previous experience with Spring Framework is required to follow this guide.
Kickstart your Vaadin 8/Spring development with an app template:
Download Vaadin Bakery App Starter Now!
Create a Spring-based project
The easiest way to create a new Spring-based application is by using Spring Boot and Spring Initializr. Spring Boot simplifies the process of developing Spring applications. Spring Initializr is a web-based tool that allows you to create project skeletons for Spring applications.
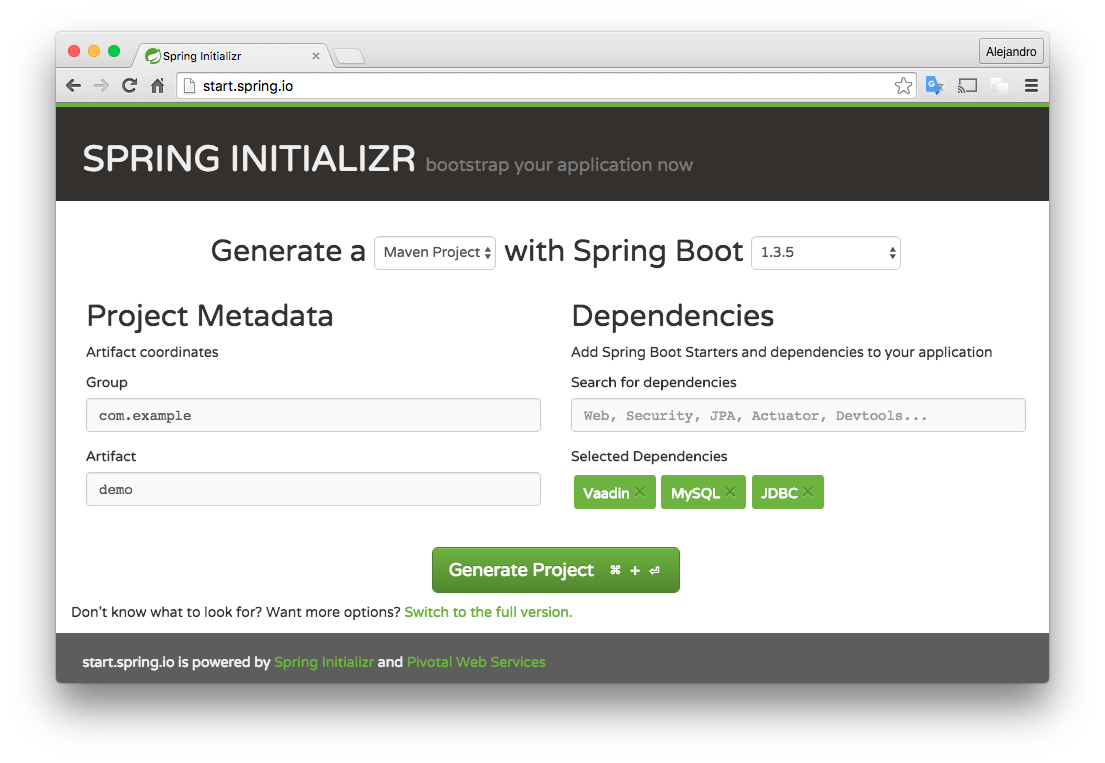
To create a new application, go to http://start.spring.io and add the Vaadin, MySql, and JDBC dependencies as shown in the following figure:
Click the Generate Project button and extract the generated zip file. You should get a Maven project you can import into your favorite IDE.
Create a MySQL database
Connect to the MySQL instance and create a new schema:
CREATE SCHEMA demo;
Create the following table:
CREATE TABLE customers(
    id SERIAL,
    first_name VARCHAR(255),
    last_name VARCHAR(255)
);
Add some test data, such as the following:
INSERT INTO customers(first_name, last_name) VALUES('Bruce', 'Tate');
INSERT INTO customers(first_name, last_name) VALUES('Mario', 'Fusco');
INSERT INTO customers(first_name, last_name) VALUES('Edson', 'Yanaga');
INSERT INTO customers(first_name, last_name) VALUES('Anton', 'Arhipov');
INSERT INTO customers(first_name, last_name) VALUES('Andres', 'Almiray');
Create a Customer class
Create the following Customer class to encapsulate the data from the customers table:
package com.example;

public class Customer {

    private Long id;
    private String firstName, lastName;

    public Customer(Long id, String firstName, String lastName) {
        this.id = id;
        this.firstName = firstName;
        this.lastName = lastName;
    }

    ... setters and getters ...
}
Create a backend service class
Start by configuring the database connection in the application.properties file inside the src/main/resources directory:
spring.datasource.url=jdbc:mysql://localhost/demo
spring.datasource.username=user
spring.datasource.password=password
spring.datasource.driver-class-name=com.mysql.jdbc.Driver
You may need to change the username and password used to connect to your database.
We will encapsulate the logic to query and modify data in a service class. This service class will use Spring Boot’s autoconfiguration capabilities and Spring Framework’s JdbcTemplate class to connect to the database and to query and update rows in the customers table.
Create the following CustomerService class:
package com.example;

import org.springframework.beans.factory.annotation.Autowired;
import org.springframework.jdbc.core.JdbcTemplate;
import org.springframework.stereotype.Component;

import java.util.List;

@Component
public class CustomerService {

    @Autowired
    private JdbcTemplate jdbcTemplate;

    public List<Customer>

            findAll() {
        return jdbcTemplate.query(
            "SELECT id, first_name, last_name FROM customers",
                (rs, rowNum) -> new Customer(rs.getLong("id"),
                rs.getString("first_name"), rs.getString("last_name")));
    }

    public void update(Customer customer) {
        jdbcTemplate.update(
            "UPDATE customers SET first_name=?, last_name=? WHERE id=?",
            customer.getFirstName(), customer.getLastName(), customer.getId());
    }

}
Notice how the CustomerService class is annotated with @Component. Spring Framework will automatically create an instance of this class. The term for this kind of instance is a bean. We can inject beans in other beans. Spring Boot itself has defined some beans for us that we can inject into the CustomerService bean. One way of injecting beans is by using the @Autowired annotation. We used this annotation to tell Spring to inject a bean of type JdbcTemplate. This is one of the beans Spring Boot has predefined for us.
The JdbcTemplate class simplifies the use of JDBC. For example, the update method of the JdbcTemplate class will execute an update (or delete) statement using Prepared Statements which protects against SQL injection.
The findAll method in the CustomerService uses Java 8 lambda expressions to map the values of the SQL query result with Customer instances.
Implement the UI
Create a Vaadin UI by implementing the VaadinUI class:
package com.example;

import com.vaadin.data.Binder;
import com.vaadin.server.VaadinRequest;
import com.vaadin.spring.annotation.SpringUI;
import com.vaadin.ui.*;
import org.springframework.beans.factory.annotation.Autowired;

import java.util.List;

@SpringUI
public class VaadinUI extends UI {

    @Autowired
    private CustomerService service;

    private Customer customer;
    private Binder<Customer> binder = new Binder<>(Customer.class);

    private Grid<Customer> grid = new Grid(Customer.class);
    private TextField firstName = new TextField("First name");
    private TextField lastName = new TextField("Last name");
    private Button save = new Button("Save", e -> saveCustomer());

    @Override
    protected void init(VaadinRequest request) {
        updateGrid();
        grid.setColumns("firstName", "lastName");
        grid.addSelectionListener(e -> updateForm());

        binder.bindInstanceFields(this);

        VerticalLayout layout = new VerticalLayout(grid, firstName, lastName, save);
        setContent(layout);
    }

    private void updateGrid() {
        List<Customer> customers = service.findAll();
        grid.setItems(customers);
        setFormVisible(false);
    }

    private void updateForm() {
        if (grid.asSingleSelect().isEmpty()) {
            setFormVisible(false);
        } else {
            customer = grid.asSingleSelect().getValue();
            binder.setBean(customer);
            setFormVisible(true);
        }
    }

    private void setFormVisible(boolean visible) {
        firstName.setVisible(visible);
        lastName.setVisible(visible);
        save.setVisible(visible);
    }

    private void saveCustomer() {
        service.update(customer);
        updateGrid();
    }
}
This class creates a UI containing a Grid component to show all the customers in the database and a form to edit customers’ first and last names. Notice how the VaadinUI class is annotated with @SpringUI. This means we can inject the CustomerService bean in this class and use it to read and update customers.
The most interesting part of this class is how data binding is managed. The Binder class allows us to connect the text fields with the corresponding Java properties in the Customer class.
Running the application
Spring Initializr created the Application class with a standard main method defining the entry point of the Java application. When you run the application using this method, Spring Boot configures and runs a Jetty server on port 8080 (all this can be configured).
Before running the application you have to build it. You can use the command line to build and run the application:
mvn install

cd target
java -jar demo-0.0.1-SNAPSHOT.jar
The following is a screenshot of the application:

Tips for more advanced requirements
The following sections give hints on how to implement more advanced requirements.
Connecting to multiple databases
In order to connect to multiple databases you need to define additional data sources and set the data source in the JdbcTemplate instance. The following is one way of defining an additional data source:
@Configuration
public class DatabaseConfig {

    @Bean
    @ConfigurationProperties(prefix = "datasource2")
    public DataSource dataSource2() {
        return DataSourceBuilder.create().build();
    }

}
The connection properties can be added into the application.properties file and should be defined using the prefix specified in the @ConfigurationProperties annotation:
datasource2.url=jdbc:mysql://localhost/demo2
datasource2.username=user2
datasource2.password=password2
datasource2.driver-class-name=com.mysql.jdbc.Driver
The data source can be injected and used in a service class as shown below:
@Component
public class CustomerService2 {

    private JdbcTemplate jdbcTemplate;

    @Autowired
    public void setDataSource2(DataSource dataSource2) {
        jdbcTemplate = new JdbcTemplate(dataSource2);
    }

    ... findBy / update / delete methods ...
}
Using named parameters
Use the NamedParameterJdbcTemplate class to use named parameters in queries instead of classic question mark placeholders:
@Component
public class CustomerService {

    @Autowired
    private NamedParameterJdbcTemplate jdbcTemplate;

    ...

    public void update(Customer customer) {
        jdbcTemplate.update(
                "UPDATE customers SET first_name=:first_name, last_name=:last_name WHERE id=:id",
                new HashMap

           ()
        );
    }

}
Invoking stored procedures
For simple stored procedures such as the following:
CREATE PROCEDURE find_all_customers()
BEGIN
    SELECT id, first_name, last_name FROM customers;
END
A simple call to the procedure using JdbcTemplate is enough:
jdbcTemplate.query("CALL find_all_customers()", ...);
However, for more sophisticated store procedures (such as when having multiple OUT parameters) use the SimpleJdbcCall or StoreProcedure classes.
Lazy loading
One way to implement lazy loading is to use LIMIT and OFFSET clauses in the SQL queries and introduce parameters for them in the service class. For example:
public ListfindAll(int limit, int offset) { return jdbcTemplate.query( "SELECT id, first_name, last_name FROM customers LIMIT ? OFFSET ?", new Object[] {limit, offset}, (rs, rowNum) -> new Customer(rs.getLong("id"), rs.getString("first_name"), rs.getString("last_name")) ); }
The UI implementation should include components to change the offset accordingly.
It’s also possible to make the Grid component to lazy load data. An easy way to do this is by using the Grid.setDataProvider method. This strategy is explained in this blog post.
Learn more about Vaadin
Discover the easiest way to build web apps in Java
Related reading that might interest you
Download our free guide to the Future of Web Apps