
We just recently published a new Maven page at vaadin.com/maven. It contains Maven “coordinates” for Vaadin projects and a super handy generic Maven repository search. But does it help you if you haven’t used Maven before? No. Are our most interesting Java examples built with Maven these days? Yes.
This tutorial tries to cover Maven basics as little as possible, but still enough to get your first Maven project up and running. Don’t expect to learn how to setup a perfect build for your project based on this tutorial alone, but you should be able to grab an existing Maven project, set it up in your IDE, build it and run it.
Download your app starter now
Get a quickstart with the one of our project templates
Requirements: pom.xml and the code
The “heart” of the Maven built project is the pom.xml file at the root of your project structure. It contains the essential metadata about your project that various tools, including the mvn command line tool, can work with. The fundamental difference to e.g. ANT build scripts is, it doesn’t directly express how your project should be built, but what it is like. With Maven you do not configure your build, but describe your project’s characteristics, like artifact type and dependencies, to the pom.xml.
Your tools, like your IDE, then read the pom.xml file to know how to handle your project. Modern IDEs, even the latest versions of Eclipse, understand pom.xml files really well, out of the box. Thus, your Maven built project doesn’t need to contain IDE settings files in your source code repository. Still, you can set it up in a couple of seconds and your co-worker can do the same in his/her favourite IDE. If your IDE can’t automatically configure the project for you, you are either doing something wrong or some very custom things.
Importing the project to IDE
The best tool to get started with Maven is probably your favourite IDE. With IDE you can easily navigate in your source code, build the project, make changes and learn! Use the IDE dude, CLI is for the nerds! :-) Seriously, it is often handy to have Maven installed as a CLI tool as well. In case you are using Maven from CLI, make sure you have a fresh version Maven installed, at least newer than 3.
IDEs have lived longer than Maven, though, so not all things are necessarily that intuitive yet. The most critical part is to import it correctly to your IDE. Below you'll find some IDE specific instructions.
NetBeans & IntelliJ IDEA
My favourite IDEs, NetBeans and IntelliJ, are the easiest ones with Maven projects. If you have checked your Maven project from a source code management system, you can just go and do “File-> Open/Open Project” and choose the project’s root directory you wish to open. NetBeans has clearly the best Maven support and it even synchronizes the project settings like its name and Java compiler settings from the IDE UI back to pom.xml automatically.
With IntelliJ, a small gotcha is to click “Enable auto configuration on pom.xml change” on the very first time IntelliJ asks it. You will pretty much always want that and make changes in build settings to pom.xml instead of IntelliJ settings.
Eclipse
One thing to ensure with Eclipse is to have JDK installed and configured as the default in Eclipse preferences. Eclipse can to some extend work with plain JRE , but all serious Java developers should have JDK installed. See these instructions if you are not sure that you have JDK set-up.
With Eclipse, you should always open Maven projects using “File->Import->Maven->Existing Maven projects”. This way Eclipse figures out it is a Maven project and knows what to do with it. The same thing can be accomplished via direct source control imports, but the above is the method I can trust with Eclipse.
You should always try to make all build settings to pom.xml instead of IDE specific settings. This way e.g. your CI server can still build your project if you e.g. change its Java version. If you change something in pom.xml, Eclipse will detect this, but it most often does nothing but just shows a small red warning in your project. In this case, you can right click on the project and choose “Maven->Update Project…”. This will basically re-configure the project in Eclipse, based on the metadata that you describe in the pom.xml.
Although Eclipse is said to have the worst Maven support among the major IDEs, it kind of goes quite far when trying to understand the pom.xml. In some cases, it shows scary red warnings about build details it cannot interpret. Most often this is nothing serious and everything works fine if you just execute one full Maven build before actually starting with the project.
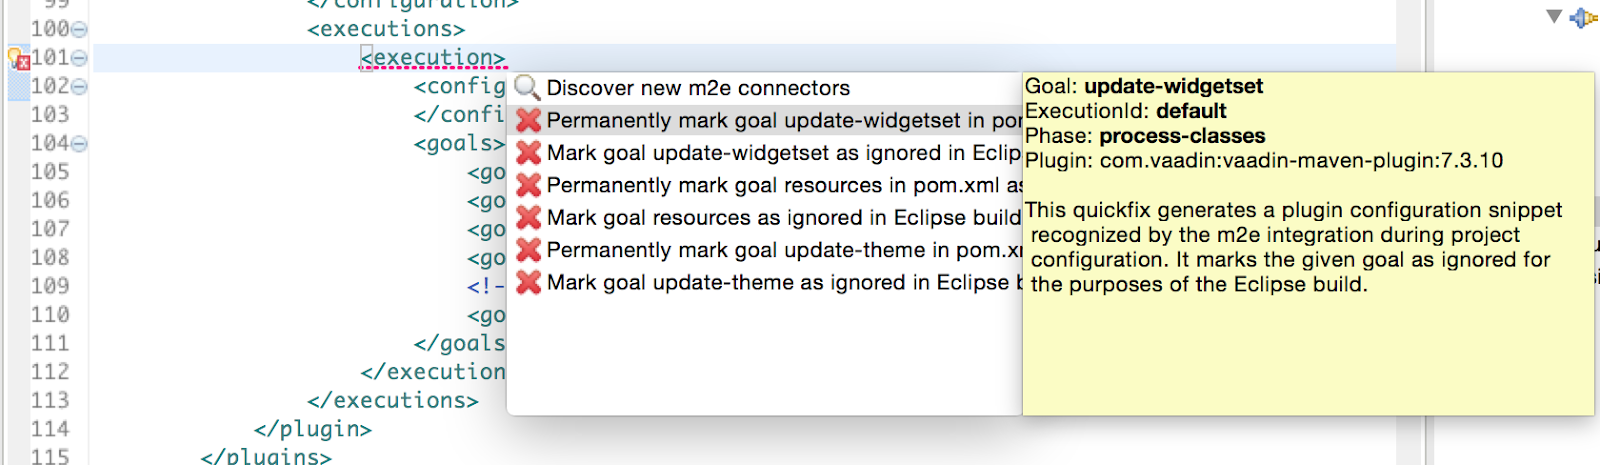
A freshly imported Vaadin project showing errors that can safely be marked as ignored.
In the above example with vaadin-maven-plugin, Eclipse doesn’t know what to do with “widgetset compilation”. In an ideal world, our Eclipse integration should support Maven projects better and yell that “I can take care of this”. Currently you can just brutally use “autofix” (CTRL-F1) and force Eclipse to ignore these steps and execute full build via Maven once after import. During the build, vaadin-maven-plugin generates the required client side resources for your project and everything works just fine.
Words about multi-module projects
Maven emphasis modularization. One logical “project” may consist of multiple modules. In case your example project contains multiple pom.xml files, it is probably a so called multi-module project. Opening just its “parent-pom”, most often located at the root directory of the project, your IDE will by default suggest to open all its child modules. Don’t be afraid, just open them all if you are not sure what you are doing.
Building the project
In case you decided to install the CLI build tool, you can build a Maven project with “mvn install” from the root directory of the project. A multi-module project will automatically cascade the call to sub modules. If you have a basic Java project or a library, it will create a jar file into your target folder, a war file for web app projects and something else for other projects. The build also puts the “artifact” to your local repository.
Even if you imported the project to an IDE, I’d suggest to do a full build once you have imported it. During the build there are probably some dependencies that are downloaded and there might be some generated resources which need to be built. In Maven conventions, all generated stuff, like Java .class files are saved under “target” directory.
NetBeans
In NetBeans the full build is always done via Maven, so you can just use the Build Project functionality. Right clicking on the project, you can also choose “Custom->Goals” to specify the exact Maven command and custom parameters. Focusing the project also shows available plugin goals in the Navigator panel.
IntelliJ IDEA
Running “Make Project” in IntelliJ is almost the same as “mvn package” via CLI, but the build is executed by the IDE instead of the “real Maven build”. This is usually slightly faster than the full Maven build as a separate build process doesn’t need to be spawned. After importing the Maven project to IntelliJ, I tend to execute a full build with Maven once to make sure everything works fine. Using the quick search feature, open “Maven Projects” panel. To build the project using Maven, double click “install” under the your-module-name->Lifecycle.
Eclipse
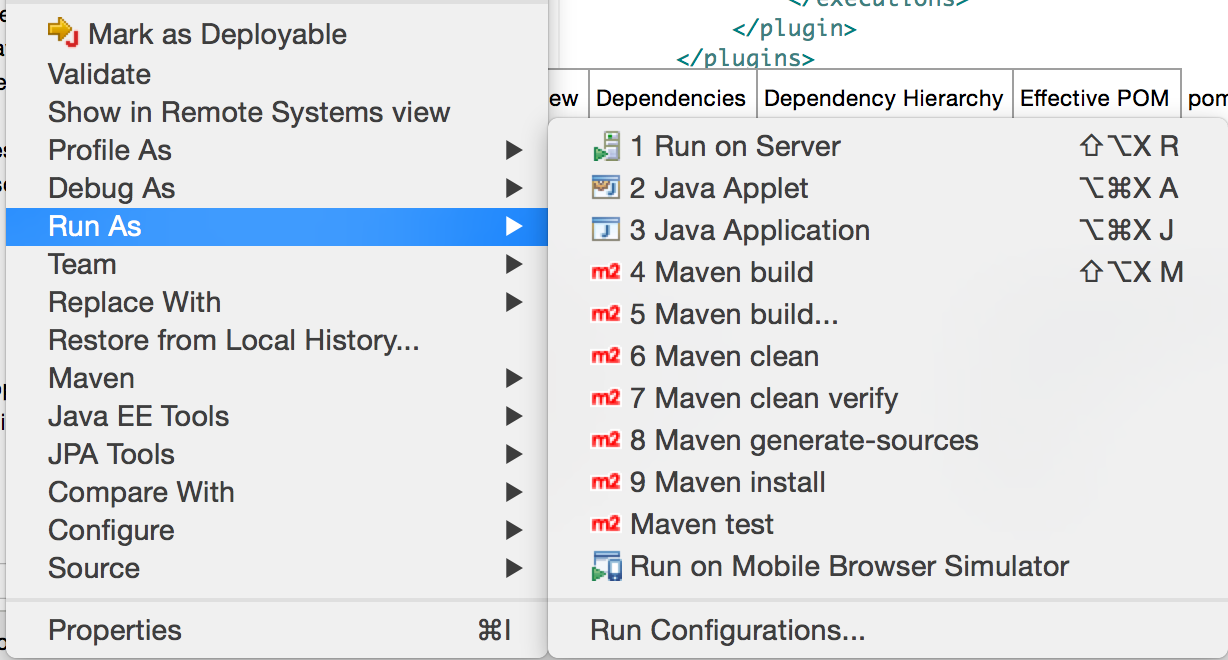
In Eclipse the most essential Maven goals are easily accessible via right click on the project and choosing “Run as”. For a newly imported module, you can choose “Maven install” to get its initial build done. You can also use custom goals or properties easily via “Maven build…”.
Speeding up the build
Your first build with Maven will take long. Period. Maven will famously download you the “whole interwebs”. It needs a lot of modules for various build steps and it also takes care of dependencies for your project. Next builds will be substantially faster because Maven caches the dependencies and builds plugins to your local Maven repository.
If there are lots of tests that you wish to skip during a development build, learn from the very beginning the parameter to skip all tests. To make a basic build without tests, issue mvn install -DskipTests. The parameter can also be passed with all IDEs.
When you progress with your Maven skills, be sure to learn about profiles as well, which can for example help you to pass e.g. the above skipTests parameter during the development on your workstation. Also Maven profiles are well supported by IDEs.
Executing the actual application
The most interesting step with your cool example application is naturally to execute it locally, see how it looks like and try to make some changes to it. So how do you actually execute your Maven built application? Well, it depends. There is no common Maven goal to execute an “application”. Below you'll find instructions for both traditional war packaged web app and basic jar packaged application.
war file - a standard web application
If the project is a standard Java web application, the artifact of your project is a WAR file and packaging tag in your pom.xml has value war. There are a couple of methods, of which the most universal is to build the project and deploy the war file manually to a compatible server. But most probably you want to launch it directly from your IDE to make things like debugger and your JRebel work out of the box.
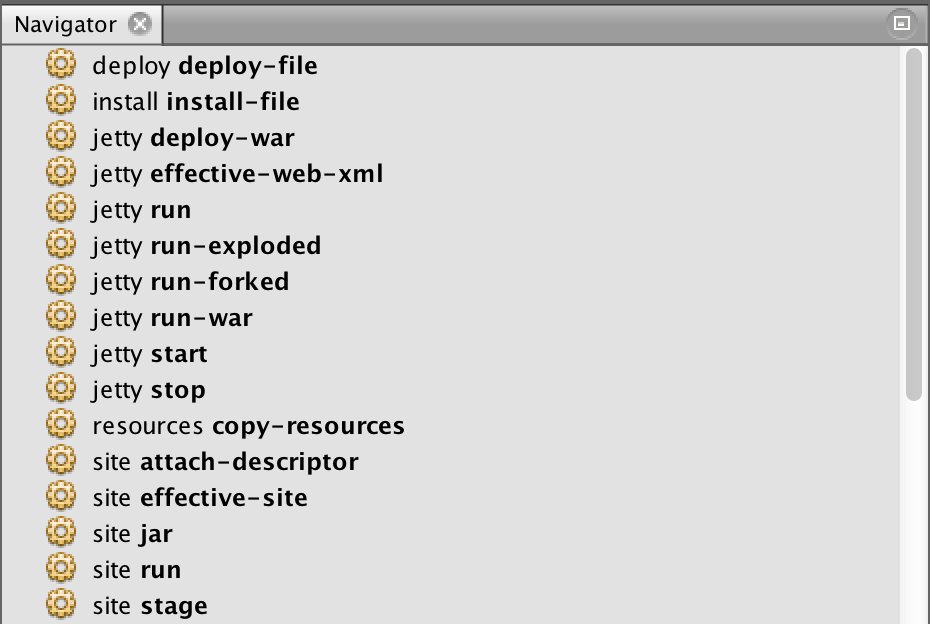
Jetty Maven Plugin goals shown by the Navigator panel in NetBeans. Choosing jetty run will launch the web project in a jetty server managed by Maven. No need to install a server at all.
Most application servers have excellent plugins for Maven. They can help you do the deployment to a remote server, but also to launch it locally. If your project has for example TomEE, WildFly or Jetty plugin installed, it is probably trivial to start the application. Those server plugins all have a “run” goal to launch an ad-hoc development server and deploy the webapp into it. Super-handy for quick hacking and testing, and you don’t even need to download and install the server separately.
As an example, you can check out my recent jpa-addressbook example from github and just issue ”mvn wildfly:run” from the project root or use the same goal with your IDE. Although it is a “heavy” Java EE project with “gazillions of dependencies”, Maven will with one single command package the application and deploy it to a local server, which it downloads for you, if necessary. In a moment you have your application available for testing from http://localhost:8080/.
The Run on Server feature in Eclipse works well with properly imported Maven WAR projects.
Another option to run your web application is to use your built-in server support in your IDE. All modern IDEs detect the project as a web app and you can just use your existing IDE skills to deploy it to your development server. Based on the details in the pom.xml, your IDE should know exactly how to do it for you.
jar file packaging - a "normal" application
Not all applications on Earth are web apps, and in fact, there are also Java web apps that aren’t actually packaged as WAR files. For example, Spring Boot apps are by default packaged as plain old JAR files. Their execution starts from the good old main method and packaged apps are launched in the traditional “java -jar“ style. The embedded web server will then serve your web application.

A Spring Boot application about to be “booted” directly from the good old main method in IntelliJ.
In this “main method style” application initialization, you can during the development phase just execute the main method directly from the IDE. All IDEs have always contained a shortcut to this, via context click on your class containing the main method. If you are working from command line, your Maven project might also have maven-exec-plugin configured that can issue the correct “java -jar” command with possibly a bit more complex classpath. And with those trendy Spring Boot apps, you can just issue “mvn spring-boot:run”.
Learn more about Vaadin
Discover the easiest way to build web apps in Java
Related reading that might interest you
Download our free guide to the Future of Web Apps
Summary
I originally planned to cover lots of other topics like conventions, build phases, plugins, dependency management, versioning, releases, generic project settings and java settings as well. But hey, with the above instructions you can already check out and play with pretty much any of the most interesting modern Maven built Java projects. I think this is exactly the Maven essentials for the inpatient developer.
In case you later want to learn more, I strongly suggest to go to maven.apache.org, read the basic documentation and understand the core concepts. Maven isn’t the easiest tool to start with, but it isn’t rocket science once you understand its fundamentals. But now it is time to return to the example project you initially wanted to play with, or verify your skills with my awesome Spring Data + Vaadin CRUD. The trick with it (Spring Boot application) is to realize it is kind of more like a normal Java application than a web application! ;-)
If you want a really quick start for your project, you could also watch our recent webinar on Vaadin archetypes.