
TestBench is a tool especially designed for testing Vaadin based applications at the UI level. It simulates user interactions like clicks and typing using a real or headless browser. To verify correct behavior developers can assert values and data on the page and even perform advanced screenshot comparisons. Tests can be written by hand or they can be recorded using TestBench Recorder. Most commonly TestBench is used to create automated acceptance or integration tests to avoid regressions and avoid using expensive humans to manually test everything.
One essential thing in automated acceptance or integration testing is to work on an as genuine environment as possible. For mobile web apps this hasn't really been possible before. Although dominant mobile browsers share the same Webkit rendering engine as Chrome and Safari, the previous solution of testing mobile web apps using a desktop browser hasn't been perfect.
The new WebDriver based TestBench 3 improves this situation and this makes TestBench 3 the best tool available for testing your TouchKit applications. There are drivers for both iOS and Android that allow tests to be run on genuine hardware or in a simulated or emulated environment. Both work by installing a custom "browser application" on the testing device. For iOS the app is called iWebDriver. It cannot be installed from the official App Store, but with XCode it can easily be installed on a simulator or a real device. The custom browsers use the same core as the native browser of the platform. Once the custom browser has been installed, the test executor can connect to it via the network and execute tests.
Creating Tests and Setting up the Environment
Recording tests has some issues on TouchKit apps*, but IMO you will get better results by coding them by hand. When you write the tests by hand, you will know exactly what your test does, and updating test cases while your software evolves is much easier. Improving your tests with parametrization, loops, etc, is also easier if you have written the tests carefully. TestBench tests are mostly like standard WebDriver tests, but you will wrap a WebDriver with TestBench and it will automatically handle ajax and Vaadin specific concerns for you. Below is a few lines of an imaginary test to give you an idea of how readable TestBench 3 tests can be.
driver = TestBench.createDriver(new ChromeDriver());
  driver.get("http://myhost/myapp/");
  WebElement input = driver.findElement(By.id("username"));
  input.sendKeys(TEST_USER);
  ...
The easiest way to develop tests is using your favorite IDE in combination with the Safari or Chrome driver. During test development you can manually start your application in a server and then verify that things work by running the jUnit test directly form the IDE. This way you can, for example, run the tests fast to a specific point marked with a break point and then use Webkit's inspector to investigate page status and develop the test further based on this information.
Once you have your test ready and working on a desktop browser you can just change the driver implementation to IPhoneDriver or AndroidDriver and verify things work as they should.
In a real world setup, you should make integration tests run automatically when the system is built using Maven or your favorite build system. The build script should be configured to start both the server and tests for you automatically. The Vornitologist demo has an SVN branch containing a build setup that automatically executes TestBench tests during the integration test phase of the Maven build. The handy Jetty plugin for Maven is configured to start a server in the pre-integration phase. You can use this as a basis for your own project or adapt it to your own build system.
The prepared test case, found in the example project, uses rather diverse methods to select elements. This is to introduce you to the various methods available with TestBench 3. Selecting elements by their identifiers is the simplest and most efficient method but it has some limitations and requires changes to the application itself (see setDebugId()). Especially if you plan on doing TDD on the UI level, you will most likely want to use lots of identifiers. Selecting elements by their style names is often also efficient and easy, but my favorite method is using XPath. XPath expressions might look ugly in the beginning if you are not familiar with them. However, they have great powers when compared to e.g. css selectors. Also, if you don't already know XPath, learning it now will most likely help you in future projects, as XPath is used in numerous places nowadays.
The example test I wrote is rather simple: it just runs once with a simple static path. Stressing your app in more advanced manners is highly recommended in real-world tests. You might start from a similar test for your app but then parametrize your tests, stress odd values, write loops and combine various portions in varying order. You might also consider testing your app with loads of (pseudo)random data. This and all other kinds of refactoring of your tests is now much simpler and more flexible as all test are plain old Java code.
Testing in the Cloud
TestBench allows flexible setups with numerous possibilities. The optimal setup depends on several factors such as the size of the project, amount of involved developers or testers and their geographical locations.
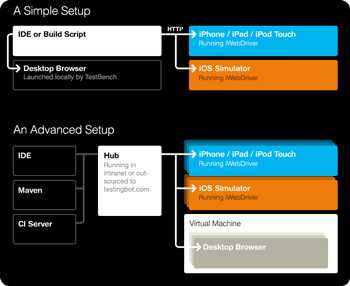
Two examples of how to set up TestBench for your project.
The simplest and I'd guess also the most common setup is that test bots are commanded directly by the test executor. This kind of setup is described in the first part of the picture. The most common test executor is a JUnit test run through your IDE or triggered by a build script - possibly in a CI environment. Browsers (test bots) can then be launched either on the same machine or on dedicated test machines.
A scalable and efficient setup for larger projects is to build a testing grid, where a hub is set up to distribute tests on many registered nodes. Such a setup is illustrated in the second part of the picture. Test bots can then be easily added or removed if requirements grow or diminish. This kind of setup also moves test execution away from the developers own machines, which allows them to do something sane with their CPU cycles when their TestBench tests are being executed.
Setting up a test hub is easy. The following command starts a hub:
java -jar vaadin-testbench-standalone-3.0.0-SNAPSHOT.jar -role hub
Test bots must then be configured to connect to this hub. The default port is 4444. On iOS, the hub address can be configured in the iOS Settings app, where iWebDriver installs its own section. Either a domain name or ip address can be used.
Now to actually use your hub in tests, you will need to change your tests to to instantiate a RemoteWebDriver, which sends all commands through the hub. With capabilities configuration you instruct the hub what specific type of browser / OS combination you wish to execute the test on. In the example below, an iOS driver is requested from the hub running on localhost:
return TestBench.createDriver(new RemoteWebDriver(new URL(
                      "http://localhost:4444/wd/hub/"),
                      DesiredCapabilities.iphone()))
One flexible option is to use an outsourced test hub. Thanks to its WebDriver roots, TestBench is compatible with a great service called TestingBot. Using their service you don't need to own a large farm of servers and devices but you can still run your tests on different kind of platforms. The example projects TBUtils class contains a helper method to create iphone driver with the hub provided by TestingBot. To run the example with it, switch the test to use that driver, throw in you own key and make your deployment address publicly available (or setup a tunnel). Now you don't even need to own an iPhone to seriously test your app on in.
Beta Version Available in the Directory Today
Even though the Recorder part in TestBench isn't fully compatible with Vaadin TouchKit, the new version now has strong support for testing TouchKit apps. Tests can be run on either real devices, so that CPU and memory constraints are real, or in a simulated or emulated environment. The WebDriver (aka Selenium 2.0) roots also provides great improvements that are not specific to mobile testing: tests are now much easier to write with the cleaner API and third party services like testingbot.com can tremendously ease your environment setup. Download a trial version for free and try it out!
*) TestBench Recorder is a Firefox plugin and the TouchKit widgetset is not compiled for the Gecko rendering engine by default. To get this work you need to recompile your widgetset to include support for Firefox. There might also be problems with things like animations due to advanced css, specific to WebKit, being used.