Note: This post has been updated to use Vaadin 8.
Many Vaadin Framework users have been wondering why we have started the pure client-side Vaadin Components project. As discussed last month, the ultimate plan is to start using these Web Components based client-side components in the client side of an upcoming version of the framework. In that version, you’ll have a plain Java API for all Vaadin Elements and it will be super easy to wrap any Web Component as a Vaadin add-on.
Although the time may still not be right for a fully Web Component based client-side engine, you can today already use Elements and other Web Components with Vaadin Framework. This can be done as with any other JS integration, as we have presented before, or using the Elements add-on, a helper library from our labs that makes it really easy to wrap Web Components as add-ons with a fully featured Java API.
As an example, let's see what is needed to wrap the ComboBox element as an add-on and how to share the plain Java API with others via Vaadin Directory (vaadin.com/directory).
Step 1: Create a new Vaadin add-on project
Start by creating a new add-on project using the archetype-vaadin-addon:
mvn archetype:generate -B \
   -DarchetypeGroupId=in.virit  \
   -DarchetypeArtifactId=archetype-vaadin-addon  \
   -DarchetypeRepository=https://oss.sonatype.org/content/repositories/snapshots/  \
   -DarchetypeVersion=2.0-SNAPSHOT \
   -DgroupId=org.vaadin.elements \
   -DartifactId=combobox-element \
   -Dversion=1.0-SNAPSHOT
Optionally, remove the example and test code (except the Server class which is used to run the test application).
Step 2: Add the required dependencies
Add the Elements add-on dependency in the pom.xml file:
<dependency>
  <groupId>org.vaadin</groupId>
  <artifactId>elements</artifactId>
  <version>0.2.0</version>
</dependency>
Download the vaadin-combo-box HTML element by running the following command from the src/main/resources/VAADIN directory (create it, if it doesn’t exist):
    cd src/main/resources/VAADIN
    bower install --save vaadin-combo-box
Alternatively, you can add a .bowerrc file to avoid changing to the VAADIN directory when you need to install multiple elements, for example.
Step 3: Extend the Element interface
Define a new ComboBoxElement interface that extends Element and sets its tag as the vaadin-combo-box HTML element:
package org.vaadin.elements;

@Tag("vaadin-combo-box")
public interface ComboBoxElement extends Element {

    static ComboBoxElement create() {
        return Elements.create(ComboBoxElement.class);
    }

    void setLabel(String label);

    void setItems(String items);

    void setValue(String value);

    String getValue();
}
You don’t have to implement this interface. The Elements add-on will provide an implementation at runtime and will match the setters and getters with the corresponding attributes of the HTML element.
Step 4: Wrap the element in a Vaadin component
Implement a new ComboBoxComponent class that imports the vaadin-combo-box element and encapsulates the related low-level logic:
package org.vaadin.elements;

import elemental.json.JsonArray;
import elemental.json.impl.JreJsonFactory;

@HtmlImport(
    "vaadin://bower_components/vaadin-combo-box/vaadin-combo-box.html")
public class ComboBoxComponent extends AbstractElementComponent {

    public static interface ValueChangeListener {
        void valueChange(String option);
    }

    private ComboBoxElement element;

    public ComboBoxComponent(String label, String... options) {
        element = ComboBoxElement.create();
        element.bindAttribute("value", "change");
        element.setLabel(label);

        if (options != null) {
            JsonArray array = new JreJsonFactory().createArray();

            for (int i = 0; i < options.length; i++) {
                array.set(i, options[i]);
            }
            element.setItems(array.toJson());
        }

        Root root = ElementIntegration.getRoot(this);
        root.appendChild(element);
    }

    public String getValue() {
        return element.getValue();
    }

    public void setValue(String value) {
        element.setValue(value);
    }

    public void addValueChangeListener(ValueChangeListener listener) {
        element.addEventListener("change",
                args -> listener.valueChange(getValue()));
    }
}
This class uses the Elements add-on to implement a Vaadin UI component that you can add into any component container, such as VerticalLayout or Panel. To make it simple for this guide, we are extending AbstractElementComponent, however, you can extend any Vaadin component that suits your specific use case (see for example the DatePicker add-on).
Step 5: Implement a test UI
Implement a test UI inside the test directory:
package org.vaadin.elements;

import com.vaadin.annotations.JavaScript;
import com.vaadin.ui.Component;
import com.vaadin.ui.Notification;
import org.vaadin.addonhelpers.AbstractTest;

@JavaScript(
    "vaadin://bower_components/webcomponentsjs/webcomponents.js")
public class BasicComboBoxComponentUsageUI extends AbstractTest {

    @Override
    public Component getTestComponent() {
        ComboBoxComponent comboBox =
            new ComboBoxComponent("Select an option",
                "Option 1", "Option 2", "Option 3");

        comboBox.setValue("Option 2");
        comboBox.addValueChangeListener(
            value -> Notification.show(value));

        return comboBox;
    }
}
The Maven archetype we used includes a set of utilities to make the development of add-ons easier. One of these utilities is a Server that creates a UI that discovers instances of type AbstractTest (which in turn, extends UI) and shows them on a list allowing you to select the AbstractTest you want to try.
Please note that at the time of writing this not all browsers natively support the technologies that enable Web Components. However, it’s possible to include a set of pollyfills by including the webcomponents.js file via the @JavaScript annotation.
Step 6: Run the test application
Run the Server.main() method from your IDE or using Maven:
mvn package exec:java -Dexec.mainClass="org.vaadin.elements.uiserver.Server" -Dexec.classpathScope=test
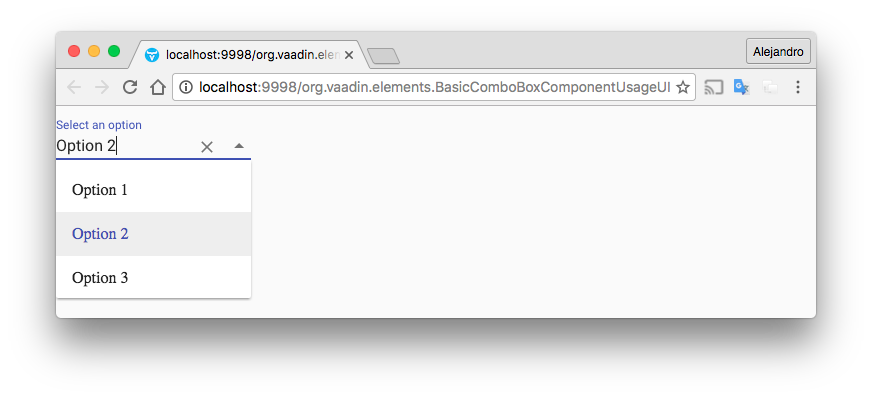
Point your browser to http://localhost:9998 and click the BasicComboBoxComponentUsageUI link.
The following is a screenshot of the application:

Step 7: Publishing the component as an add-on
To publish the add-on at https://vaadin.com/directory, follow the instructions in the generated README.md file.
ComboBox component from the core, but I hope it inspires you to wrap other Web Components with a plain Java API!
