
This tutorial shows how to deploy a Java web application to the IBM Cloud. You can upload one Cloud foundry application with a memory limit of 256MB to IBM Cloud with a free Lite account.
The tutorial uses a Vaadin Starter application that exceeds the memory limit of the Lite account. Activate a free 30 Pay-As-You-Go account trial and get $200 credits to test IBM Cloud’s commercial services.
|
WARNING
|
Keep track of the remaining time and credits on your trial! |
You can deploy the application directly from your command line or from a GitHub repository as a CI pipeline. Skip to Option 2 after the prerequisites, if you prefer to only set up the latter.
Source code on GitHub.
Thank you to Barbaros Özdemir form IBM for authoring this tutorial!
Prerequisites:
Prepare your Vaadin application
I’m using the latest LTS (Vaadin 14 at the time of writing) starter app as an example. You can download the app from https://vaadin.com/start if you don’t have your own app to deploy.
Once you have imported your project you will need to build it in production mode (i.e. run mvn clean package -Pproduction). For more details please have a look at https://vaadin.com/docs/flow/production/tutorial-production-mode-basic.html.
At this point your Vaadin project is ready to run on a Websphere or Tomcat Server.
Sign up for a free IBM account
You need an IBMid to create a Cloud Foundry Organization and space.
To create an IBMid:
-
Go to https://myibm.ibm.com and click on Create an IBMid.
-
Create your IBMid by filling in the details.
-
Then use your IBMid to sign in on IBM Cloud at https://cloud.ibm.com.
NOTEYou can deploy 1 CF (Cloud Foundry Application) that’s max 256MB in size with a Lite account. Upgrade to a Pay-As-You-Go account to deploy larger and more applications, such as the Vaadin Starter used in this tutorial.
Install the Cloud Foundry CLI
Install the Cloud Foundry CLI to enable CF command in your terminal. Please visit https://docs.cloudfoundry.org/cf-cli/install-go-cli.html for instructions.
Create a CF Organization and space
-
select Manage → Account.
-
Click on Cloud Foundry Orgs in the Account window.
-
Create a Cloud Foundry organization (e.g. “Vaadin14”) and a space (e.g. “dev”) in one of the regions listed (e.g. “US South”). Note that the Cloud Foundry organization name must be unique.
When you return to your IBM Cloud Dashboard you should be able to see the Cloud Foundry Organization and its space(s) in the resource list https://cloud.ibm.com/resources.
Please note that you can do these steps alternatively by using CF or IBM Cloud CLI only, e.g. you might use following CF CLI commands to login to the region US South and create an organization and space:
cf login -a api.us-south.cf.cloud.ibm.com
cf create-org your_cf_organization_name
cf create-space your_cf_space_name
Option 1: Deploy from command line
This is for uploading a .jar directly onto IBM Cloud. Skip to the next section if you wish to deploy from GitHub. You can either use the default Cloud Foundry CLI or the IBM Cloud CLI to push your application.
Login to IBM Cloud with CF or IBM Cloud CLI
This tutorial uses the CF CLI. In case you want to use IBM Cloud CLI, simply add ibmcloud before the cf commands once you are logged in. For logging in, please use the ibmcloud login command and follow instructions to select region and cf organization.
|
TIP
|
To install IBM Cloud CLI, please visit https://cloud.ibm.com/docs/cli?topic=cloud-cli-install-ibmcloud-cli. |
In this example, our Cloud Foundry space is located in the region "US South". The IBM Cloud endpoint for US South region is “api.us-south.cf.cloud.ibm.com”. To lookup endpoints for other regions, please visit https://cloud.ibm.com/docs/cloud-foundry-public?topic=cloud-foundry-public-endpoints#api-endpoint-options.
Login to CF with your endpoint using the command cf login -a your_api_endpoint.
barbaros@barbaros-ThinkPad-L380-Yoga:~$ cf login -a api.us-south.cf.cloud.ibm.com
API endpoint: https://api.us-south.cf.cloud.ibm.com

Email> your_email_address
Password> your_password
Authenticating...
OK
Select an org (or press enter to skip):
1.
2.
3. Vaadin14
Org> 3
Targeted org Vaadin14
Targeted space dev

API endpoint:   https://api.us-south.cf.cloud.ibm.com (API version: 2.147.0)
User:       	your_email_address
Org:        	Vaadin14
Space:      	dev
barbaros@barbaros-ThinkPad-L380-Yoga:~$
|
NOTE
|
For Oauth login you need to use: cf login -a the_endpoint_address -sso and follow the instructions. |
Once you are logged in you are ready for the final step before pushing your application: Creating a manifest.yml file.
Create a manifest.yml file
-
Navigate to the root folder of your Vaadin project and create a new file
manifest.yml. Open themanifest.ymlfile and enter your desired application name, number of instances you want to deploy, amount of memory you want to provide for each instance, the cloud foundry buildpack you want to use and the path to your.waror.jarfile similar as shown below:manifest.ymlapplications:
- name: vaadin-demo
instances: 1
memory: 2G
buildback: java_buildpack
path: target/my-starter-project-1.0-SNAPSHOT.jarNOTEPlease note that you can give less than 2G memory for your application, i.e. 256M if you use a Lite account.
Once you are done you can proceed to the final step to deploy your application on IBM Cloud.
Push your Vaadin application to IBM Cloud
Navigate to the root folder of your Vaadin project and run the cf push command:
. . .
Waiting for app to start...
name:          	my-starter-project-vaadin14
requested state:   started
routes:            my-starter-project-vaadin14.mybluemix.net
last uploaded: 	Sat 02 May 14:57:09 CEST 2020
stack:         	cflinuxfs3
buildpacks:    	java_buildpack

type:            web
instances:   	1/1
memory usage:	2048M
start command:   JAVA_OPTS="-agentpath:$PWD/.java-buildpack/open_jdk_jre/bin/jvmkill-1.16.0_RELEASE=printHeapHistogram=1 -Djava.io.tmpdir=$TMPDIR
                 -XX:ActiveProcessorCount=$(nproc)
                 -Djava.ext.dirs=$PWD/.java-buildpack/container_security_provider:$PWD/.java-buildpack/open_jdk_jre/lib/ext
                 -Djava.security.properties=$PWD/.java-buildpack/java_security/java.security $JAVA_OPTS -Daccess.logging.enabled=false
             	-Dhttp.port=$PORT" && CALCULATED_MEMORY=$($PWD/.java-buildpack/open_jdk_jre/bin/java-buildpack-memory-calculator-3.13.0_RELEASE
             	-totMemory=$MEMORY_LIMIT -loadedClasses=12031 -poolType=metaspace -stackThreads=250 -vmOptions="$JAVA_OPTS") && echo JVM Memory
             	Configuration: $CALCULATED_MEMORY && JAVA_OPTS="$JAVA_OPTS $CALCULATED_MEMORY" && MALLOC_ARENA_MAX=2 JAVA_OPTS=$JAVA_OPTS
                 JAVA_HOME=$PWD/.java-buildpack/open_jdk_jre exec $PWD/.java-buildpack/tomcat/bin/catalina.sh run
 	state     since              	cpu	memory     	disk       	details
#0   running   2020-05-02T01:57:39Z   0.0%   287.9M of 2G   183.5M of 1G
You can check the status of your Cloud Foundry applications with the cf apps command, stop an application with the cf stop application_name command or delete it with cf delete application_name.
To see the recent logs, use cf logs application_name -–recent or use cf logs application_name to view logs in real time.
|
NOTE
|
Replace each instance of application_name with the name you provided for you application. |
Option 2: Set up a continuous deployment pipeline
This is an alternative way to deploy your application which will allow you to push updates to it directly from your git repository.
Provision a CD service
-
Provision a Continuous Delivery service on IBM Cloud by clicking on Catalog and selecting the service.
TIPYou can also use the search field to find the service you are looking for. -
When you provision your Continuous Delivery service, you might want to make sure that your location is the same as the location of your CF Organization’s space.
In this tutorial "Dallas" (i.e. "US South") has been selected.
Create a Toolchain
Once you have provisioned a Continuous Delivery service you will need to create a Toolchain for it.
You can create a Toolchain by:
-
Selecting your Continuous Delivery service from Resource List on Dashboard and clicking on Getting Started.
-
At this point you will have the option to create a toolchain or view existing toolchains. Click on view existing toolchains (or click on create a toolchain if you want to skip the overview of toolchains).
TIPIf you haven’t created a dedicated "Resource Group" for your project, you can create one by visiting your Dashboard (IBM Cloud) → Manage → Account → Resource Groups. -
Next, you will be able to pick the "Resource Group" and the "Location" for your toolchain. Click on Create toolchain.
-
Scroll down the page until you see Other templates.
-
Select Build your own toolchain.
-
Give your toolchain a name, select a region, a resource group and click on Create.
Configure tools
You will need two tools: “Git Repos and Issue Tracking” -which is a Gitlab clone on IBM Cloud- and “Delivery Pipeline”.
-
First, add the git repository and make sure that Track deployment of code changes is checked.
-
You can provision a private git repository on IBM Cloud for free. Next you need to provision a Delivery Pipeline.
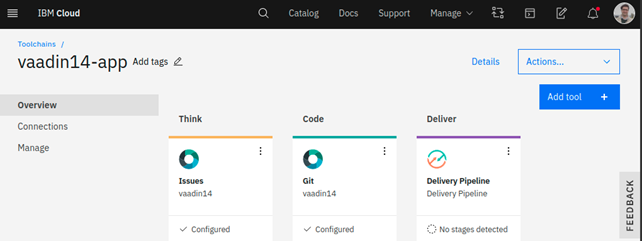
After provisioning both tools, your toolchain should be looking like this:
Deploy your application
Now, you need to push your Vaadin 14 project to the git repository.
-
Right-click to open the Git tool in a new tab and follow the instructions.
-
After pushing your project, return to the tab of your toolchain and click on the Delivery Pipeline tool.
-
You will need to create a new “Stage”. The “Input” of the Stage will be automatically filled with information from the Git repository you added to your toolchain. Make sure that you configure the “Build” Job as shown below and save. This will be your “BuildStage”.
Here is the Deploy script:
#!/bin/bash
mvn -B package -Pproduction
cp manifest.yml target/manifest.yml
cd target
echo $(pwd)
echo $(ls) -
Next youneed to create a new stage “DeployStage”. The input will be automatically configured as Build artifacts from the previous stage. Configure the “Deploy” Job similar as shown below:
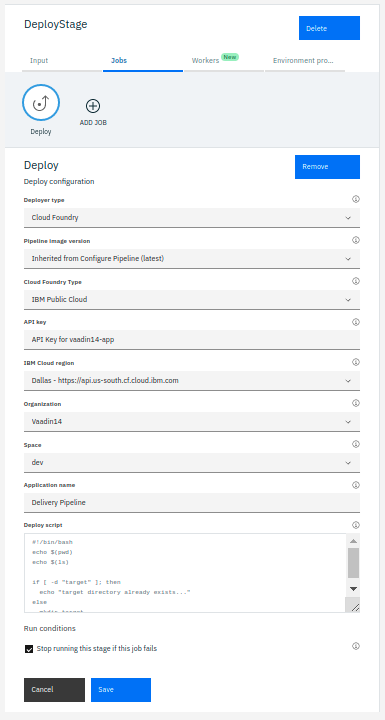
Here is the Deploy script:
#!/bin/bash
echo $(pwd)
echo $(ls)

if [ -d "target" ]; then
  echo "target directory already exists..."
else
  mkdir target
  echo "Created target directory..."
fi

cp my-starter-project-plain-java-servlet-1.0-SNAPSHOT.war target
cf push -
Finally, click on the Play icon and run the stage.
After successful deployment when you click on View console you will be forwarded to deployment page of the application, where you can check its status:
Clicking on Visit App URL will show you the app’s website.
For questions about deployments on IBM Cloud please feel free to contact barbaros.oezdemir@at.ibm.com