
Developing well-structured Vaadin applications is essentially composing a lot of well-named custom components. Some of those components have a few more responsibilities than giving order and structure to your codebase – namely fields, the components you use in your forms to edit the properties of your domain objects. Sometimes you can avoid having to create one, by using a built-in component and implementing a suitable converter, but I find that properly typed field implementations result in more readable and maintainable code.
Two-way data binding from your domain objects to Vaadin components is typically done using a helper class called Binder. To make your custom fields compatible with Binder, and so with virtually all Vaadin forms, it must implement an interface called HasValue. Pretty easy so far, whether you are using composition or wrapping some web component, but if you want to make it really behave well in your form, there are a number of other nice-to-have features that you want to implement, such as required indication, validity indication, tooltips, etc. Some of these are showcased in the following code snippet and screenshot.
duration.setLabel("Label for field");
duration.setRequiredIndicatorVisible(true);
duration.setTooltipText("This showed when hovered with mouse.");
duration.setInvalid(true);
duration.setErrorMessage("This makes the field red and error message visible.");
duration.setHelperText("This is so-called helper text. Kind of like tooltip but always visible.");

Almost all the form fields in the core Vaadin component set implement these handy features. And when you drop your first custom field into your app's form, you’ll realize how essential they are for proper form UX.
For perfect field-specific flexibility, you can implement these features one by one. But, in reality, there is only one reasonable way to get all these details covered in your component: the abstract CustomField helper class. Arguably, it is a bit hidden in our docs (listed on the components side, although it is more like a framework feature), but it should be the primary tool for most use cases, instead of the better-exposed AbstractField, AbstractCompositeField or AbstractSinglePropertyField. The CustomField allows you to use pure Java to wrap a single or multiple existing Vaadin components as a perfect reusable form field for your custom types.
Let me quickly show how I just recently created an editor for the java.time.Duration data type that I needed for an in-progress Vaadin project.
Duration field example
The Duration class is a handy data type in the JDK. It is a close relative to Period, but is not tied to some specific time. Fundamentally it is just a number (of [nano]seconds) but, because of its handy API and the readability it brings to my domain model, I like to use it in my domain models. Most recently, I needed that for my fishing logger that I’m using to log some training data for a machine learning project. I was quite surprised I didn’t find a ready-made UI field for this from the add-on Directory, so it became an example for this tutorial, which I have put off finishing for too long.
There are probably a dozen different ways to implement the UI field. You could use multiple dropdowns for seconds, minutes, and hours, (ab)use the slightly related TimePicker component, or be lazy like me and implement it using a single TextField. The first iteration of DurationField looked pretty much like this:
import com.vaadin.flow.component.customfield.CustomField;
import com.vaadin.flow.component.textfield.TextField;
import java.time.Duration;

public class DurationField extends CustomField<Duration> {
   TextField durationInput = new TextField();
   public DurationField() {
       // CustomField has a protected add(Component...) method,
       // compose the actual field as you wish with 100% Java
       add(durationInput);
   }

   @Override
   protected Duration generateModelValue() {
       // Parse the logical field value from the user input
       return Duration.parse(durationInput.getValue());
   }

   @Override
   protected void setPresentationValue(Duration duration) {
       // Update the user input field(s) with the presentation value
       // coming via API call (setValue(Duration), e.g. via Binder)
       durationInput.setValue(duration.toString());
   }
}
It is technically a working field for Duration that you can already bind to your DTO without special configuration but, thanks to the ISO-8601 formatting that JDK uses by default, you don’t want to use this field in an actual UI. However, regarding form features, we already got pretty much everything for free. By creating a trivial DTO, you can test this with the following code (or just be convinced by the screenshot):
private DurationField empty = new DurationField();
private DurationField zero = new DurationField();
private DurationField twoHours = new DurationField();
private DurationField aboutDayAndAHalf = new DurationField();
private DurationField required = new DurationField();

public DurationFieldTestView() {
   empty.setLabel("Empty by default");
   empty.setHelperText("This is helper text for a field that is empty by default. Fill in a duration.");
   zero.setLabel("Zero by default");
   zero.setTooltipText("Tooltips are only showed when a mouse hovers over the field.");
   twoHours.setLabel("Two hours");
   aboutDayAndAHalf.setLabel("About a day and a half");
   required.setLabel("This should contain 'required' indicator");
   add(empty, zero, twoHours, aboutDayAndAHalf, required);

   var dto = new DurationDto();
   var binder = new BeanValidationBinder<>(DurationDto.class);
   binder.bindInstanceFields(this);
   binder.setBean(dto);
   binder.validate();

   add(new Button("Validate & show value", e -> {
       binder.validate();
       Notification.show("Dto: " + dto.toString());
   }));
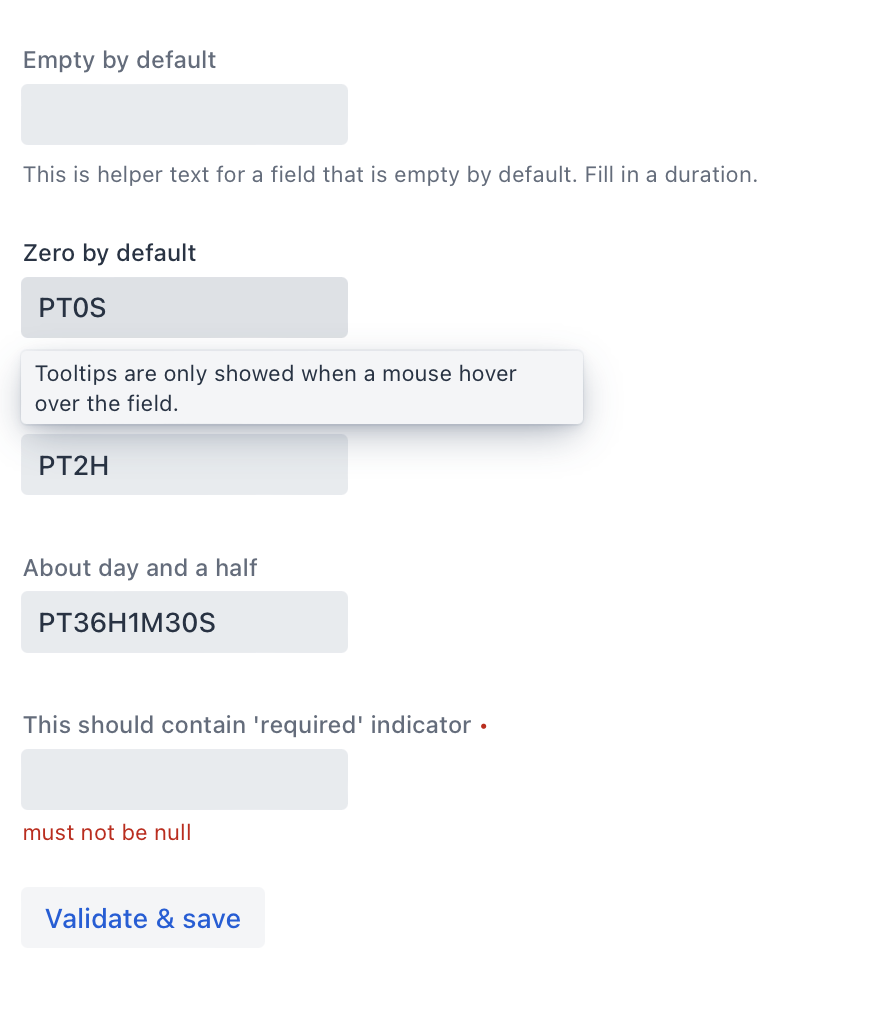
Screenshot of a test view showcasing several form features that the CustomField component provided: labels, helper texts, tooltips, required indication, validation display, etc.
For the actual DurationField that I accepted to my app, I still added following enhancements:
- Human-friendly lenient formatting, “hh:mm:ss” as default. Parsing and formatting logic are defined in protected methods for possible customization.
- Some built-in validation to guide users towards proper formatting.
- Constructor with a label (this also comes with pretty much all core Vaadin components, and is good for API consistency).
- A “proxy” for the input prompt, as this simple field happens to be based on
TextField. - Defaulting to use “lazy value changes mode” by default and proxying related methods to the underlying
TextField. I like desktop-application-like forms where validation errors (and fixes) are shown on the fly without triggering validation by clicking the save button.
The above features are not super relevant to the current topic, so if you are interested, check out the details from the Viritin add-on GitHub repository, where I dropped the final implementation.
The “magical” value-change events with CustomField
A big part of why we got so much done with so little code in the example above is related to CustomField’s “magic” related value-change events. In some cases, that magic works perfectly, but it might also bite you back hard in more complex cases. In its constructor, CustomField hooks a client-side value-change listener to the wrapping DOM element:
    // Force a value update when the change event generated

    getElement().addEventListener("change", e -> this.updateValue());
In cases like this DurationField, this works perfectly. The built-in logic of CustomField is triggered exactly when it should be, as the underlying vaadin-text-field DOM element fires change events, which happen to be fired at a perfect time for the interests of this trivial DurationField. From the vaadin-text-field component, it propagates to the vaadin-custom-field level and from there on to the actual logic in the CustomField class.
But it is quite common that this is either too much or not enough. Here are two examples I have faced myself recently:
- Sometimes, your wrapped component(s) do not fire
value-changeevents on the client side, and the magic you have used suddenly doesn't work. - Sometimes, your field has components firing
value-changeevents that are completely irrelevant to the logical value of the field. Consider a slightly more complexGrid-basedPersonselector, withTextField-based free-text filtering. By default, you’ll receive a ton of obsolete (and potentially expensive) calls to your logic when the user is only filtering available users from which to pick the actual selection.
The first of these is rather easy to work around, once you just figure out what is wrong. Instead of relying on this built-in magic, you’ll have to call the updateValue() (protected method in CustomField) yourself, when the logical value of the field has changed. A good example of this is in the recently published MapLibre add-on, which contains a CustomField-based field implementation for JTS Polygon data type. In a listener attached to the lower-level drawing API, the new Polygon value is first generated and then the CustomField is notified of the new value using the updateValue() method:
        getDrawControl().addGeometryChangeListener(e -> {
            GeometryCollection geom = e.getGeom();
            if(cuttingHole) {
                cuttingHole = false;
                try {
                    Geometry hole = geom.getGeometryN(1);
                    polygon = (Polygon) geom.getGeometryN(0).symDifference(hole);
                } catch (Exception ex) {
                    Notification.show("Cutting hole failed, make sure it is within the existing Polygon and doesn't conflict other holes.");
                }
                getDrawControl().setGeometry(polygon);
            } else {
                polygon = (Polygon) geom.getGeometryN(0);
                cutHole.setVisible(allowCuttingHoles && polygon != null);
                getResetButton().setVisible(polygon != null);
            }
           // notify CustomField about value change, triggers events etc.
            updateValue();
        });
For the second case, the solution also lies in the updateValue() method. The current version of CustomField doesn't provide a solution to completely disabling listening to client-side value-change events, so the workaround this time is to replace the default behavior with an empty method body. Naturally, this now disables the magic from all the other inputs you possibly wrap in your CustomField, so you might now have to manually trigger the original updateValue() method or directly call setModelValue(generateModelValue(), true); in appropriate places.
Learn more about Vaadin's CustomField class and start building more interactive and user-friendly forms. Read documentation -->