Migrating applications is hard. I think most readers to relate to that. Everyone who has undertaken the task of migrating an existing application that is used in production has undoubtedly faced many pain points in the process.
Migrating from Swing and a single-user desktop UI to the web comes with a set of additional challenges. You have to be aware that your application will now serve multiple users instead of one, each of them with their own session, which creates some challenges in terms of managing server resources.
With Vaadin you won’t have to do anything special as the framework handles the basics for you, but having that in mind will help you figure out problems that may arise if you allocate too many resources in an application and don’t do the proper cleanup.
This article will not provide a detailed architectural comparison of those differences. Instead, it aims to show how to migrate a simple Swing application to a web application using Vaadin. The app is based on Java 8 and can be found here.
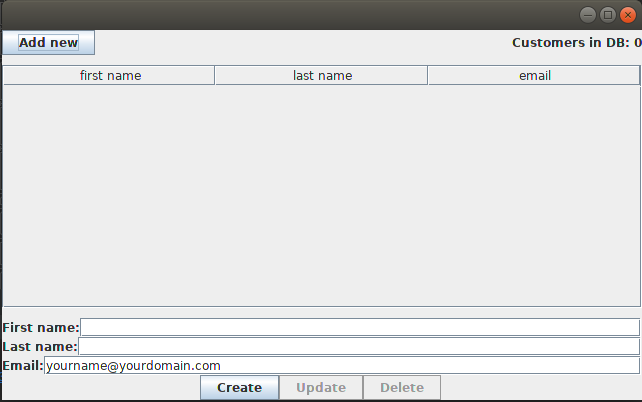
With those introductory notes out of the way, we can get to the process of migrating a Swing application to Vaadin 13. In other words, let’s tackle how can we go from this:
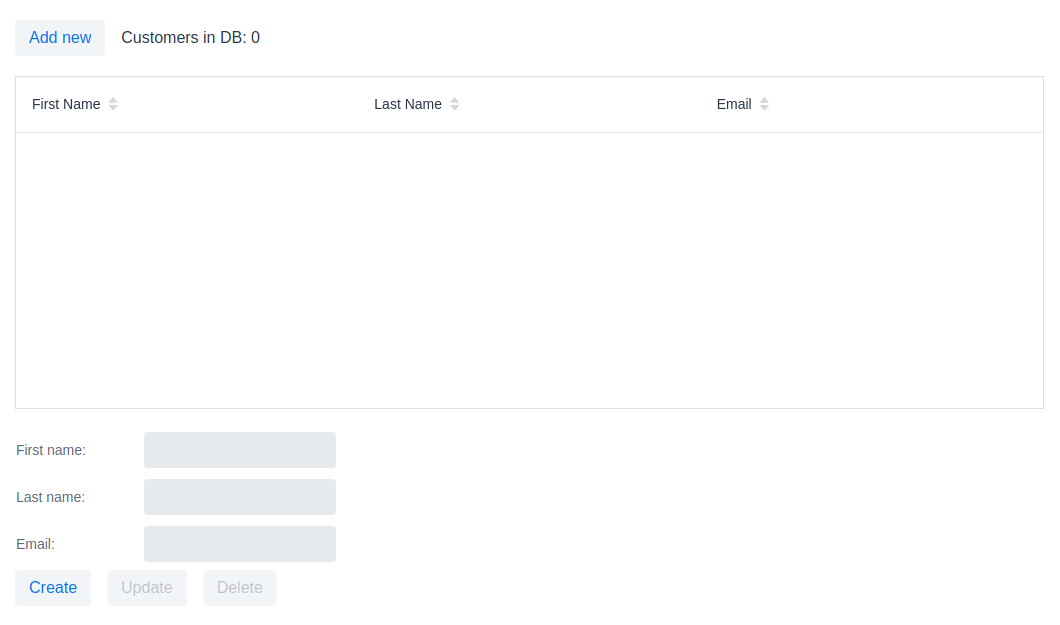
To this :
Show me the code!
Two classes make up the Swing application shown in the screenshot, one is the CustomerForm shown at the bottom of the application window, and the other is the SwingApplication which combines action handling, the table of customers and the form for adding and editing customers.
Let’s start with the fields and the class declaration :
public class CustomerForm extends JPanel implements ActionListener {

    JTextField firstName = new JTextField();
    JTextField lastName = new JTextField();
    JTextField email = new JTextField("yourname@yourdomain.com");
    JButton create = new JButton("Create");
    JButton update = new JButton("Update");
    JButton delete = new JButton("Delete");

    private final SwingApplication application;
private Customer editedCustomer;public class CustomerForm extends FormLayout implements ActionListener {
TextField firstName = new TextField();
TextField lastName = new TextField();
TextField email = new TextField();
Button create = new Button("Create");
Button update = new Button("Update");
Button delete = new Button("Delete");
private final VaadinApplication application;
private Customer editedCustomer;What we did :
-
We replaced
JTextField,JButtonandJPanelwithTextField,ButtonandFormLayoutrespectively.
Next, let’s take a look at the constructor and the helper method addWithCaption used in the sample app :
public CustomerForm(SwingApplication application) {
    this.application = application;

    setLayout(new BoxLayout(this, BoxLayout.PAGE_AXIS));

    addWithCaption(firstName, "First name:");
    addWithCaption(lastName, "Last name:");
    addWithCaption(email, "Email:");

    final Box actionButtons = Box.createHorizontalBox();

    actionButtons.add(create);
    actionButtons.add(update);
    actionButtons.add(delete);

    add(actionButtons);

    create.addActionListener(this);
    update.addActionListener(this);
    delete.addActionListener(this);

    updateButtonStates();
    }
...
private void addWithCaption(JTextField f, String caption) {
    Box box = Box.createHorizontalBox();
    box.add(new JLabel(caption));
    box.add(Box.createHorizontalGlue());
    box.add(f);

    add(box);
}public CustomerForm(VaadinApplication application) {
this.application = application;
setResponsiveSteps(new ResponsiveStep("0", 1, ResponsiveStep.LabelsPosition.ASIDE));
addFormItem(firstName, "First name:");
addFormItem(lastName, "Last name:");
addFormItem(email, "Email:");
final HorizontalLayout actionButtons = new HorizontalLayout();
actionButtons.add(create);
actionButtons.add(update);
actionButtons.add(delete);
add(actionButtons);
create.addClickListener(this);
update.addClickListener(this);
delete.addClickListener(this);
updateButtonStates();
}What we did :
-
We renamed the constructor parameter from
SwingApplicationtoVaadinApplication, that’s irrelevant to the framework but since we are migrating a java swing desktop application to a web application written in Vaadin, renaming the class is a good idea conceptually -
Layouts in Vaadin are containers for other items, they decide how to organize the children we add to them, extending
FormLayoutis the point we decide the layout to use, so we don’t need a specialsetLayout()call in Vaadin -
We added some configuration for the
ResponsiveStepso that we have a single column form and we useaddFormIteminstead of the helper methodaddWithCaptionused for convenience in the Swing application. These are both parts of theFormLayout,and you can read more on that on the documentation ofFormLayout. -
We used a
HorizontalLayoutinstead of the horizontal box -
We replaced
addActionListenerwithaddClickListener
Next let’s work with action handling, as it stands now our addClickListener() statements will not compile. Let’s fix that :
@Override
public void actionPerformed(ActionEvent e) {
    if (e.getSource() == delete) {
        application.getCustomerFacade().remove(editedCustomer);
        application.deselect();
        clear();
    } else {
        Customer c = editedCustomer;
        if (e.getSource() == create) {
            c = new Customer();
        }
        c.setFirstName(firstName.getText());
        c.setLastName(lastName.getText());
        c.setEmail(email.getText());
        application.getCustomerFacade().save(c);
    }
    application.refreshData();
}@Override
public void onComponentEvent(ClickEvent<Button> e) {
if (e.getSource() == delete) {
application.getCustomerFacade().remove(editedCustomer);
application.deselect();
clear();
} else {
Customer c = editedCustomer;
if (e.getSource() == create) {
c = new Customer();
}
c.setFirstName(firstName.getValue());
c.setLastName(lastName.getValue());
c.setEmail(email.getValue());
application.getCustomerFacade().save(c);
}
application.refreshData();
}Also let’s go to the class declaration and change it :
public class CustomerForm extends JPanel implements ActionListenerpublic class CustomerForm extends FormLayout implements ComponentEventListener<ClickEvent<Button>>What we did:
-
We replaced the
ActionListenerswing interface withComponentEventListener<ClickEvent<Button>>. A nice way to read this is "this class is a listener for component events of the 'click' type that haveButtonas their source." -
We also replace
getText()calls withgetValue(). Several Vaadin components implement theHasValue<T>interface to provide a uniform way of accessing values in fields, for instance,TextFieldis aHasValue<String>andCheckboxis aHasValue<Boolean>. As a resultTextFieldhas a method calledgetValue()which returns a String -
We replaced
actionPerformedwithonComponentEventbecause we changed the interface we’re implementing
Next let’s handle the editCustomer() and clear() methods :
void editCustomer(Customer c) {
        this.editedCustomer = c;
        firstName.setText(c.getFirstName());
        lastName.setText(c.getLastName());
        email.setText(c.getEmail());
        updateButtonStates();
    }

    void clear() {
        editedCustomer = null;
        firstName.setText("");
        lastName.setText("");
        email.setText("your@email.com");
        updateButtonStates();
} void editCustomer(Customer c) {
this.editedCustomer = c;
firstName.setValue(c.getFirstName());
lastName.setValue(c.getLastName());
email.setValue(c.getEmail());
updateButtonStates();
}
void clear() {
editedCustomer = null;
firstName.setValue("");
lastName.setValue("");
email.setValue("your@email.com");
updateButtonStates();
}What we did :
-
We replaced
setText()withsetValue(). This is the other side of theHasValue<String>interface that was previously introduced
The updateButtonStates() method remains unchanged. With these changes in place now our form compiles and it’s a valid Vaadin component which we can add in any container.
Now let’s move to the actual application and take a look a the necessary changes :
/* No annotations here */
public class SwingApplication extends JFrame {

    CustomerForm form;
    JLabel countLabel = new JLabel();
    JButton newCustomer = new JButton("Add new");

    String[] columnNames = new String[]{"first name", "last name", "email"};
    private JTable table;

    private List<Customer> customers;

    private CustomerFacadeRemote customerFacade;

    void deselect() {
        table.getSelectionModel().clearSelection();
}@Route("")
public class VaadinApplication extends VerticalLayout {
CustomerForm form;
Span countLabel = new Span();
Button newCustomer = new Button("Add new");
String[] columnNames = new String[]{"firstName", "lastName", "email"};
private Grid<Customer> table;
private List<Customer> customers;
private CustomerFacadeRemote customerFacade;
void deselect() {
table.getSelectionModel().deselectAll();
}What we did :
-
We added the
@Route("")annotation on our class. This marks the class as a view for the router. With our setup, the application will be deployed underhttp://localhost:8080/server-1.0-SNAPSHOT, and@Route("")tells the platform "show this when the user navigates to http://localhost:8080/server-1.0-SNAPSHOT/, in the same way, that@Route("about")says "show this when the user navigates to http://localhost:8080/server-1.0-SNAPSHOT/about ". -
We replaced
JFramewithVerticalLayout. We want the elements of the application to be placed one after another, and that’s something that theVerticalLayoutdoes -
We renamed
JLabeltoSpan. This may strike you as odd, we could have renamedJLabeltoLabel,and the visual outcome would have been the same, so whySpan? As you get more familiar with Vaadin, you will know that the Java components are translated to HTML elements (not always in a 1-1 fashion) and thereSpanis the semantically appropriate element for text content andLabelis used to label another element, typically used in forms -
We replaced
JTablewithGrid<Customer>, slightly changed the values ofcolumnNamesand removed theCustomerTableModel. We are letting theGriddo the heavy lifting for us, and there’s a "reasonable default" behavior forGridwhich in many cases makes the model or additional configuration unnecessary. For now, it’s essential to know that we utilize the Grid’s bean inspection functionality, and agetFirstName()method in a bean calledCustomeris mapped to a column with the idfirstNameand a header "First Name."
Next, let’s take a look at the next section of the app :
public static void main(String args[]) {
    new SwingApplication().createUI();
}

private void createUI() {
    final BorderLayout borderLayout = new BorderLayout(10, 10);
    setLayout(borderLayout);

    newCustomer.addActionListener(new ActionListener() {

        @Override
        public void actionPerformed(ActionEvent e) {
            form.clear();
        }
    });

    form = new CustomerForm(this);

    Box hbox = Box.createHorizontalBox();
    hbox.add(newCustomer);
    hbox.add(Box.createGlue());
    hbox.add(countLabel);
    add(hbox, BorderLayout.PAGE_START);

    table = new JTable();
    table.getSelectionModel().setSelectionMode(
            ListSelectionModel.SINGLE_SELECTION);
    table.getSelectionModel().addListSelectionListener(
            new ListSelectionListener() {

                @Override
                public void valueChanged(ListSelectionEvent e) {
                    Customer c = customers.get(e.getFirstIndex());
                    form.editCustomer(c);
                }
            });
    add(new JScrollPane(table), BorderLayout.CENTER);
    add(form, BorderLayout.PAGE_END);

    refreshData();
    setSize(640, 400);
    setVisible(true);
}public VaadinApplication() {
createUI();
}
private void createUI() {
/*
*
* Nothing to configure on the layout
*/
newCustomer.addClickListener(buttonClickEvent -> form.clear());
form = new CustomerForm(this);
HorizontalLayout hbox = new HorizontalLayout();
hbox.setAlignItems(Alignment.BASELINE);
hbox.setWidthFull();
hbox.add(newCustomer);
hbox.add(countLabel);
add(hbox);
table = new Grid<>(Customer.class);
table.setSelectionMode(Grid.SelectionMode.SINGLE);
table.setColumns(columnNames);
table.addSelectionListener(selectionEvent -> {
Customer c = selectionEvent.getFirstSelectedItem().orElse(null);
if (c == null) {
form.clear();
} else {
form.editCustomer(c);
}
});
add(table);
add(form);
refreshData();
setSizeFull();
}It looks similar again but with a few subtle differences.
What we did :
-
We removed the
mainmethod, and we callcreateUI()in the constructor instead -
We removed
BorderLayoutandsetLayout()as we don’t need additional layout configuration -
We replaced
addActionListenerwithaddClickListener, the explanation is the same as in theCustomerForm -
We replaced the horizontal box with a
HorizontalLayout, we set the alignment to baseline and set the layout width to full. TheHorizontalLayoutis an abstraction of CSS Flexbox. Explaining the use of FlexBox is out of the scope of this article, but you can find more information on the Ordererd Layout component page here -
We replaced
JTablewithGrid, set the selection mode toSINGLEand set the list of columns that should be shown. Here the most important thing is theCustomer.classargument in theGridwhich plays a role similar to theAbstractTableModelin a Swing application. TheGridwill inspect the class to figure out how many columns to show, what header to display and how to get the information it needs -
We set the selection mode to
SINGLE. The available modes areSINGLE,MULTIandNONEwithSINGLEbeing the default. This line is redundant, but it demonstrates how to set the selection mode -
We added a
SelectionListenerto theGridwhich is the equivalent of adding aListSelectionListenerto theJTableselection model. The only change in the logic is that we need to handle the case where the selection is empty as you may get this even as a result of a "deselect."
The last piece that we need to change is the refreshData() method. We’ll go from this :
protected void refreshData() {
    customers = getCustomerFacade().findAll();
    table.setModel(new CustomerTableModel());
    countLabel.setText("Customers in DB: " + customers.size());
}protected void refreshData() {
customers = getCustomerFacade().findAll();
table.setItems(customers);
countLabel.setText("Customers in DB: " + customers.size());
}What we did :
-
All we did is replace
setModel()withsetItems()and pass to it the list of items we want theGridto show.
If we run the application we will see that we have reached the goal we set at the beginning of the article :
Conclusion
In this small application, we see a striking similarity between Java Swing and Vaadin. This familiarity will allow a smoother transition to the web for teams with a strong Swing background, and at the same time, it doesn’t sacrifice the need for a modern look and feel and modern capabilities.
Vaadin provides a set of high quality, UI components that you can use out of the box. But its core benefit is that you can fully utilize frontend expertise (external or internal to your team) to build new layouts and customized web components, which in turn you can conveniently wrap inside a Java component that fires events and provides access to its state.
These components can serve as building blocks for your Java developers, saving time and providing consistency across the application, the platform will handle the complicated parts of communicating changes between the browser and your server.
Vaadin is not Swing, it’s not built to be a 1-1 mapping from Swing to the web. I strongly recommend taking a look at the official documentation and especially the section on binding data to components, that could simplify your application and offer validation capabilities "for free," especially if you use something like the BeanValidationBinder.
I hope that this article demonstrates that you can lean on what is familiar and explore the capabilities of Vaadin while taking on the difficult task of migrating a large existing application to the web.