Getting development environment up and running
This section gives a step-by-step guide for setting up a development environment. IT Mill Toolkit supports a wide variety of tools, so you can use any IDE for writing the code, most web browsers for viewing the results, any operating system or processor supported by Java 1.4 platform, and almost any Java server for deploying the results.
In this example, we use the following toolchain:
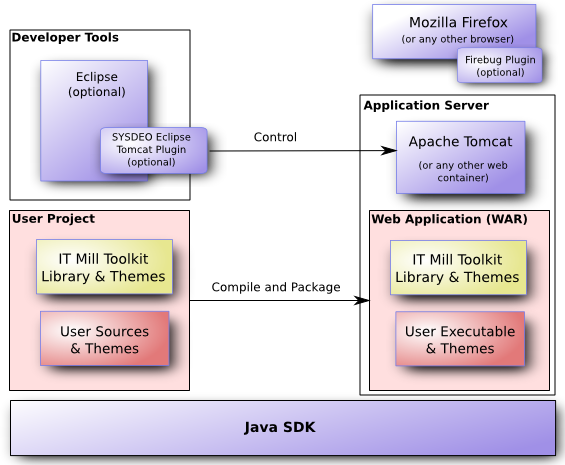
Figure 1.3, “Development Toolchain and Process” above illustrates the development environment and process. You develop your application as an Eclipse project. The project must include, in addition to your source code, IT Mill Toolkit Library package and the theme package. It can, optionally, include your project-specific themes. When the project is compiled and packaged as a web application (WAR), the IT Mill components are copied to the package. SYSDEO Tomcat plugin for Eclipse allows easy deployment of web applications and debugging them under Tomcat.
Setting up the Java and Eclipse in Windows XP is really straightforward.
-
Download the installation packages from:
- Sun Java 2 Standard Edition 6.0 Update 1 from http://java.sun.com/javase/downloads/index.jsp
- Eclipse SDK 3.2.1 from http://www.eclipse.org/downloads/
-
Install Java SDK by running the installer. The default options are fine.
-
Decompress Eclipse SDK package to a suitable directory. You are free to select any directory or to use any ZIP decompressor, but in this example we decompress the ZIP file by just double-clicking it and selecting "Extract all files" task from Windows compressed folder task. Here we use
C:\devas the target directory. -
Eclipse is now installed to
C:\dev\eclipseand could be started from there (by clicking eclipse.exe), but lets first install Sysdeo plugin before starting it.
You have many options for installing Java SDK and Eclipse in Linux and UNIX. The package management system of your operating system may provide the packages. For example, in Ubuntu Linux, which includes Sun Java SDK and Eclipse in its APT repository, you can install the programs from a package manager GUI or from command-line with a command such as:
$ sudo apt-get install sun-java6-jdk eclipseNotice that the latest versions of the packages available in a Linux package repository may be incompatible with other packages, such as the Sysdeo Plugin, which are not installed using the package management. The versions mentioned above have been tested to work.
You can also download the packages from:
- Sun Java 2 Standard Edition 6.0 Update 1 from http://java.sun.com/javase/downloads/index.jsp
- Eclipse SDK 3.2.1 from http://www.eclipse.org/downloads/
and follow the instructions in the installer. For Eclipse, enter:#cd/opt#sh(path-to-installation-package)/jdk-6u1-linux-i586.bin
If you installed the software from command line, you may wish to add the#tar zxf(path-to-installation-package)/eclipse-SDK-3.2.2-linux-gtk.tar.gz
bin subdirectories in the
installation directories to your system or
user PATH.
Apache Tomcat is simple lightweight Java (web) server suitable both for development and production. There a many ways of installing it, but here we simply decompress the code zip-package. We also install nice plugin from Sysdeo to control the Tomcat from Eclipse.
-
Download the installation packages from:
- Apache Tomcat 5.5.20 (Core, zip) from http://tomcat.apache.org/
- Sysdeo Eclipse Tomcat Launcher plugin 3.2 beta3 from http://www.sysdeo.com/eclipse/tomcatplugin
-
Decompress Apache Tomcat package to suitable directory. Here we use
C:\devas the target directory. The Apache Tomcat home directory will beC:\dev\apache-tomcat-5.5.20. -
Decompress Sysdeo Plugin to Eclipse plugin directory
C:\dev\eclipse\plugins. -
Sysdeo plugin supports dynamic loading of classes from Eclipse to Tomcat. This feature allows one to make changes to web web application while debugging. To install dynamic loading feature, decompress
C:\dev\eclipse\plugins\com.sysdeo.eclipse.tomcat_3.2.0.beta3\DevLoader.ziptoC:\dev\apache-tomcat-5.5.20\server\classes. -
Now we are ready to start and configure Eclipse. Start it by running
C:\dev\eclipse\eclipse.exe.When starting Eclipse the first time, it asks where to save the workspace. You can select any directory, but here we select
C:\dev\workspace. I would suggest to also set this to be the default.You can either see some Eclipse tutorials on the "Welcome" -screen or go to workbench to continue
Configure the Tomcat by selecting from the menu. Select from the tree on left. Set Tomcat version to be 5.x and Tomcat home to point to
C:\dev\apache-tomcat-5.5.20. Other defaults are fine.

Because IT Mill Toolkit supports many web browsers, you can use any of them for development. If you also plan to build any theme parts, like CSS files, customized layouts, or even completely new user interface components, we recommend that you use Firefox for debugging. The toolkit specially supports Firebug debugger and shows special support information there.
To install Firefox, just go to www.mozilla.com and download the installer. Using installer should be trivial.
After installing Firefox, use it to open http://www.getfirebug.com/ to install Firebug 1.01. If clicking -button does not open install window, enable installs from this domain by clicking yellow warning bar in the top of the browser-window.
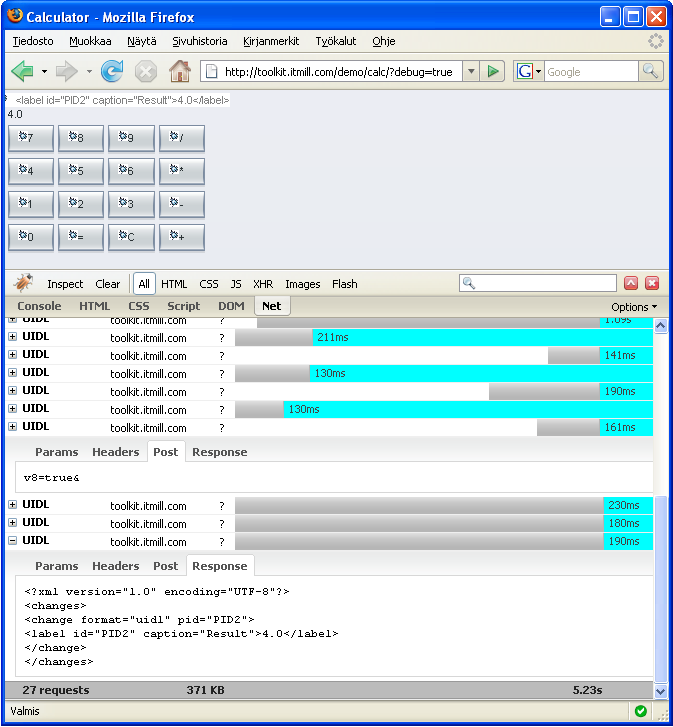
When Firebug is installed, it can be enabled anytime from bottom right corner of the Firefox window. See example on debugging the section called “Calculator” below.
Now that you have installed the development environment, you can proceed to making your first application.