Example application walkthrough
Let us follow the long tradition of first saying "Hello World!" when learning a new programming environment. After that, we can go through a more detailed example that implements the model-view-controller architecture. The two examples given are really simple, but this is mostly because IT Mill Toolkit is designed to make things simple.
Example 1.1. HelloWorld.java
import com.itmill.toolkit.ui.*;

public class HelloWorld extends com.itmill.toolkit.Application {

    public void init() {
        Window main = new Window("Hello window");
        setMainWindow(main);
        main.addComponent(new Label("Hello World!"));
    }
}
The first thing to note is that the example application extends
com.itmill.toolkit.Application class. The
Application class is used as the base class for all
user applications. Instances of the Application are
essentially user sessions, and one is created for each user using the
application. In the context of our HelloWorld application, it is
sufficient to know that the application is started when the user first
accesses it and on that time init method is
invoked.
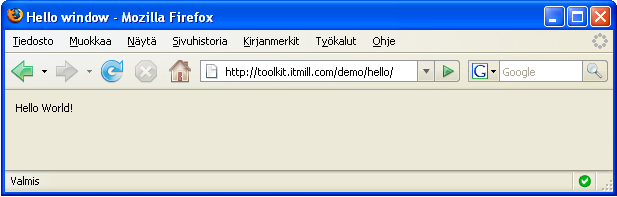
Initialization of HelloWorld application first creates a new window and sets its caption to be "Hello window". The window is then set as the main window of the application. This means that when a user launches the application, the contents of the main window are shown to the user. The caption is shown as a title of the (browser) window.
A new user interface component of class
com.itmill.toolkit.ui.Label
is created. The label is set to draw the text "Hello
World!". Finally the label is added to the main
window. And here we are, when the application is
started, it draws the text "Hello World!" to the
browser window.
The following screenshot shows what the "Hello World!" program will look like in a web browser.
Example 1.1, “HelloWorld.java” implements our "Hello World!" program. Before going into details, we should note that this example source code is complete and does not need any additional declaratively defined template files to be run. To run the program, you can just add it to your web application explained in the section called “Application Environment”.
One of the most amazing, or dare say annoying, things about modern computers is that while they cost hundreds if not thousands of currency units, they are less useful for calculations than an abacus. Recent operating systems have taken a significant step forward by including a trivial calculator program with almost every computer. Our little version below takes some 50 lines of code.
Let us first look what it should look like.

We all have to admit it, the calculator is not very beautiful with the gray buttons and backgrounds and all. In Chapter 6, Themes, we will show you how to excel in beauty, but for now we keep it dull and gray.
Let us look how it was done. Example 1.2, “Calc.java” implements a simple calculator that can do add, subtract, divide and multiply operations. Of course, this is not too useful to do with a server-based application, but it demonstrates event management, layout management, and a few other features of IT Mill Toolkit nicely.
Example 1.2. Calc.java
import com.itmill.toolkit.ui.*;

public class Calc
    extends com.itmill.toolkit.Application
    implements Button.ClickListener {

    private Label display = null;
    private double stored = 0.0;
    private double current = 0.0;
    private String operation = "C";
    private static String[] captions =
        {"7","8","9","/","4","5","6","*","1","2","3","-","0","=","C","+" };

    public void init() {

        GridLayout layout = new GridLayout(4, 5);

        display = new Label(Double.toString(current));
        display.setCaption("Result");
        layout.addComponent(display, 0, 0, 3, 0);

        for (int i = 0; i < captions.length; i++) {
            layout.addComponent(new Button(captions[i], this));
        }

        addWindow(new Window("Calculator", layout));
        setTheme("corporate");
    }


    public void buttonClick(Button.ClickEvent event) {

        try {
            // Number button pressed
            current = current * 10
                    + Double.parseDouble(event.getButton().getCaption());
            display.setValue(Double.toString(current));
        } catch (java.lang.NumberFormatException e) {

            // Operation button pressed
            if (operation.equals("+")) stored += current;
            if (operation.equals("-")) stored -= current;
            if (operation.equals("*")) stored *= current;
            if (operation.equals("/")) stored /= current;
            if (operation.equals("C")) stored = current;
            if (event.getButton().getCaption().equals("C")) stored = 0.0;
            operation = event.getButton().getCaption();
            current = 0.0;
            display.setValue(Double.toString(stored));
        }
    }
}
Let us next look at the architecture of this marvellous piece of modern technology by considering it from the perspective of the model-view-controller (MVC) design pattern. MVC is central to any decent user interface design, so we will revisit it frequently later in this guide. Our first example is actually not a very good example of MVC, but that is mainly to keep the size of the example in 50 lines. The main benefit is learning to think through the design pattern.
The application has internal state that is
simply stored in the applications properties in
the
Calculator
instance:
-
storedis the last value entered to the calculator before the value that is now displayed. -
currentis the value that is currently shown on calculators display. -
operationthis is the previously selected operation that will be done betweenstoredandcurrentwhen entering current is finished.
As with the HelloWorld, the application extends
com.itmill.toolkit.Application and initializes itself
in init. In this method, we initialize the user
interface of the application or anything else that needs to be initiated in
application start.
The user interface is created with GridLayout. It
provides an easy way of setting components in tabular layout; one just
specifies that the layout has four columns and adds the component to the
layout. First we create and add display as Label and
then all the Button components in for-loop.
Construction of user interface component trees can be done freely in any
order the programmer wants to. In HelloWorld
example, we added the Label component to the
Window. For the examples sake, here we set the layout
in Window constructor. This is almost the same; if
the layout is not specified, Window uses
OrderedLayout by default and adding components to a
Window adds them to its layout. Here we skip the
OrderedLayout and use
GridLayout instead. Then we just add the
Window to the
Application. Because this is the first
Window in the application, it is automatically
recognized to be the main window.
Note that the user interface programming is kept on logical level - nothing is said about colors, fonts, how buttons behave and such. This is all specified more carefully in application Theme. This is important as it frees the application programmer from the compexity of details related to look and feel. It also makes possible to maintain looks as separate themes - maybe created by different people.
Programming a "controller" in IT Mill Toolkit is not quite different from Swing or any other event based user interface framework. One just attaches event handlers to components and programs the actions in those handlers. The toolkit manages all the complexity of creating event handlers in DOM, their memory management issues, network transport of actions with AJAX, security, etc. Keeping all these "out of the way", the programmer can focus on the application itself.
In Calculator example, all buttons are assigned to send
their events to the application by saying in the Button
constructor that Button should send the event to
this and implementing
Button.Clicklistener. All the events (here) are sent to
the same listener method
buttonClick . To keep the example
simple, the listener decides what to do by looking at
button caption from received event.
The logic in the listener is fairly simple - if the caption is a number, it
is added as the next digit to current and the value
of current is set to the
display. Note that the IT Mill Toolkit handles all
sending of content to web browser automatically - it decides on what parts
of the screen need to be repainted and only updates them. For other buttons
application state is updated according to the button pressed and display is
also updated.