11.8. GWT Widget Development
Development of new GWT widgets includes widget set definition (GWT Module Descriptor), compiling the widgets and the Vaadin Client-Side Engine to JavaScript with the GWT Compiler, and debugging the application in the GWT Development Mode.
You can use any IDE for developing GWT components for Vaadin. The examples given in this book are for the Eclipse IDE. It allows easy launching of the GWT Development Mode, debugging, and running an external compiler for GWT widget sets.
Creation of a Vaadin project that uses the default widget set was covered in Section 2.3, “Your First Project with Vaadin”. Developing custom widgets creates a number of additional requirements for a project.
Let us review the steps required for creating an application that contains custom widgets. Details for each step are given in the subsequent sections.
- Create a new Vaadin project (for Eclipse, see Section 2.3.1)
- Copy or import the GWT JARs to the project and add them to the class path (Section 11.8.2)
- Write the source code for the client-side widgets, their server-side counterparts, and the application (Section 11.8.3)
-
Write the
web.xmlDeployment Descriptor for the web application- Define the widget set used in the application (Section 11.7.2)
- Compile the widget set to JavaScript runtime with GWT Compiler (Section 11.8.4)
- Deploy the project to an application server (for Eclipse and Tomcat see Section 2.3.3)
-
Either:
- Open a web browser to use the web application.
- Open a web browser in GWT Development Mode to debug the client-side widget code. (Section 11.8.6)
The contents of a ready widget development project are described in Section 11.8.5, “Ready to Run”.
The Vaadin Plugin for Eclipse makes the creation of application custom widgets as well as the application projects easy by taking care of all the above steps (except deployment), so if you use it, please see Section 11.2, “Doing It the Simple Way in Eclipse” for detailed instructions.
You will need to include the Google Web Toolkit in your project to develop custom widgets. You can download it from the GWT website - just make sure the version is compatible with the version of Vaadin that you use. The package includes precompiled libraries and applications for the specific platform of the installation. To use the libraries, you need to configure them in the classpath of your project as described below.
You can copy or import either the entire GWT directory or just the GWT JARs to your project.
If you use Eclipse and copy the GWT directory or the libraries to the project with system tools, remember to select your project folder and press F5 to refresh the project. You can also import the directory as follows (importing the JARs is similar):
- Right-click on the project folder in Project Explorer and select → .
- From the Import dialog, select → and click .
- Click button of the "From directory" field and browse to the parent directory of the GWT installation directory. Click in the file selection dialog.
-
Select the
gwtentry in the list box for importing. -
In the "Into folder" field, enter
myproject/gwt. (If you do not set this, all the contents of thegwtdirectory will be imported directly below the root directory of the project which is undesirable.) - Click .
You must include the GWT libraries in the classpath of the project. If using Eclipse, right-click on the project folder in the Project Explorer in Eclipse and select . Select → .
The project structure is otherwise free, but if you use the build
script described in Section 11.8.4, “Compiling GWT Widget Sets” or
configure the GWT Development Mode, as described in Section 11.8.6, “GWT Development Mode”, the examples assume that
source files are located under the
WebContent/WEB-INF/src folder.
We recommend that the name for the package containing the widget set
is widgetset, but this is not required. GWT does,
however, require that the client-side code is written under a
client package and any stylesheets are located
under a public directory (not necessarily a
package) under the package containing the
.gwt.xml descriptor.
See Section 11.8.5, “Ready to Run” for an example project structure.
If you want to use the Color Picker application as an application skeleton, you need to import it under the source folder.
- Right-click on the source folder and select .
- In the Import dialog, select → and click .
-
Browse to
WebContent/WEB-INF/src/com/vaadin/demo/colorpicker/and click button in the Import from directory dialog. -
In the Into folder field, enter
myproject/WebContent/WEB-INF/src/com/vaadin/demo/colorpicker. -
Check the
colorpickerentry in the list box. - Click .
This will import the directory as
com.vaadin.demo.colorpicker package. If you
want to use it as a skeleton for your own project, you should refactor
it to some other name. Notice that you will need to refactor the
package and application name manually in the
web.xml and .gwt.xml
descriptor files.
You need to compile the Vaadin Client-Side Engine and your custom widget set to JavaScript with the GWT Compiler. The easiest way is to use the Vaadin Plugin for Eclipse, it has a toolbar button that allows you to compile the widget set. See Section 11.2.2, “Recompiling the Widget Set” for instructions.
If you need to use Ant for compiling a widget set, you can find a script template at the URL https://vaadin.com/download/misc/build-widgetset.xml. You can copy the build script to your project and, once configured, enter:
$ ant -f build-widgetset.xml
To configure the build script, you need to set the paths in the
"configure" target and the widget set class name in the
"compile-widgetset" target to suit your project.
You can launch the build script from Eclipse, by right-clicking the script in Package Explorer and selecting → . Progress of the compilation is shown in the Console window.
After compilation, refresh the project by selecting it and
pressing F5. This makes Eclipse scan new
content in the file system and become aware of the output of the
compilation in the WebContent/VAADIN/widgetsets/
directory. If the project is not refreshed, the JavaScript runtime is not
included in the web application and running the application will result in
an error message such as the following:
Requested resource [VAADIN/widgetsets/com.vaadin.demo.colorpicker.gwt.ColorPickerWidgetSet/com.vaadin.demo.colorpicker.gwt.ColorPickerWidgetSet.nocache.js] not found from filesystem or through class loader. Add widgetset and/or theme JAR to your classpath or add files to WebContent/VAADIN folder.
Compilation with GWT is required also initially when using the GWT Development Mode, which is described in Section 11.8.6, “GWT Development Mode”. The compilation with the GWT Compiler must be done at least once, as it provides files that are used also by the GWT Development Mode, even though the browser runs the GWT application in Java Virtual Machine instead of JavaScript.
Warning
Because GWT supports a slightly reduced version of Java, GWT compilation can produce errors that do not occur with the Java compiler integrated in the Eclipse IDE.
Also notice that client-side compilation loads the server-side classes (to
find the @ClientWidget annotations) and, as a side
effect, executes any static code blocks in the classes, even in any
non-component classes such as the application class. This could cause
unexpected behaviour during the compilation.
If you wish to use the build script to compile your own widget sets, open it in an editor. The build script contains some instructions in the beginning of the file.
First, you need to make some basic configuration in the
configure target:
<target name="configure">
    <!-- Path from this file to the project root -->
    <property name="base"
              value="../../../" />

    <!-- Location of GWT distribution -->
    <property name="gwt-location"
              value="${base}gwt" />

    <!-- Location of Vaadin JAR -->
    <property name="vaadin-jar-location"
            value="${base}WebContent/WEB-INF/lib/vaadin-6.3.3.jar"/>

    <!-- Location of project source code -->
    <property name="src-location"
              value="${base}WebContent/WEB-INF/src" />

    <!-- Target where to compile server-side classes -->
    <property name="server-side-destination"
              value="${base}WebContent/WEB-INF/classes"/>

    <!-- Target where to compile the widget set -->
    <property name="client-side-destination"
              value="${base}WebContent/VAADIN/widgetsets" />
</target>
You also need to define the widget set in the
configure-widgetset target:
<!-- NOTE: Modify this example to compile your own widgetset -->
<target name="configure-widgetset">

  <!-- Name of the widget set -->
  <property name="widgetset"
    value="com.vaadin.demo.colorpicker.gwt.ColorPickerWidgetSet"/>
The widget set class name must match the package and the file name of
the .gwt.xml descriptor, without the extension.
You can use the compile-widgetset target as it
is, or as a template for your own configuration:
<!-- Build the widget set. -->
<target name="compile-widgetset"
        depends="compile-server-side, generate-widgetset">
    <echo>Compiling ${widgetset}...</echo>

    <java classname="com.google.gwt.dev.Compiler"
          failonerror="yes" fork="yes" maxmemory="256m">
        <arg value="-war" />
        <arg value="${client-side-destination}" />
        <arg value="${widgetset}" />
        <jvmarg value="-Xss1024k"/>
        <jvmarg value="-Djava.awt.headless=true"/>
        <classpath>
            <path refid="compile.classpath"/>
        </classpath>
    </java>
</target>
Notice that the server-side must be compiled before the client-side and the compiled server-side classes must be included in the class path for the GWT Compiler. The reason is that the annotations that define the component-to-widget mappings are read from the class files during the GWT compilation.
Google Web Toolkit Version
You must use a version of GWT that is compatible with the version of Vaadin you are using. If you use the Vaadin Plugin for Eclipse, it automatically downloads a GWT version that matches the currently used Vaadin version.
Java Stack Overflow Problems
The -Xss parameter for the Java process may
be necessary if you experience stack overflow errors with the
default stack size. They occur especially with GWT 1.6, which uses
large amount of stack space.
Notice further that the Windows version of Sun JRE 1.5 has a bug
that makes the stack size setting ineffective. The Windows version
also has a smaller default stack size than the other platforms. If
you experience the problem, we advice that you either use JRE 1.6
on the Windows platform or use a wrapper that circumvents the
problem. To use the wrapper, use class
com.vaadin.launcher.WidgetsetCompiler
in the build script instead of the regular compiler.
The -Djava.awt.headless=true parameter is
necessary in Linux/UNIX platforms to avoid some X11 warnings.
You can now compile the widget set with the following command:
$ ant -f build-widgetset.xml
If you use libraries containing other widget sets, you may want to
automatically generate the .gwt.xml GWT Module
Descriptor that defines the widget set that combines the Vaadin
default widget set, widget sets included in any libraries, and any
widget sets defined in your project.
If you use the build-widgetset.xml Ant build
script as a template, you need to define the settings required for
generating a widget set in the configure-widgetset
target.
<target name="configure-widgetset">
  <property name="widgetset"
         value="com.vaadin.demo.generated.GeneratedWidgetSet"/>
  <property name="generate.widgetset" value="1"/>
  <property name="widgetset-path" value="com/vaadin/demo/widgetset"/>
</target>
Define the name of the widget set definition file, without the
.gwt.xml suffix, in the
widgetset property. The
generate-widgetset target is executed only if the
generate.widgetset property is defined. You also
need to give a file path to the widget set directory, relative to the
$src-location directory..
The generate-widgetset target is defined as
follows:
<target name="generate-widgetset"
        depends="compile-server-side, configure-widgetset"
        if="generate.widgetset">

    <!-- Create the directory if it does not already exist. -->
    <mkdir dir="${src-location}/${widgetset-path}"/>

    <java classname="com.vaadin.terminal.gwt.widgetsetutils.WidgetSetBuilder"
          failonerror="yes" fork="yes" maxmemory="256m">
        <arg value="${widgetset}"/>
        <jvmarg value="-Xss1024k"/>
        <jvmarg value="-Djava.awt.headless=true"/>
        <classpath>
            <path refid="compile.classpath"/>
        </classpath>
    </java>
</target>
The widget set builder assumes that the root of the source directory
is the first item in the class path, here defined
with the src-location property. The location must
point to the root of the entire source tree, not the path of the
widget set under it. Also the location of compiled server-side classes
must be included, here defined with the
server-side-destination property. In the example
script, the class path is defined in the init
target as follows:
<path id="compile.classpath">
    <pathelement path="${src-location}" />
	<pathelement path="${server-side-destination}" />
	<pathelement path="${toolkit-jar-location}" />
	<pathelement path="${gwt-location}/gwt-user.jar" />
	<pathelement path="${gwt-location}/gwt-dev-${gwt-platform}.jar" />
    <pathelement path="${gwt-location}/validation-api-1.0.0.GA.jar" />
    <pathelement path="${gwt-location}/validation-api-1.0.0.GA-sources.jar" />
    <fileset dir="${base}WebContent/WEB-INF/lib/">
    	<include name="*.jar"/>
     </fileset>
</path>
Figure 11.8, “Annotated Project Contents” shows the contents of a ready project.

Notice that the Package Explorer does not correspond with the file system contents. Eclipse displays the items marked with asterisk (*) in a logical location, instead of the physical location in the file system.
You can either run the application in web mode, as introduced in Section 2.3.4, or debug it in the GWT Development Mode, as detailed in the next section.
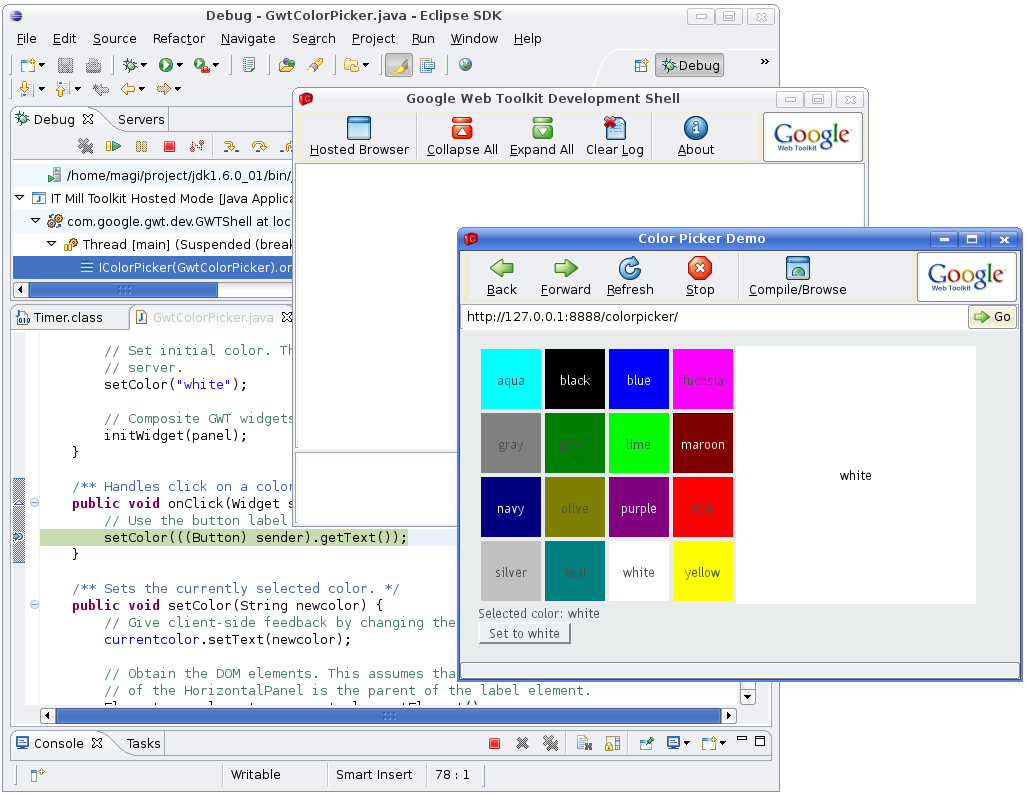
The GWT Development Mode allows debugging client-side GWT applications in a Java IDE such as Eclipse, as if the applications ran as Java in the browser, even though they actually are JavaScript. This is made possible by the Google Web Toolkit Developer Plugin, which is available for major browsers, such as Mozilla Firefox, Google Chrome, Safari, and Internet Explorer.
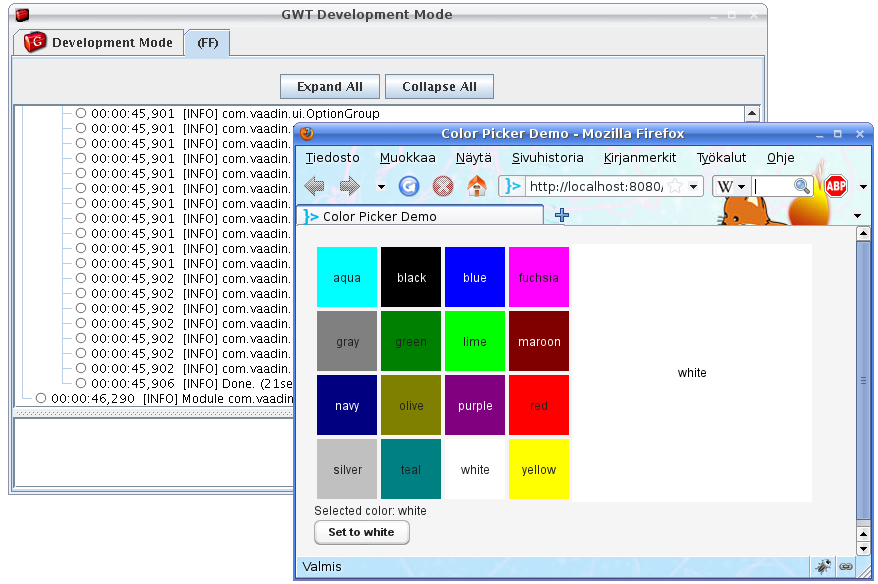
Figure 11.9, “GWT Development Mode” shows the GWT Development Mode in action. On the left, you have the GWT Development Mode window. It displays compilation information and possible errors that occur during compilation. You can open the application in a new browser window by clicking .
The browser window has a button, which runs the GWT Compiler to produce the runtime code and opens a regular web browser to run the application. Notice that even though it is possible to recompile the program with the button, GWT Compiler must be run at least once before launching the GWT Development Mode, as described in Section 11.8.4, “Compiling GWT Widget Sets”, as the compiler creates some required files.
Because GWT supports a slightly reduced version of Java, GWT compilation can produce errors that do not occur with the Java compiler integrated in the Eclipse IDE. Such errors will show up in the GWT Development Mode window.
If you use the Vaadin Plugin for Eclipse, you can create a launch configuration for the GWT Development Mode in the project properties. The Vaadin project properties are described in Section 11.2.3, “Plugin Related Project Settings”. Open the project properties and the Vaadin section, click and . You should see the launch configuration appear in the project.
You can run a launch configuration in a few different ways. For example, select it, open menu → , and select the launch configuration. The GWT Development Mode window should open.
This section describes how to create a launch configuration for the GWT Development Mode manually in the Eclipse IDE, without using the Vaadin Plugin for Eclipse.
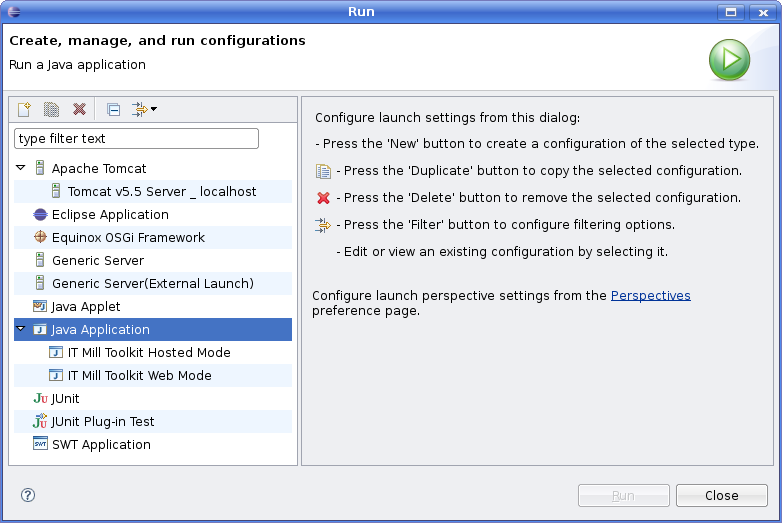
- Select from menu → and the Debug configuration window will open. Notice that it is not purposeful to run the GWT Development Mode in the "Run" mode, because its entire purpose is to allow debugging.
-
Select the folder and click on the button to create a new launch configuration.
-
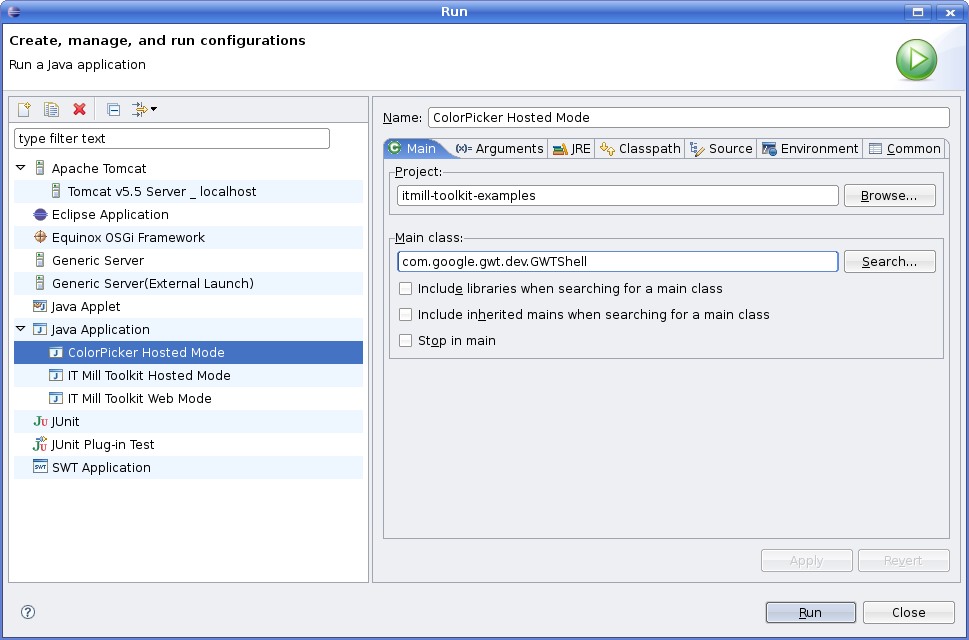
Click on the created launch configuration to open it on the
right-side panel. In the Main tab, give the
launch configuration a name. Define the Main
class as
com.google.gwt.dev.DevMode.
-
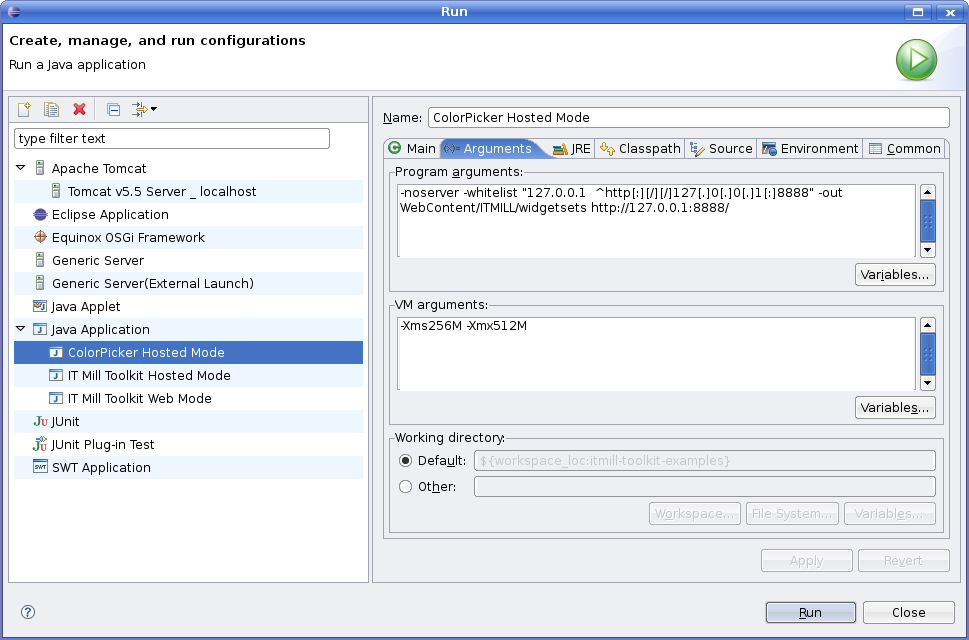
Switch to the Arguments tab and enter arguments for the application.
-
In the Program arguments field, enter:
-noserver -war WebContent/VAADIN/widgetsets
com.example.myproject.widgetset.MyProjectWidgetSet-startupUrl http://localhost:8080/myprojectThe browser application,
DevMode, takes as its arguments the following parameters:- -noserver
-
Prevents an embedded web server from starting, thereby allowing to use an already running server.
- -whitelist
-
Adds a regular expression to the list of allowed URL patterns for the web browser. Modify the port number from the 8080 given above as necessary.
- -war
-
Output directory for compiling widgets with GWT Compiler. The directory must be
WebContent/VAADIN/widgetsets. You can compile the widgets either from the GWT Development Mode window or externally as explained later in this chapter. - -startupUrl <URL>
-
The URL to connect to. This must be the same as the whitelist entry given above. The port number must correspond to the port of the running web server. The Jetty web server included in Vaadin will run in port 8888 by default. In contrast, Apache Tomcat installed under Eclipse will run in port 8080 by default.
-
In the VM arguments field enter, for example,
-Xms256M -Xmx512Mto give the GWT Development Mode more memory than the default amount.
-
-
In the Classpath tab, you will by default
have
vaadin-examples, which contains the default classpath entries for the project. If the classpath entries for the project are sufficient, this should be enough. - Click to save the launch configuration.
- Click to launch the GWT Development Mode using the launch configuration.
See the following section for details on debugging with the GWT Development Mode.
The purpose of the GWT Development Mode is to allow debugging client-side GWT applications, or in our case, GWT widgets. Below is a checklist for important requirements for launching the GWT Development Mode:
- GWT is installed in the project.
- GWT libraries are included in the project classpath.
- Widget sets have been compiled with GWT Compiler.
-
web.xmldescriptor is configured. - Web server is running and listening to the correct port.
- GWT Development Mode launch configuration is configured.
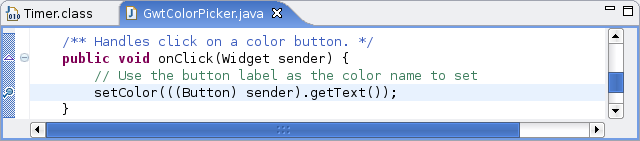
Once everything is ready to start debugging, just open a source file,
for example, the
com.vaadin.demo.colorpicker.gwt.client.ui.GwtColorPicker
class. Find the onClick() method. At the line
containing the setColor() call, right-click
on the leftmost bar in the editor and select
from the popup menu. A small magnifying glass will appear in the bar
to indicate the breakpoint.
Select from menu → and the Debug configuration window will open. Notice that it is not purposeful to run the GWT Development Mode in the "Run" mode, because its entire purpose is to allow debugging.
Starting applications under the GWT Development Mode can take considerable time! Compiling widgets can take 10-60 seconds, depending on the hardware. During this time, the web browser is unresponsive, does not update its window, and appears "stuck".
Please refer to Eclipse IDE documentation for further instructions on using the debugger.
Packaging and reusing custom components is almost as easy as with any Java code, but with a small difference. You can package the source code of a widget set as a JAR. A user can drop the JAR in the project and add it to the class path. If using widgets from multiple widget sets, the user has to inherit the widget set in a combining widget set (which can be generated automatically). The user then has to compile the widget set(s) as described in Section 11.8.4, “Compiling GWT Widget Sets”.
While you could, in theory, package precompiled widget sets in the JAR as well, it would create a serious danger for incompatibility between the client-side and server-side versions of Vaadin. The user would anyhow have to recompile the widget set if he uses multiple widget sets packaged in different JARs, or has developed project-specific widgets.
The widget set build script template, which you can find at the URL https://vaadin.com/download/misc/build-widgetset.xml,
includes an example package-jar target for building a
JAR. You can use the example as it is or modify it as you need.
You need to make the JAR packaging specific configuration in the
configure-jar target. Change to property values to
reflect your widget set.
<target name="configure-jar">
    <!-- The compiled JAR name -->
    <property name="jar-destination"
              value="${base}colorpicker.jar"/>

    <!-- Title of the widget set (for JAR) -->
    <property name="widgetset-title"
              value="ColorPicker"/>

    <!-- Version of the widget set (for JAR) -->
    <property name="widgetset-version" value="1.0"/>

    <!-- Vendor of the widget set (for JAR) -->
    <property name="widgetset-vendor"
              value="IT Mill Oy"/>
</target>
You may want to check also the package-jar target if
you want to use other license information or otherwise customize the
package content.
Assuming that you have otherwise configured the build script for your project as described in Section 11.8.4, “Compiling GWT Widget Sets”, you can build the JAR package with the following command:
$ ant -f build-widgetset.xml package-jar
Notice that the package-jar target does
not depend on the compile-widgetset target,
as the compiled widget set is not included in the package. If you really
wish to do so, add the dependency and include the compiled files as a
fileset for the package.
Below are some typical cases that may cause you trouble.
- Deferred binding fails
-
The widget set compilation in GWT Development Mode console produces the following error, which is shown in the Eclipse console:
Deferred binding failed for 'com.vaadin.csvalidation.widgetset.client.ui.VJavaScriptEditor' (did you forget to inherit a required module?)
This problem occurs if the creation of an instance of a widget fails, usually due to an exception in the constructor. The GWT Development Mode console displays a more detailed exception log.
- Widgets are missing from the widget set
-
The widget set compilation displays the list of widgets included in the widget set. If the list includes only the inherited widgets (built-in Vaadin widgets), but your custom widgets are missing, there is a problem.
The typical reason is that the server-side classes are not yet compiled or are missing from the classpath. Check that the server-side compilation output folder (such as
build/classes) is included in the classpath of GWT Compiler and that you compile the server-side components before the client-side, so that they are available in the classpath. The reason for this is that GWT Compiler (or more precisely a Vaadin widget set generator) reads the annotations that define the mappping from server-side components to client-side widgets from compiled class files. - The correct widget set is not loaded
-
The widget set must be specified in
WebContent/WEB-INF/web.xmldescriptor, as an initialization parameter for the servlet.<init-param> <description>Application widgetset</description> <param-name>widgetset</param-name> <param-value>com.example.mylibrary.widgetset.MyWidgetset</param-value> </init-param> - A generated widget set inherits itself
-
The widget set builder can create a
.gwt.xmldescriptor that inherits the same widget set. This usually occurs when the class path for the source files is set to something different than the root of the entire source tree, so that the package name of the widget set to be defined with the descriptor would be invalid.