Chapter 2. Getting Started with Vaadin
Table of Contents
This chapter gives practical instructions for installing the recommended toolchain and either the Vaadin Plugin for Eclipse or, if you use another IDE or no IDE at all, the Vaadin JAR.
This section gives a step-by-step guide for setting up a development environment. Vaadin supports a wide variety of tools, so you can use any IDE for writing the code, most web browsers for viewing the results, any operating system or processor supported by the Java 1.5 platform, and almost any Java web server for deploying the application.
In this example, we use the following toolchain:
- Windows XP, Linux, or Mac OS X
- Sun Java 2 Standard Edition 6.0 (Java 1.5 or newer is required)
- Eclipse IDE for Java EE Developers
- Apache Tomcat 7.0 (Core) or newer
- Mozilla Firefox browser
- Firebug debug tool (optional)
- Vaadin Framework
The above reference toolchain is a good choice of tools, but you can use almost any tools you are comfortable with.
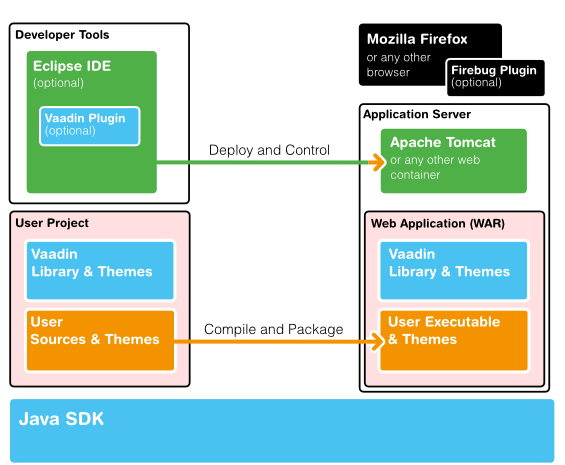
Figure 2.1, “Development Toolchain and Process” illustrates the development environment and process. You develop your application as an Eclipse project. The project must include, in addition to your source code, the Vaadin Library. It can also include project-specific themes.
You must compile and deploy a project to a web container before you can use it. You can deploy a project through the Web Tools Platform for Eclipse, which allows automatic deployment of web applications from Eclipse. You can deploy a project also manually, by creating a web application archive (WAR) and deploying it through the web container's interface.
Java SDK is required by Vaadin and also by the Eclipse IDE. Vaadin is compatible with Java 1.5 and later editions.
-
Download Sun Java 2 Standard Edition 6.0 from http://java.sun.com/javase/downloads/index.jsp
-
Install the Java SDK by running the installer. The default options are fine.
-
Download Sun Java 2 Standard Edition 6.0 from http://java.sun.com/javase/downloads/index.jsp
-
Decompress it under a suitable base directory, such as
/opt. For example, for Java SDK, enter (either as root or with sudo in Linux):#cd/opt#sh(path-to-installation-package)/jdk-6u1-linux-i586.binand follow the instructions in the installer.
Eclipse is now installed in
C:\dev\eclipse and can be started from
there (by double clicking eclipse.exe).
-
Download Eclipse IDE for Java EE Developers (Ganymede version) from http://www.eclipse.org/downloads/
-
Decompress the Eclipse IDE package to a suitable directory. You are free to select any directory and to use any ZIP decompressor, but in this example we decompress the ZIP file by just double-clicking it and selecting "Extract all files" task from Windows compressed folder task. In our installation example, we use
C:\devas the target directory.
You have two basic options for installing Eclipse in Linux and UNIX: you can either install it using the package manager of your operating system or by downloading and installing the packages manually. The manual installation method is recommended, because the latest versions of the packages available in a Linux package repository may be incompatible with Eclipse plugins that are not installed using the package manager.
-
Download Download Eclipse IDE for Java EE Developers (Ganymede version) from http://www.eclipse.org/downloads/
-
Decompress the Eclipse package into a suitable base directory. It is important to make sure that there is no old Eclipse installation in the target directory. Installing a new version on top of an old one probably renders Eclipse unusable.
-
Eclipse should normally be installed as a regular user, as this makes installation of plugins easier. Eclipse also stores some user settings in the installation directory. To install the package, enter:
$tar zxf(path-to-installation-package)/eclipse-jee-ganymede-SR2-linux-gtk.tar.gzThis will extract the package to a subdirectory with the name
eclipse. -
You may wish to add the Eclipse installation directory and the
binsubdirectory in the installation directory of Java SDK to your system or user PATH.
An alternative to the above procedure is to use the package management system of your operating system. For example, in Ubuntu Linux, which includes Sun Java SDK and Eclipse in its APT repository, you can install the programs from a package manager GUI or from command-line with a command such as:
$ sudo apt-get install sun-java6-jdk eclipseThis is, however, not recommended, because the Eclipse package may not include all the necessary Java EE tools, most importantly the Web Standard Tools, and it may cause incompatibilities with some components that are not installed with the package management system of your operating system.
Apache Tomcat is a lightweight Java web server suitable for both development and production. There are many ways to install it, but here we simply decompress the installation package.
Apache Tomcat should be installed with user permissions. During development, you will be running Eclipse or some other IDE with user permissions, but deploying web applications to a Tomcat server that is installed system-wide requires administrator or root permissions.
-
Download the installation package:
Apache Tomcat 7.0 (Core Binary Distribution) from
http://tomcat.apache.org/ -
Decompress Apache Tomcat package to a suitable target directory, such as
C:\dev(Windows) or/opt(Linux or Mac OS X). The Apache Tomcat home directory will beC:\dev\apache-tomcat-7.0.xor/opt/apache-tomcat-7.0.x, respectively.
Vaadin supports many web browsers and you can use any of them for development. If you plan to create a custom theme, customized layouts, or create new components, we recommend that you use Firefox together with Firebug.
If you do not have Firefox installed already, go to www.getfirefox.com and download and run the installer. In Linux, you can install it also with a package manager.
Optional. After installing Firefox, use it to open http://www.getfirebug.com/. Follow the instructions on the site to install the latest stable version of Firebug available for the browser. You might need to tell Firefox to allow the installation by clicking the yellow warning bar at the top of the browser-window.
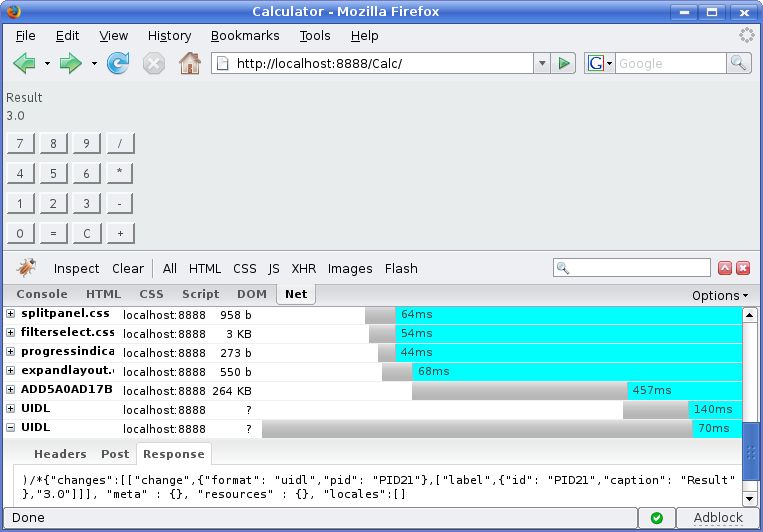
When Firebug is installed, it can be enabled at any time from the bottom right corner of the Firefox window. Figure 2.2, “Firebug Debugger for Firefox” shows an example of what Firebug looks like.
Now that you have installed the development environment, you can proceed to creating your first application.