2.2. Installing Vaadin
This section gives instructions for installing Vaadin in your development environment. You have two basic options for installing:
- If you use Eclipse, we recommend that you can install the Vaadin Plugin for Eclipse, as described in Section 2.2.1, “Vaadin Plugin for Eclipse”
- Otherwise, download and install the JAR package, as described in Section 2.2.2, “Installing the JAR Package”.
These options are explained in detail in the following sections.
If you are using the Eclipse IDE, using the Vaadin plugin should help greatly. The plugin includes:
-
An integration plugin with wizards for creating new Vaadin-based projects, themes, and client-side widgets and widget sets.
-
A visual editor for editing custom composite user interface components in a WYSIWYG fashion. With full round-trip support from source code to visual model and back, the editor integrates seamlessly with your development process.
-
A version of Book of Vaadin that you can browse in the Eclipse Help system.
You can install the plugin as follows:
-
Start Eclipse.
-
Select → .
-
Select the tab.
-
Add the Vaadin plugin update site by clicking .
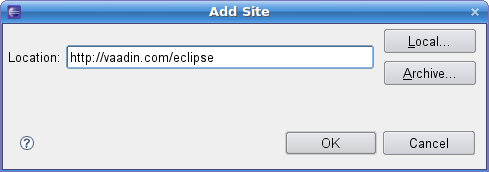
Enter the URL of the Vaadin Update Site: http://vaadin.com/eclipse and click . The Vaadin site should now appear in the Software Updates window.
-
Select all the Vaadin plugins in the tree.
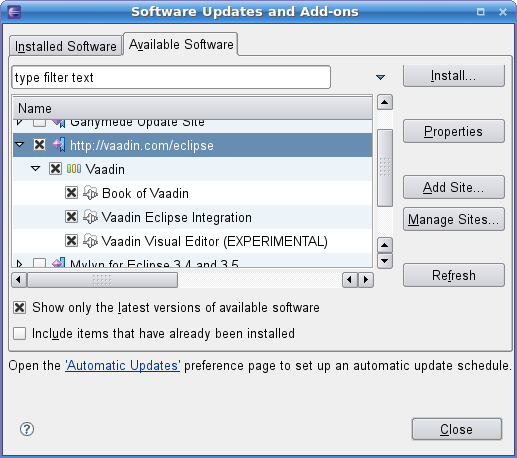
Finally, click .
Detailed and up-to-date installation instructions for the Eclipse plugin can be found at http://vaadin.com/eclipse.
If you have automatic updates enabled in Eclipse (see → → → ), the Vaadin plugin will be updated automatically along with other plugins. Otherwise, you can update the Vaadin plugin (there are actually multiple plugins) manually as follows:
-
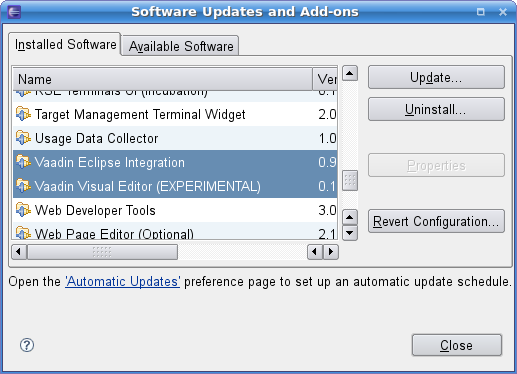
Select → , the Software Updates and Add-ons window will open.
-
Select the Installed Software tab.
-
If you want to update only the Vaadin plugins, select them in the list by clicking the plugins and holding the Ctrl key pressed for all but the first.
-
Click .
Notice that updating the Vaadin plugin updates only the plugin and not the Vaadin library, which is project specific. See below for instructions for updating the library.
Updating the Vaadin plugin does not update Vaadin library. The library is project specific, as a different version might be required for different projects, so you have to update it separately for each project. To change the library to a newer (or some other) version, do as follows:
-
Select the project in the Project Explorer and select → or press Alt+Enter.
-
In the project preferences window that opens, select → .
-
If the version that you want to use is not included in the Vaadin version drop-down list, click to open the download window.
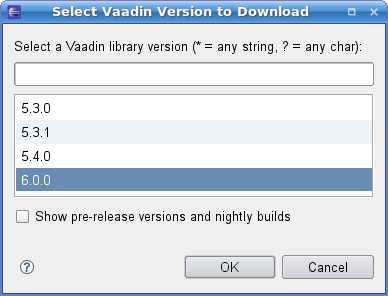
If you want to use a development version, select Show pre-release versions and nightly builds. Select the version that you want to download and click .
-
Select the version that you want to use from the Vaadin version down-down list and click .
You can observe that the new library appears in the
WebContent/WEB-INF/lib folder.
You can install the Vaadin JAR package in a few simple steps:
-
Download the newest Vaadin JAR package from the download page at http://vaadin.com/download/.
-
Put the JAR in the
WEB-APP/libweb library folder in the project.
The location of the WEB-APP/lib folder depends on
the project organization.
-
In Eclipse projects:
WebContent/WEB-INF/lib. -
In Maven projects:
src/main/webapp/WEB-INF/lib.