20.2. Installing Vaadin TestBench
Installation of Vaadin TestBench covers the following tasks:
-
Download and unpack the Vaadin TestBench installation package
-
Install Vaadin TestBench Recorder
-
Install Vaadin TestBench Library
Which modules you need to install depends on whether you are developing tests or running existing tests. Two basic installation types are covered in these instructions:
-
Test development installation on a workstation
-
Distributed grid installation
In a typical test development setup, you install Vaadin TestBench on a workstation. You can use the TestBench Recorder to record test cases and export them as JUnit test case stubs. This is especially recommended if you are new to Vaadin TestBench and do not want to code from scratch. You can install the Recorder in Firefox as described in Section 20.2.6, “Installing the Recorder”.
You may find it convenient to develop and execute tests under an IDE such as Eclipse. The special support for running JUnit test cases in Eclipse is described in Section 20.5.3, “Running JUnit Tests in Eclipse”.
In such a test development setup, you do not need a grid hub or nodes. However, if you develop tests for a grid, you can run the tests, the grid hub, and one node all in your development workstation. A distributed setup is described in the following section.
Vaadin TestBench supports distributed execution of tests in a grid. A test grid consists of the following categories of hosts:
-
One or more test servers executing the tests
-
A grid hub
-
Grid nodes
The components of a grid setup are illustrated in Figure 20.3, “Vaadin TestBench Grid Setup”.
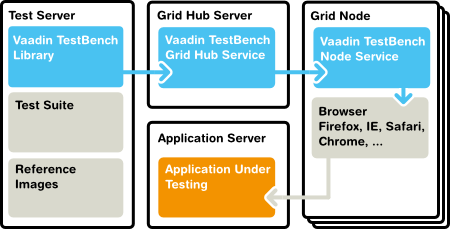
The grid hub is a service that handles communication between the JUnit test runner and the nodes. The nodes are services that perform the actual execution of test commands in the browser.
The hub requires very little resources, so you would typically run it either in the test server or on one of the nodes. You can run the tests, the hub, and one node all in one host, but in a fully distributed setup, you install the Vaadin TestBench components on separate hosts.
Controlling browsers over a distributed setup requires using a remote WebDriver. Grid development and use of the hub and nodes is described in Section 20.7, “Running Tests in an Distributed Environment”.
First, download the installation package
vaadin-testbench-3.1.0.zip and extract
the installation package where you can find it.
In Windows, use the default ZIP decompression feature to extract the
package into your chosen directory, for example,
C:\dev.
Windows Zip Decompression Problem
The default decompression program in Windows XP and Vista as well
as some versions of WinRAR cannot unpack the installation package
properly in certain cases. Decompression can result in an error
such as: "The system cannot find the file specified." This can
happen because the default decompression program is unable to
handle long file paths where the total length exceeds 256
characters. This can occur, for example, if you try to unpack the
package under Desktop. You should unpack the package directly into
C:\dev or some other short path or use
another decompression program.
In Linux, Mac OS X, and other UNIX-like systems, you can use Info-ZIP or other ZIP software with the command:
$unzipvaadin-testbench-3.1.0.zip
The contents of the installation package will be extracted under the current directory.
In Mac OS X, you can also double-click the package to extract it under the current folder in a folder with the same name as the package.
The installation package contains the following:
documentation-
The documentation folder contains the TestBench library API documentation, a PDF excerpt of this chapter of Book of Vaadin, and the license.
example-
The example folder provides TestBench examples. An example Maven configuration POM is given, as well as the JUnit test Java source files. For a description of the contents, see Section 20.2.5, “Example Contents”.
maven-
The Maven folder contains version of the Vaadin TestBench libraries that you can install in your local Maven repository. Please follow the instructions in Section 20.5.5, “Executing Tests with Maven”.
vaadin-testbench-recorder-
This folder constains the Vaadin TestBench Recorder, which you can install in Firefox. Please follow the instructions in Section 20.2.6, “Installing the Recorder”.
vaadin-testbench-standalone-3.1.0.jar-
This is the Vaadin TestBench library. It is a standalone library that includes the Selenium WebDriver and many other required libraries.
vaadin-testbench-standalone-3.1.0-javadoc.jar-
This is the JavaDoc API documentation for the TestBench library. If you use Eclipse, you can associate the JAR with the TestBench JAR in the project preferences, in the build path library settings.
The example/maven folder provides a number of
examples for using Vaadin TestBench. The source code for the application
to be tested, a desktop calculator application, is given in the
src/main/java subfolder.
The tests examples given under the src/test/java
subfolder, in the com/vaadin/testbenchexample package
subfolder, are as follows:
SimpleCalculatorITCase.java-
Demonstrates the basic use of WebDriver. Interacts with the buttons in the user interface by clicking them and checks the resulting value. Uses
By.id()to access the elements. LoopingCalculatorITCase.java-
Otherwise as the simple example, but shows how to use looping to produce programmatic repetition to create a complex use case.
ScreenshotITCase.java-
Shows how to compare screenshots, as described in Section 20.6, “Taking and Comparing Screenshots”. Some of the test cases include random input, so they require masked screenshot comparison to mask the random areas out.
The included reference images were taken with Firefox on Mac OS X, so if you use another platform, they will fail. You will need to copy the error images to the reference screenshot folder and mask out the areas with the alpha channel as described in Section 20.6.3, “Taking Screenshots for Comparison”.
SelectorExamplesITCase.java-
This example shows how to use different selectors:
By.id()- selecting by identifierBy.xpath()- selecting by an XPath expression
VerifyExecutionTimeITCase.java-
Shows how to time the execution of a test case and how to report it.
AdvancedCommandsITCase.java-
Demonstrates how to test tooltips (Section 20.5.10, “Testing Tooltips”) and context menus. Uses debug IDs, XPath expressions, as well as CSS selectors to find the elements to check.
For information about running the examples with Maven, see Section 20.5.5, “Executing Tests with Maven”.
You can use the Vaadin TestBench Recorder in a test development environment to record test cases and to export them as JUnit test case stubs, which you can then develop further. This gives you a quick start when you are learning to use TestBench. Later you can use the Recorder to identify the HTML DOM paths of the user interface elements which you want to test.
After extracting the files from the installation package, do the following:
-
Change to the
vaadin-testbench-recorderdirectory under the installation directory. -
Open Mozilla Firefox
-
Either drag and drop the
vaadin-testbench-recorder-3.1.0.xpito an open Firefox window or open it from the menu with → . -
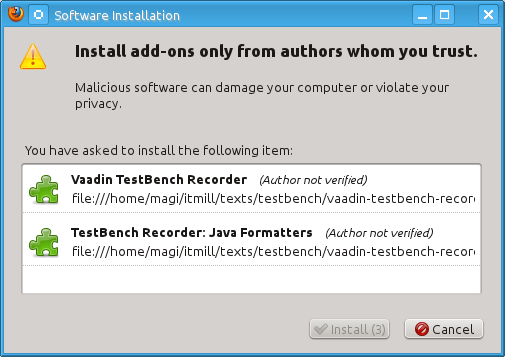
Firefox will ask if you want to install the TestBench Recorder extension. Click .
-
After the installation of the add-on is finished, Firefox offers to restart. Click .
Installation of a new version of Vaadin TestBench Recorder will overwrite an existing previous version.
After Firefox has restarted, navigate to a Vaadin application for which you want to record test cases, such as http://demo.vaadin.com/sampler.
Whether developing tests with the WebDriver in the workstation or running tests in a grid, using some browsers requires that a browser driver is installed.
-
Download the latest browser driver
-
Internet Explorer (Windows only) - install
IEDriverServer.exefrom: -
Chrome - install ChromeDriver (a part of the Chromium project) for your platform from:
-
- Add the driver executable to PATH or define it as a system property in the application using WebDriver locally, or in distributed use give it as a command-line parameter to the grid node service, as described in Section 20.7.4, “Starting a Grid Node”.
If you are running the tests in a grid environment, you need to make some configuration to the test nodes to get more stable results.
Further configuration is provided in command-line parameters when starting the node services, as described in Section 20.7.4, “Starting a Grid Node”.
Make any operating system settings that might interfere with the browser and how it is opened or closed. Typical problems include crash handler dialogs.
On Windows, disable error reporting in case a browser crashes as follows:
-
Open →
-
Select the Advanced tab
-
Select Error reporting
-
Check that Disable error reporting is selected
-
Check that But notify me when critical errors occur is not selected
The screenshot comparison feature requires that the user interface of the browser stays constant. The exact features that interfere with testing depend on the browser and the operating system.
In general:
-
Disable blinking cursor
-
Use identical operating system themeing on every host
-
Turn off any software that may suddenly pop up a new window
-
Turn off screen saver
If using Windows and Internet Explorer, you should give also the following setting:
-
Turn on Allow active content to run in files on My Computer under Security settings