5.15. Tree
The Tree component allows a natural way to represent
data that has hierarchical relationships, such as filesystems or message
threads. The Tree component in Vaadin works
much like the tree components of most modern desktop user interface toolkits,
for example in directory browsing.
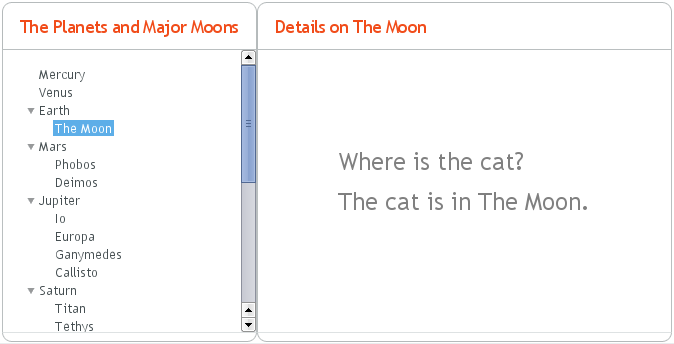
The typical use of the Tree component is for displaying
a hierachical menu, like a menu on the left side of the screen, as in Figure 5.56, “A Tree Component as a Menu”, or for displaying filesystems or
other hierarchical datasets. The menu style makes the
appearance of the tree more suitable for this purpose.
final Object[][] planets = new Object[][]{
        new Object[]{"Mercury"},
        new Object[]{"Venus"},
        new Object[]{"Earth", "The Moon"},
        new Object[]{"Mars", "Phobos", "Deimos"},
        new Object[]{"Jupiter", "Io", "Europa", "Ganymedes",
                                "Callisto"},
        new Object[]{"Saturn",  "Titan", "Tethys", "Dione",
                                "Rhea", "Iapetus"},
        new Object[]{"Uranus",  "Miranda", "Ariel", "Umbriel",
                                "Titania", "Oberon"},
        new Object[]{"Neptune", "Triton", "Proteus", "Nereid",
                                "Larissa"}};

Tree tree = new Tree("The Planets and Major Moons");

/* Add planets as root items in the tree. */
for (int i=0; i<planets.length; i++) {
    String planet = (String) (planets[i][0]);
    tree.addItem(planet);

    if (planets[i].length == 1) {
        // The planet has no moons so make it a leaf.
        tree.setChildrenAllowed(planet, false);
    } else {
        // Add children (moons) under the planets.
        for (int j=1; j<planets[i].length; j++) {
            String moon = (String) planets[i][j];

            // Add the item as a regular item.
            tree.addItem(moon);

            // Set it to be a child.
            tree.setParent(moon, planet);

            // Make the moons look like leaves.
            tree.setChildrenAllowed(moon, false);
        }

        // Expand the subtree.
        tree.expandItemsRecursively(planet);
    }
}

main.addComponent(tree);
Figure 5.56, “A Tree Component as a Menu” below shows the tree from the code
example in a practical situation.
You can read or set the currently selected item by the value property of the
Tree component, that is, with
getValue() and
setValue(). When the user clicks an item on a tree,
the tree will receive an ValueChangeEvent, which you
can catch with a ValueChangeListener. To receive the
event immediately after the click, you need to set the tree as
setImmediate(true).
The Tree component uses
Container data sources much like the
Table component, with the addition that it also
utilizes hierarchy information maintained by a
HierarchicalContainer. The contained items can be of
any item type supported by the container. The default container and its
addItem() assume that the items are strings and the
string value is used as the item ID.