4.3. Sub-Windows
An application-level window can have a number of floating child or sub-windows. They are managed by the client-side JavaScript runtime of Vaadin using HTML features. Vaadin allows opening and closing sub-windows, refreshing one window from another, resizing windows, and scrolling the window content. Sub-windows are typically used for Dialog Windows and Multiple Document Interface applications. Sub-windows are by default not modal; you can set them modal as described in Section 4.3.4, “Modal Windows”.
As with all user interface components, the appearance of a window and its contents is defined with themes.
User control of a sub-window is limited to moving, resizing, and closing the window. Maximizing or minimizing are not yet supported.
You can open a new window by creating a new
Window object and adding it to the
main window with addWindow() method of
the Application class.
mywindow = new Window("My Window");
mainwindow.addWindow(mywindow);
You close the window in a similar fashion, by calling the
removeWindow() of the
Application class:
myapplication.removeWindow (mywindow);
The user can, by default, close a sub-window by clicking the close
button in the upper-right corner of the window. You can disable the button
by setting the window as read-only with
setReadOnly(true). Notice that you could disable
the button also by making it invisible in CSS with a "display:
none" formatting. The problem with such a cosmetic disabling
is that a malicious user might re-enable the button and close the window,
which might cause problems and possibly be a security hole. Setting
the window as read-only not only disables the close button on the client
side, but also prevents processing the close event on the server side.
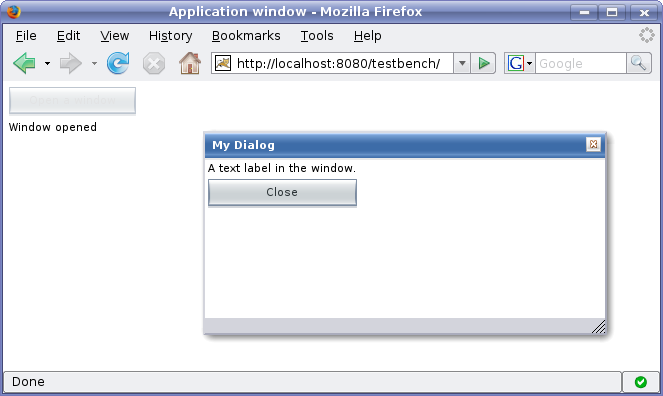
The following example demonstrates the use of a sub-window in an application. The example manages the window using a custom component that contains a button for opening and closing the window.
/** Component contains a button that allows opening a window. */
public class WindowOpener extends CustomComponent
                          implements Window.CloseListener {
    Window mainwindow;  // Reference to main window
    Window mywindow;    // The window to be opened
    Button openbutton;  // Button for opening the window
    Button closebutton; // A button in the window
    Label  explanation; // A descriptive text

    public WindowOpener(String label, Window main) {
        mainwindow = main;

        // The component contains a button that opens the window.
        final VerticalLayout layout = new VerticalLayout();

        openbutton = new Button("Open Window", this,
                                "openButtonClick");
        explanation = new Label("Explanation");
        layout.addComponent(openbutton);
        layout.addComponent(explanation);

        setCompositionRoot(layout);
    }

    /** Handle the clicks for the two buttons. */
    public void openButtonClick(Button.ClickEvent event) {
        /* Create a new window. */
        mywindow = new Window("My Dialog");
        mywindow.setPositionX(200);
        mywindow.setPositionY(100);

        /* Add the window inside the main window. */
        mainwindow.addWindow(mywindow);

        /* Listen for close events for the window. */
        mywindow.addListener(this);

        /* Add components in the window. */
        mywindow.addComponent(
                new Label("A text label in the window."));
        closebutton = new Button("Close", this, "closeButtonClick");
        mywindow.addComponent(closebutton);

        /* Allow opening only one window at a time. */
        openbutton.setEnabled(false);

        explanation.setValue("Window opened");
    }

    /** Handle Close button click and close the window. */
    public void closeButtonClick(Button.ClickEvent event) {
        /* Windows are managed by the application object. */
        mainwindow.removeWindow(mywindow);

        /* Return to initial state. */
        openbutton.setEnabled(true);

        explanation.setValue("Closed with button");
    }

    /** In case the window is closed otherwise. */
    public void windowClose(CloseEvent e) {
        /* Return to initial state. */
        openbutton.setEnabled(true);

        explanation.setValue("Closed with window controls");
    }
}
The example implements a custom component that inherits the
CustomComponent class. It consists of a
Button that it uses to open a window and a
Label to describe the state of the window. When the
window is open, the button is disabled. When the window is closed, the
button is enabled again.
You can use the above custom component in the application class with:
 public void init() {
    Window main = new Window("The Main Window");
    setMainWindow(main);

    main.addComponent(new WindowOpener("Window Opener", main));
}
When added to an application, the screen will look as illustrated in the following screenshot:
When created, a window will have a default size and
position. You can specify the size of a window with
setHeight() and
setWidth() methods. You can set the
position of the window with setPositionX()
and setPositionY() methods.
/* Create a new window. */
mywindow = new Window("My Dialog");

/* Set window size. */
mywindow.setHeight("200px");
mywindow.setWidth("400px");

/* Set window position. */
mywindow.setPositionX(200);
mywindow.setPositionY(50);
Notice that the size of the main window is unknown and the
getHeight and
getWidth methods will return
-1.
If a sub-window has a fixed or percentual size and its content becomes too
big to fit in the content area, a scroll bar will appear for the
particular direction. On the other hand, if the sub-window has undefined
size in the direction, it will fit the size of the content and never get a
scroll bar. Scroll bars in sub-windows are handled with regular HTML
features, namely overflow: auto property in CSS.
As Window extends Panel,
windows are also Scrollable. Note that the
interface defines programmatic scrolling, not
scrolling by the user. Please see Section 6.6, “Panel”.
A modal window is a child window that has to be closed by the user before the use of the parent window can continue. Dialog windows are typically modal. The advantage of modal windows is the simplification of user interaction, which may contribute to the clarity of the user interface. Modal windows are also easy to use from a development perspective, because as user interaction is isolated to them, changes in application state are more limited while the modal window is open. The disadvantage of modal windows is that they can restrict workflow too much.
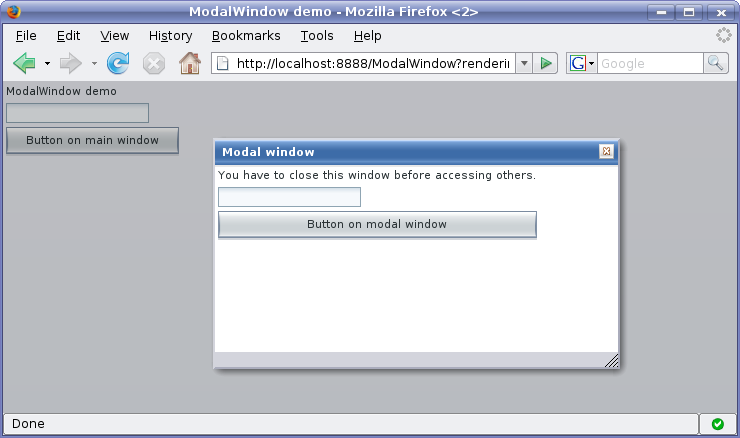
Depending on theme settings, the parent window may be grayed while the modal window is open.
The demo application of Vaadin includes an example of using modal windows. Figure 4.3, “Screenshot of the Modal Window Demo Application” above is from the demo application. The example includes the source code.
Security Warning
Modality of child windows is purely a client-side feature and can be circumvented with client-side attack code. You should not trust in the modality of child windows in security-critical situations such as login windows.