11.2. Doing It the Simple Way in Eclipse
While you can develop new widgets with any IDE or even without, you may find Eclipse and the Vaadin Plugin for it useful, as it automates all the basic routines of widget development, most importantly the creation of new widgets.
You can create a new widget as follows:
-
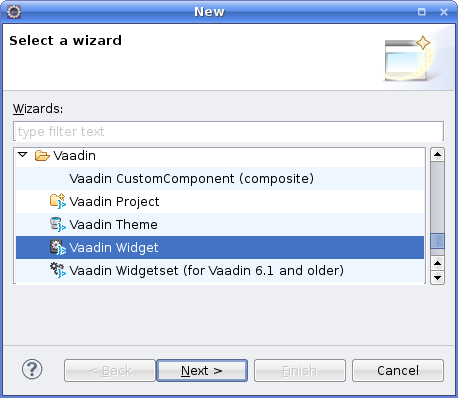
Select → → in the main menu or right-click the Project Explorer and select → or press Ctrl+N to open the New dialog.
-
In the first, Select a wizard step, select → and click .
-
In the New Component wizard step, fill out the target folder, package, and class information.
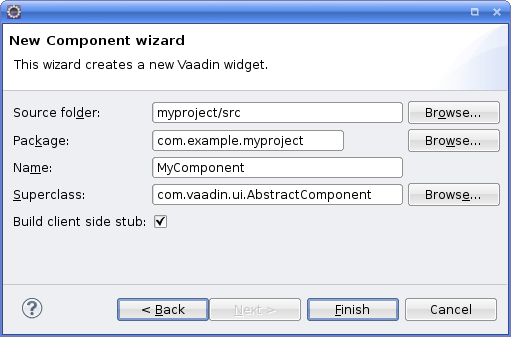
- Source folder
-
The root folder of the entire source tree. The default value is the default source tree of your project, and you should normally leave it unchanged unless you have a different project structure.
- Package
-
The parent package under which the new server-side component should be created. If it does not already exist, the
.gwt.xmldescriptor that defines the widget set will be created under the widgetset subpackage under this package, and the actual new widget under the widgetset.client.ui subpackage. - Name
-
The class name of the new server-side component. The name of the client-side widget stub (if you have its creation enabled) will be the same but with "
V-" prefix, for example,VMycomponent. You can rename the classes afterwards. - Superclass
-
The superclass of the server-side component. It is
AbstractComponentby default, butcom.vaadin.ui.AbstractFieldorcom.vaadin.ui.AbstractSelectare other commonly used superclasses. If you are extending an existing component, you should select it as the superclass. You can easily change the superclass later. - Build client-side stub
-
When this option is selected (strongly recommended), the wizard will build a stub for the client-side widget.
Finally, click to create the new component.
The wizard will:
-
Create a server-side component stub in the base package
-
Create a GWT module descriptor file (
.gwt.xml) in thewidgetsetpackage under the base package -
Create a client-side widget stub in the
widgetset.client.uipackage under the base package -
Modify the
web.xmldeployment descriptor to specify the widget set class name parameter for the application.
The structure of the server-side component and the client-side widget, and the serialization of component state between them, is explained in the subsequent sections of this chapter.
To compile the widget set, click the button in the Eclipse toolbar. See Section 11.2.2, “Recompiling the Widget Set” for details. After the compilation
finishes, you should be able to run your application as before, but using
the new widget set. The compilation result is written under the
WebContent/VAADIN/widgetsets folder. When you need to
recompile the widget set in Eclipse, see Section 11.2.2, “Recompiling the Widget Set”. For detailed information on compiling
widget sets, see Section 11.8.4, “Compiling GWT Widget Sets”.
The following setting is inserted in the web.xml
deployment descriptor to enable the widget set:
<init-param>
    <description>Application widgetset</description>
    <param-name>widgetset</param-name>
    <param-value>com.example.myproject.widgetset.MyprojectApplicationWidgetset</param-value>
</init-param>
You can refactor the package structure if you find need for it, but GWT
compiler requires that the client-side code must
always be stored under a package named "client".
After you edit a widget, you need to recompile the widget set. Vaadin automatically suggests to compile the widget set every time you save a client-side source file. If this gets annoying, you can disable the automatic recompilation from the Vaadin category in project settings, by selecting the Suspend automatic widgetset builds option.
You can recompile the widget set manually by clicking the button in the Eclipse toolbar, shown in Figure 11.2, “The Button in Eclipse Toolbar” while the project is open and selected.

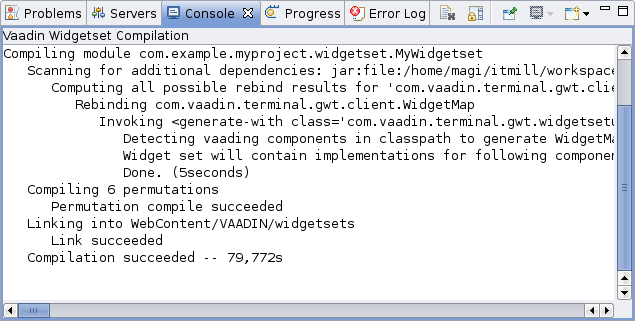
The compilation progress is shown in the Console panel in Eclipse, as illustrated in Figure 11.3, “Recompiling a Widget Set”.
The compilation output is written under the
WebContent/VAADIN/widgetsets folder, in a widget set
specific folder.
You can speed up the compilation significantly by compiling the widget set
only for your browser during development. The generated
.gwt.xml descriptor stub includes a disabled element
that specifies the target browser. See Section 11.5, “Defining a Widget Set” for
more details on setting the user-agent property.
For detailed information on compiling widget sets, see Section 11.8.4, “Compiling GWT Widget Sets”. Should you compile a widget set outside Eclipse, you need to refresh the project by selecting it in Project Explorer and pressing F5.
When you have the Eclipse Plugin installed, the project settings will have a Vaadin section, where you can select the Vaadin version and make settings to widget set building. The settings window is shown in Figure 11.4, “Plugin Related Project Settings”.
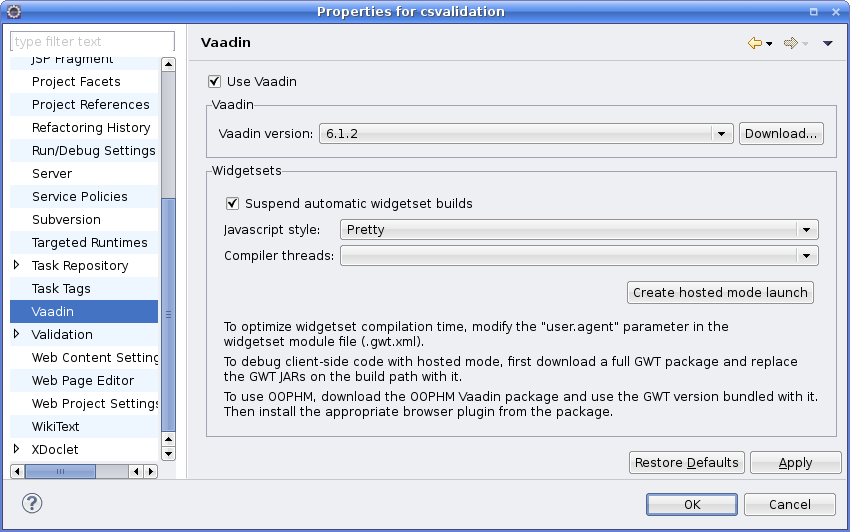
- Suspend automatic widgetset builds
-
Normally, when this option is unselected, Eclipse will suggest to rebuild the widget set automatically every time you save a widget source file. If this gets annoying, you can suspend the automatic building by enabling this option. You then have to click the widget set build button in the Eclipse toolbar.
- JavaScript style
-
Normally, GWT outputs obfuscated JavaScript to make the code less readable. The main purpose is to protect the intellectual property, but the obfuscated code is also more compact, reducing the time required to load and parse the files. The Obfuscated mode is the default. The other output types are Pretty, which makes the JavaScript more readable to a human, and Detailed, which is more detailed than the pretty option with, for example, more descriptive variable names.
- Compiler threads
-
You can set the GWT Compiler to use a specific number of threads to use the available processor cores.
- Create development mode launch
-
Clicking this button generates a launch configuration for starting the application in GWT Development Mode. You can use the launch configuration to debug client-side code. See Section 11.8.6, “GWT Development Mode” for detailed information on the GWT Develpment Mode launch configuration.
The plugin will automatically download the GWT version compatible with the selected Vaadin package.