5.19. Form
Most web applications need forms. The Form component in
Vaadin offers an easy way to create forms where the fields can be
automatically generated from a data source that is bound to the form. The
BeanItem adapter allows the data sources to be just
JavaBeans or Plain Old Java Objects (POJOs) with just the setter and getter
methods. Form manages buffering so that the form
contents can be committed to the data source only when filling the form is
complete, and before that, the user can discard any changes.
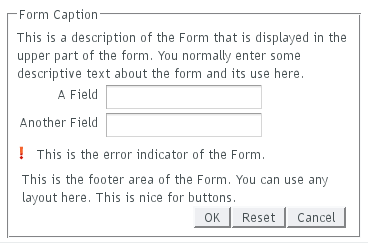
The Form component is also a layout, with a bounding
box, a caption, a description field, and a special error indicator. As such,
it can also be used within logical forms to group input fields.
To begin with the Form, it is a UI component with
a layout suitable for its purpose. A Form has a
caption, a description, a layout that contains the fields, an error indicator,
and a footer, as illustrated in Figure 5.61, “Layout of the Form Component”
below. Unlike with other components, the caption is shown within the
border. (See the details below on how to enable the border with CSS, as it may
not be enabled in the default style.)
Unlike most components, Form does not accept the
caption in the constructor, as forms are often captionless, but you can
give the caption with the setCaption(). While the
description text, which you can set with
setDescription(), is shown as a tooltip in most
other components, a Form displays it in top of the
form box as shown in the figure above.
Formform = newForm(); form.setCaption("Form Caption"); form.setDescription("This is a description of the Form that is " + "displayed in the upper part of the form. You normally " + "enter some descriptive text about the form and its " + "use here.");
Form has FormLayout
as its default layout, but you can set any other layout with
setLayout(). See
Section 6.5, “FormLayout” for more information.
Note that the Form itself handles layout for
the description, the footer and other common elements of the form.
The user-set layout only manages the contained fields and their
captions.
The Form is most of all a container for fields so
it offers many kinds of automation for creating and managing fields. You
can, of course, create fields directly in the layout, but it is usually
more desirable to bind the fields to the connected data source.
// Add a field directly to the layout. This field will
// not be bound to the data source Item of the form.
form.getLayout().addComponent(new TextField("A Field"));

// Add a field and bind it to an named item property.
form.addField("another", new TextField("Another Field"));
Binding forms and their fields to data objects is described further in Section 5.19.2, “Binding Form to Data” below.
The Form has a special error indicator inside the
form. The indicator can show the following types of error messages:
- Errors set with the
setComponentError()method of the form. For example:form.setComponentError(new UserError("This is the error indicator of the Form.")); - Errors caused by a validator attached to the
FormwithaddValidator(). - Errors caused by validators attached to the fields inside forms,
if
setValidationVisible(true)is set for the form. This type of validation is explained futher in Section 5.19.3, “Validating Form Input” below. - Errors from automatic validation of fields set as
required with
setRequired(true)if an error message has also been set withsetRequiredError().
Only a single error is displayed in the error indicator at a time.
Finally, Form has a footer area. The footer is a
HorizontalLayout by default, but you can
change it with setFooter().
// Set the footer layout. form.setFooter(newVerticalLayout()); form.getFooter().addComponent( newLabel("This is the footer area of the Form. "+ "You can use any layout here. "+ "This is nice for buttons.")); // Have a button bar in the footer.HorizontalLayoutokbar = newHorizontalLayout(); okbar.setHeight("25px"); form.getFooter().addComponent(okbar); // Add an Ok (commit), Reset (discard), and Cancel buttons // for the form.Buttonokbutton = newButton("OK", form, "commit"); okbar.addComponent(okbutton); okbar.setComponentAlignment(okbutton, Alignment.TOP_RIGHT); okbar.addComponent(newButton("Reset", form, "discard")); okbar.addComponent(newButton("Cancel"));
.v-form {}
.v-form legend
.v-form fieldset {}
.v-form-error {}
.v-form-errormessage {}
.v-form-description {}
The top-level style name of a Form component is
v-form. It is important to notice that the form is
implemented as a HTML <fieldset>, which
allows placing the caption (or "legend") inside the border. It would
not be so meaningful to set a border for the top-level form
element. The following example sets a border around the form, as is
done in Figure 5.61, “Layout of the Form Component” above.
.v-form fieldset {
    border: thin solid;
}
The top-level element of the form has the style name
v-form-error if a component error has been set for
the form.
The main purpose of the Form component is that you
can bind it to a data source and let the Form
generate and manage fields automatically. The data source can be any class
that implements the Item interface, which is part
of the Vaadin Data Model, as described in Chapter 9, Binding Components to Data. You can either implement the
Item interface yourself, which can be overly
complicated, or use the ready BeanItem adapter to
bind the form to any JavaBean object. You can also use
PropertysetItem to bind the form to an ad hoc set
of Property objects, resembling a
Map.
Let us consider the following simple JavaBean with proper setter and getter methods for the member variables.
/** A simple JavaBean. */
public class PersonBean {
    String name;
    String city;

    public void setName(String name) {
        this.name = name;
    }

    public String getName() {
        return name;
    }

    public void setCity(String city) {
        this.city = city;
    }

    public String getCity() {
        return city;
    }
}
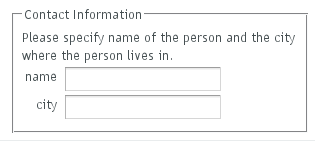
We can now bind this bean to a Form using the
BeanItem adapter as follows.
// Create a form and use FormLayout as its layout. finalFormform = newForm(); // Set form caption and description texts form.setCaption("Contact Information"); form.setDescription("Please specify name of the person and the city where the person lives in."); // Create the custom bean.PersonBeanbean = newPersonBean(); // Create a bean item that is bound to the bean.BeanItemitem = newBeanItem(bean); // Bind the bean item as the data source for the form. form.setItemDataSource(item);
The Form uses FormLayout
layout by default and automatically generates the fields for each of the
bean properties, as shown in Figure 5.62, “Form Automatically Generated from a Bean”
below.
The automatically determined order of the fields can be undesirable. To
set the order properly, you can use the
setVisibleItemProperties() method of the
Form, which takes an ordered collection as its
parameter. Fields that are not listed in the collection are not included
in the form.
// Set the order of the items in the form.Vectororder = newVector(); order.add("city"); order.add("name"); form.setVisibleItemProperties(order);
The form uses the property identifiers as the captions of the fields by
default. If you want to have more proper captions for the fields, which is
often the case, you need to use a FieldFactory to
create the fields, as is shown in the section below.
The form generates the fields automatically using very coarse logic. A
String, int, or
double will result in a
TextField alike, regardless of the meaning of
the field. You might want to have a city name to be input with a combo
box, for example. You can create such custom fields by implementing
the createField() method in the
FormFieldFactory interface.
The default implementation, DefaultFieldFactory
is shared with the Table component: it also
implements the TableFieldFactory
interface. This allows the DefaultFieldFactory
to create the fields for both purposes with the same logic. It is
usually simplest to just extend the default implementation instead of
implementing the interfaces from scratch. You should consult the
source code of DefaultFieldFactory to see how
it works; you may want to reimplement
createFieldByPropertyType(), which actually
creates the fields by type, instead of the
createField().
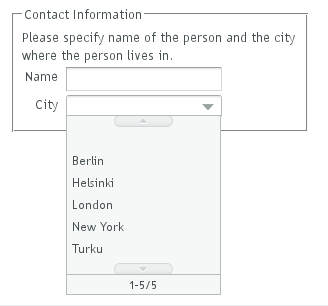
Below is an example of implementing the
FormFieldFactory interface for a specific form,
using the names of the fields of the form to create the editable field
components.
class MyFieldFactory implements FormFieldFactory {
    public Field createField(Item item, Object propertyId,
                             Component uiContext) {
        // Identify the fields by their Property ID.
        String pid = (String) propertyId;
        if ("name".equals(pid)) {
            return new TextField("Name");
        } else if ("city".equals(pid)) {
            Select select = new Select("City");
            select.addItem("Berlin");
            select.addItem("Helsinki");
            select.addItem("London");
            select.addItem("New York");
            select.addItem("Turku");
            select.setNewItemsAllowed(true);
            return select;
        }

        return null; // Invalid field (property) name.
    }
}
You set a Form to use a custom field factory
with setFormFieldFactory():
form.setFormFieldFactory(new MyFieldFactory());
The earlier example will now look as shown in Figure 5.63, “Form Fields Generated with a FormFieldFactory”.
Validation of the form input is one of the most important tasks in handling forms. The fields in Vaadin can be bound to validators. The validation provides feedback about bad input and the forms can also manage validation results and accept the input only if all validations are successful. Fields can also be set as required, which is a special built-in validator. The validators work on the server-side.
Validators check the validity of input and, if the input is invalid,
can provide an error message through an exception. Validators are classes
that implement the Validator interface. The
interface has two methods that you must implement:
isValid() that returns the success or failure
as a truth value, and validate(), which
reports a failure with an exception. The exception can be associated
with an error message describing the details of the error.
Simple validators that only need to produce a single error message
in case the validation fails can inherit from
AbstractValidator or
AbstractStringValidator.
The Vaadin also provides a number of standard validators,
including IntegerValidator and
DoubleValidator for validating numerical
input, StringLengthValidator,
EmailValidator and the more general
RegexpValidator for checking that a string
matches a Java regular expression:
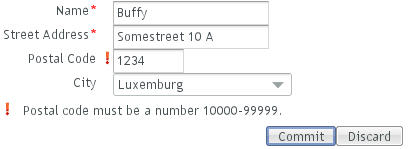
// Postal code that must be 5 digits (10000-99999).
TextField field = new TextField("Postal Code");
field.setColumns(5);

// Create the validator
Validator postalCodeValidator = new RegexpValidator(
    "[1-9][0-9]{4}", "Postal code must be a number 10000-99999.");
field.addValidator(postalCodeValidator);
If you are using a custom FieldFactory to
generate the fields, you may want to set the validators for fields
there. It is useful to have the form in immediate
mode:
// Set the form to act immediately on user input. This is
// necessary for the validation of the fields to occur immediately
// when the input focus changes and not just on commit.
form.setImmediate(true);
Validation is done always when you call the
commit() method of the
Form.
// The Commit button calls form.commit().
Button commit = new Button("Commit", form, "commit");
If any of the validators in the form fail, the commit will fail and a
validation exception message is displayed in the error indicator of
the form. If the commit is successful, the input data is written to
the data source. Notice that commit() also
implicitly sets setValidationVisible(true) (if
setValidationVisibleOnCommit() is
true, as is the default). This makes the error
indicators visible even if they were previously not visible.
For cases in which more complex error handling is required, the
validator can also implement the Validator
interface directly:
// Create the validator
Validator postalCodeValidator = new Validator() {

    // The isValid() method returns simply a boolean value, so
    // it can not return an error message.
    public boolean isValid(Object value) {
        if (value == null || !(value instanceof String)) {
            return false;
        }

        return ((String) value).matches("[1-9][0-9]{4}");
    }

    // Upon failure, the validate() method throws an exception
    // with an error message.
    public void validate(Object value)
                throws InvalidValueException {
        if (!isValid(value)) {
            if (value != null &&
                value.toString().startsWith("0")) {
                throw new InvalidValueException(
                    "Postal code must not start with a zero.");
            } else {
                throw new InvalidValueException(
                    "Postal code must be a number 10000-99999.");
            }
        }
    }
};
Setting a field as required outside a form is
usually just a visual clue to the user. Leaving a required field empty
does not display any error indicator in the empty field as a failed
validation does. However, if you set a form field as required with
setRequired(true) and give an error message
with setRequiredError() and the user leaves
the required field empty, the form will display the error message in
its error indicator.
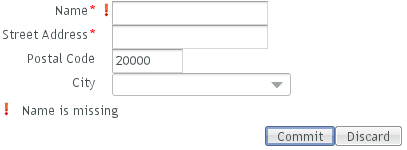
form.getField("name").setRequired(true);
form.getField("name").setRequiredError("Name is missing");
form.getField("address").setRequired(true); // No error message
To have the validation done immediately when the fields lose focus, you should set the form as immediate, as was done in the section above.
Note
It is important that you provide the user with feedback from failed validation of required fields either by setting an error message or by providing the feedback by other means.
Otherwise, when a user clicks the button (commits the form), the button does not appear to work and the form does not indicate any reason. As an alternative to setting the error message, you can handle the validation error and provide the feedback about the problem with a different mechanism.
Buffering means keeping the edited data in a buffer and writing it to the data
source only when the commit() method is called for the
component. If the user has made changes to a buffer, calling
discard() restores the buffer from the data
source. Buffering is actually a feature of all Field
components and Form is a
Field. Form manages the buffering of
its contained fields so that if commit() or
discard() is called for the Form, it
calls the respective method for all of its managed fields.
final Form form = new Form();
...add components...

// Enable buffering.
form.setWriteThrough(false);

// The Ok button calls form.commit().
Button commit = new Button("Ok", form, "commit");

// The Restore button calls form.discard().
Button restore = new Button("Restore", form, "discard");
The Form example in the Feature Browser of Vaadin demonstrates buffering in
forms. The Widget caching demo in Additional demos demonstrates
buffering in other Field components, its source code is
available in BufferedComponents.java.