Note: This post has been updated to use Vaadin 8.
When speaking about business applications, you might find that a lot of them fall into the “data-centric” kind of application where SQL is frequently the key technology. Similarly, when speaking about web applications, you’ll end up with HTML rendered on the browser, most likely with the help of JavaScript. If we put this into the context of Java, web business applications can be implemented by directly using SQL, HTML, JavaScript, and of course Java. Vaadin and jOOQ enable you to implement data-centric web applications using only one language: Java.
This step by step guide shows you how to implement a Spring-based web application that connects to a MySQL server in order to query data that can be filtered from the UI. This guide assumes you know the very basics of Maven and Spring Framework (particularly the concept of dependency injection).
Step 1: Create a Spring-based project
Create a new Spring Boot application by going to http://start.spring.io and adding the Vaadin, jOOQ, and MySql dependencies as shown in the following figure:
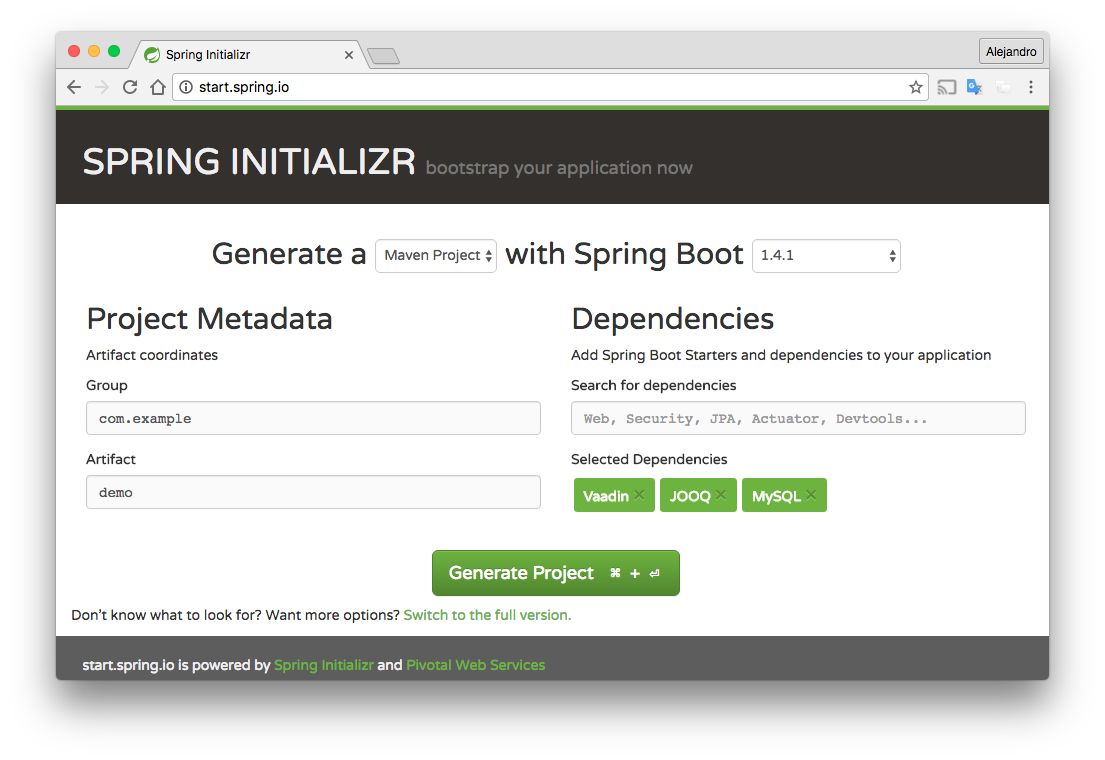 Click the Generate Project button and extract the generated zip file. You should get a Maven project you can import into your favorite IDE.
Step 2: Create a MySQL database
Connect to the MySQL instance and create a new schema:
CREATE SCHEMA demo;
Create the following table:
CREATE TABLE customer(
    id SERIAL, first_name VARCHAR(255),
    last_name VARCHAR(255)
);
Add some test data, such as the following:
INSERT INTO customer(first_name, last_name) VALUES('Lukas', 'Eder');
INSERT INTO customer(first_name, last_name) VALUES('Mario', 'Fusco');
INSERT INTO customer(first_name, last_name) VALUES('Edson', 'Yanaga');
INSERT INTO customer(first_name, last_name) VALUES('Anton', 'Arhipov');
INSERT INTO customer(first_name, last_name) VALUES('Andres', 'Almiray');
Step 3: Configure the database connection
jOOQ allows you to reverse-engineer the database into a set of Java classes modeling the tables, sequences, and stored procedures, among other database objects.
Start by configuring the database connection in the application.properties file inside the src/main/resources directory:
spring.datasource.url=jdbc:mysql://localhost/demo
spring.datasource.username=user
spring.datasource.password=password
spring.datasource.driver-class-name=com.mysql.jdbc.Driver
spring.jooq.sql-dialect=MySQL
Remember to change the username and password used to connect to your own database.
Step 4: Reverse-engineer the database
Add the Properties Maven plugin and the jOOQ Code Generator plugin for Maven in the plugins section of the pom.xml file:
<plugin>
   <groupId>org.codehaus.mojo</groupId>
   <artifactId>properties-maven-plugin</artifactId>
   <version>1.0.0</version>
   <executions>
       <execution>
           <phase>initialize</phase>
           <goals>
               <goal>read-project-properties</goal>
           </goals>
           <configuration>
               <files>
                   <file>src/main/resources/application.properties</file>
               </files>
           </configuration>
       </execution>
   </executions>
</plugin>
<plugin>
   <groupId>org.jooq</groupId>
   <artifactId>jooq-codegen-maven</artifactId>
   <version>3.8.4</version>
   <executions>
       <execution>
           <goals>
               <goal>generate</goal>
           </goals>
       </execution>
   </executions>
   <configuration>
       <jdbc>
           <url>${spring.datasource.url}</url>
           <user>${spring.datasource.username}</user>
           <password>${spring.datasource.password}</password>
           <driver>${spring.datasource.driver}</driver>
       </jdbc>
       <generator>
           <database>
               <name>org.jooq.util.mysql.MySQLDatabase</name>
               <inputSchema>demo</inputSchema>
           </database>
           <target>
               <packageName>com.example</packageName>
               <directory>target/generated-sources/jooq</directory>
           </target>
       </generator>
   </configuration>
</plugin>
The previous snippet uses the connection properties defined in the application.properties file to avoid duplicating this configuration. Make sure the <inputSchema> element contains the name of the MySQL database you previously created.
Run the following Maven command:
mvn clean installThis will reverse-engineer the database and generate the corresponding Java classes in the target/generated-sources/jooq/ directory.
Note that if you are using Eclipse, you have to give it an extra “hint” for it to pick the generated sources directory and not to complain about missing “m2e connectors”.
Step 5: Create a back-end service class
Create the following CustomerService class:
package com.example;

import com.example.tables.records.CustomerRecord;
import org.jooq.DSLContext;
import org.springframework.beans.factory.annotation.Autowired;
import org.springframework.stereotype.Component;

import java.util.List;

import static com.example.Tables.*;

@Component
public class CustomerService {

    @Autowired
    private DSLContext dslContext;

    public List<CustomerRecord> searchByName(String name) {
        String filter = name + "%";
        return dslContext
            .selectFrom(CUSTOMER)
            .where(CUSTOMER.FIRST_NAME.likeIgnoreCase(filter)
            .or(CUSTOMER.LAST_NAME.likeIgnoreCase(filter)))
            .fetchInto(CustomerRecord.class);
    }
}
Spring Boot will automatically create a bean of type DSLContext that you can use to query the database using plain Java but in a way that resembles SQL. Visit the official documentation site of jOOQ for more information about the capabilities of its API.
Step 6: Implement the UI
Create a Vaadin UI by implementing the VaadinUI class:
package com.example;

import com.example.tables.records.CustomerRecord;
import com.vaadin.server.VaadinRequest;
import com.vaadin.spring.annotation.SpringUI;
import com.vaadin.ui.Grid;
import com.vaadin.ui.TextField;
import com.vaadin.ui.UI;
import com.vaadin.ui.VerticalLayout;
import org.springframework.beans.factory.annotation.Autowired;

import java.util.List;

@SpringUI
public class VaadinUI extends UI {

    @Autowired
    private CustomerService service;

    private Grid<CustomerRecord> grid = new Grid(CustomerRecord.class);

    @Override
    protected void init(VaadinRequest vaadinRequest) {
        TextField filter = new TextField("Filter by name:");
        filter.addValueChangeListener(e -> updateGrid(filter.getValue()));

        VerticalLayout layout = new VerticalLayout(filter, grid);
        setContent(layout);
        updateGrid("");
        grid.setColumns("firstName", "lastName");
    }

    private void updateGrid(String filter) {
        List<CustomerRecord> customers = service.searchByName(filter);
        grid.setItems(customers);
    }

}
This class creates a UI containing a Grid component to show all the customers in the database and a filter to search by first or last name. Notice how the VaadinUI class is annotated with @SpringUI. This means we can inject the CustomerService bean in this class and use it to fetch customers.
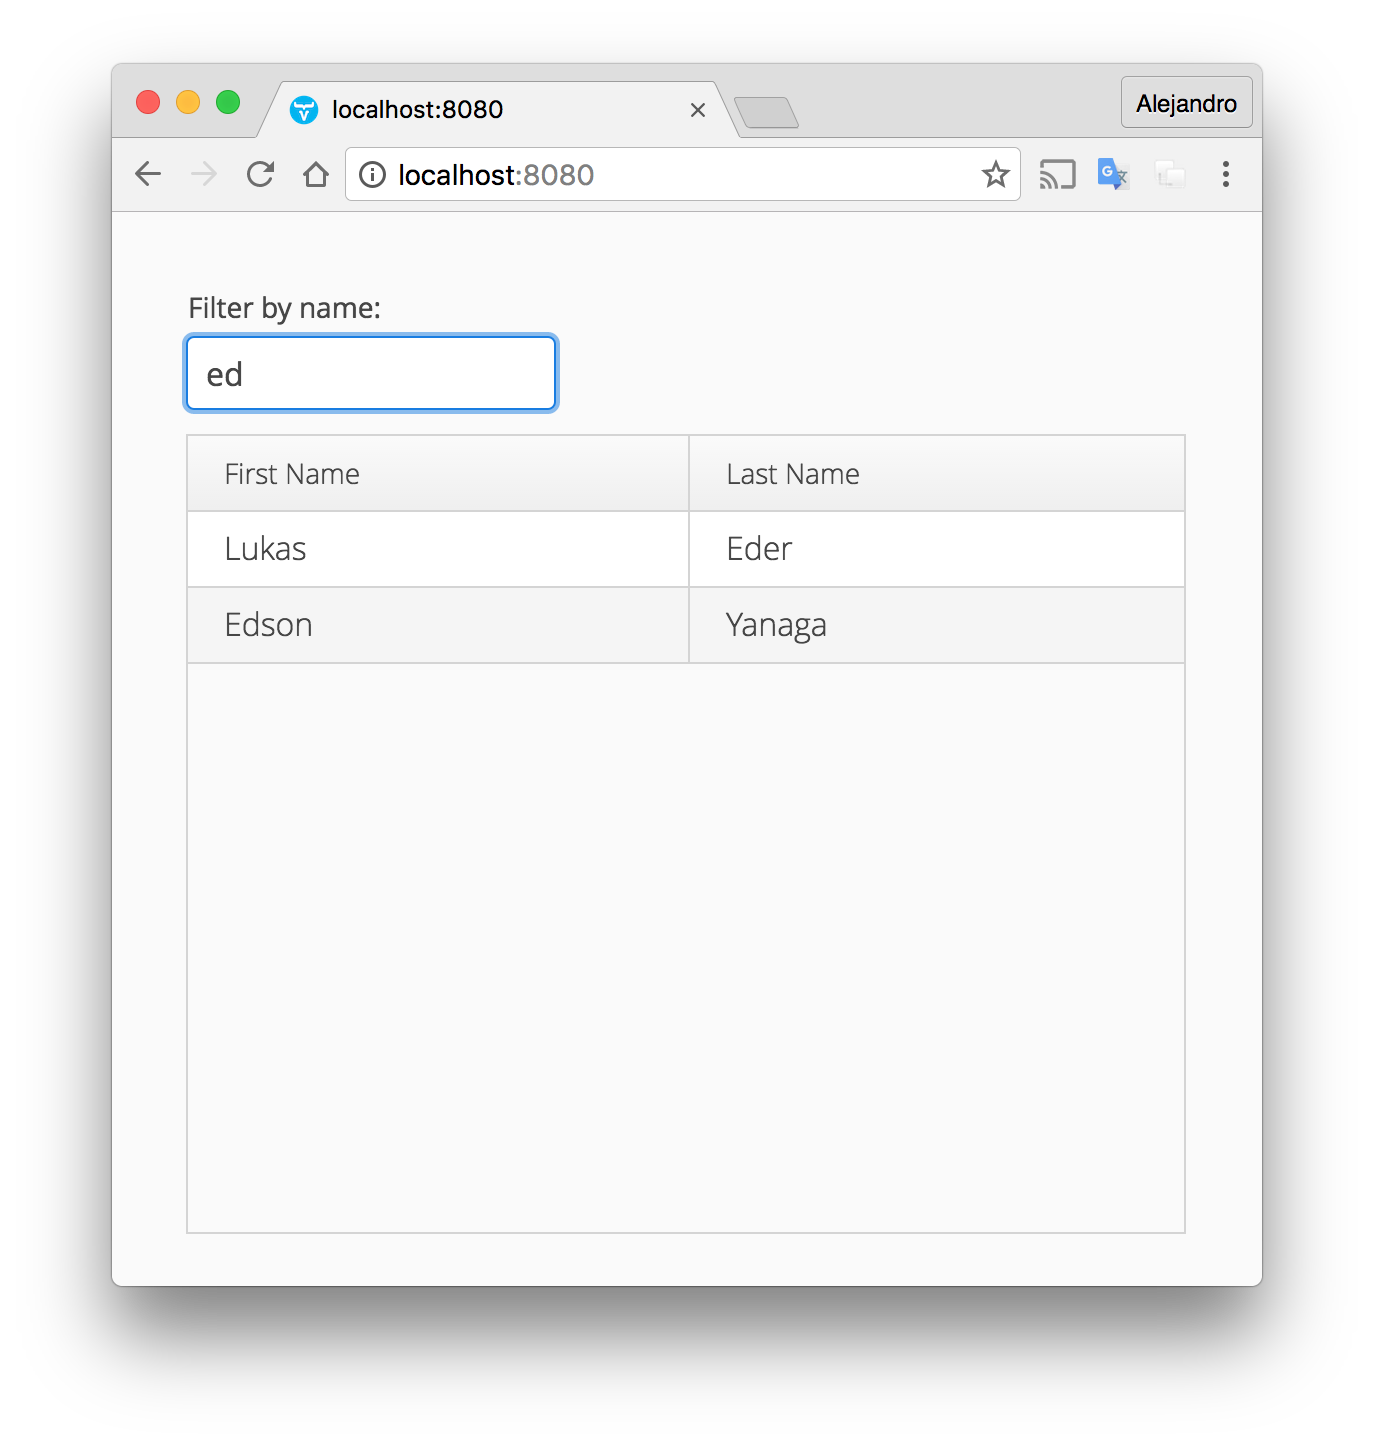
Step 7: Run the application
Spring Initializr created the Application class with a standard main method defining the entry point of the Java application. When you run the application using this method, Spring Boot configures and runs a Tomcat server on port 8080 (all this can be configured).
Before running the application you have to build it. You can use the following command to build and run the application:
mvn install spring-boot:run
The following is a screenshot of the application: